The Weekly Meal Prep System (5 Days of Lunches in 2 Hours)
A high-output Sunday cook that produces five distinct lunch meals from one focused kitchen session. We analyzed the most-watched meal prep channels to extract the sequencing logic, container strategy, and ingredient selection that separates genuinely useful prep from a week of eating the same sad grain bowl.
“Most meal prep fails not because the food is bad, but because the system is wrong. You make five identical containers of chicken and rice, eat two, and throw out three because you couldn't face a fourth. The fix isn't variety for its own sake — it's building a prep framework where a single two-hour session produces genuinely different meals that you'll actually want to eat on Friday.”
Why This Recipe Works
Meal prep is not a recipe. It's a manufacturing process, and like any process, it fails when the sequencing is wrong and succeeds when the logic is tight. The reason most meal prep attempts collapse by Wednesday is not the food — it's the planning architecture. You either made too much of one thing, prepped everything serially instead of in parallel, or built containers that degrade faster than your week progresses. This system fixes all three.
The Sequencing Principle
The entire two-hour window runs on one rule: start your longest passive cooks first, then fill the active time with everything else. Brown rice takes 40-45 minutes of nearly unattended simmering. That window is exactly enough time to prep and season your proteins, cut your vegetables, preheat the oven, and get two sheet pans loaded. If you start with the rice, by the time it finishes you're pulling roasted chicken out of the oven. If you start with the chicken, you're standing around waiting for rice to cook after everything else is done.
This is the difference between a two-hour prep and a four-hour prep. The tasks are identical — the sequence is the variable. Professional kitchens call this mise en place, but the underlying principle is simpler than that: never let a burner or oven sit idle when there's a passive cook available to run on it.
Why Chicken Thighs Beat Chicken Breasts Every Time
The single most common meal prep mistake is building your protein around chicken breasts. Breasts are lean, which is their selling point and their fatal flaw in a multi-day prep. Lean protein has no insulation against the drying effects of refrigeration and reheating. A breast cooked perfectly on Sunday is cardboard by Tuesday. A thigh cooked to the same internal temperature stays juicy through Friday because its intramuscular fat acts as a moisture reservoir that keeps releasing during reheating.
The practical instruction is simple: buy thighs, not breasts. If you need the lower calorie count of a breast, use a 50/50 split — but understand that your breast portions will need more aggressive saucing to compensate for the texture loss by mid-week.
The Split Seasoning Method
Cooking the same chicken all week is a morale problem disguised as a preference problem. The fix isn't cooking two separate proteins — it's splitting your single protein batch at the seasoning stage. Half gets smoked paprika and garlic. Half gets turmeric, cumin, and lemon zest. Both halves go on the same sheet pan at the same temperature for the same time. The cook is identical. The flavor profiles are completely different. One batch becomes two distinct meals with zero additional effort.
Apply this logic to every component: two grain types instead of one, two vegetable preparations with different seasoning profiles. You're not doing more work — you're doing the same work with more intentionality at the seasoning stage. The variety that makes Friday's lunch worth eating is built in 30 seconds of extra thought before the food hits the heat.
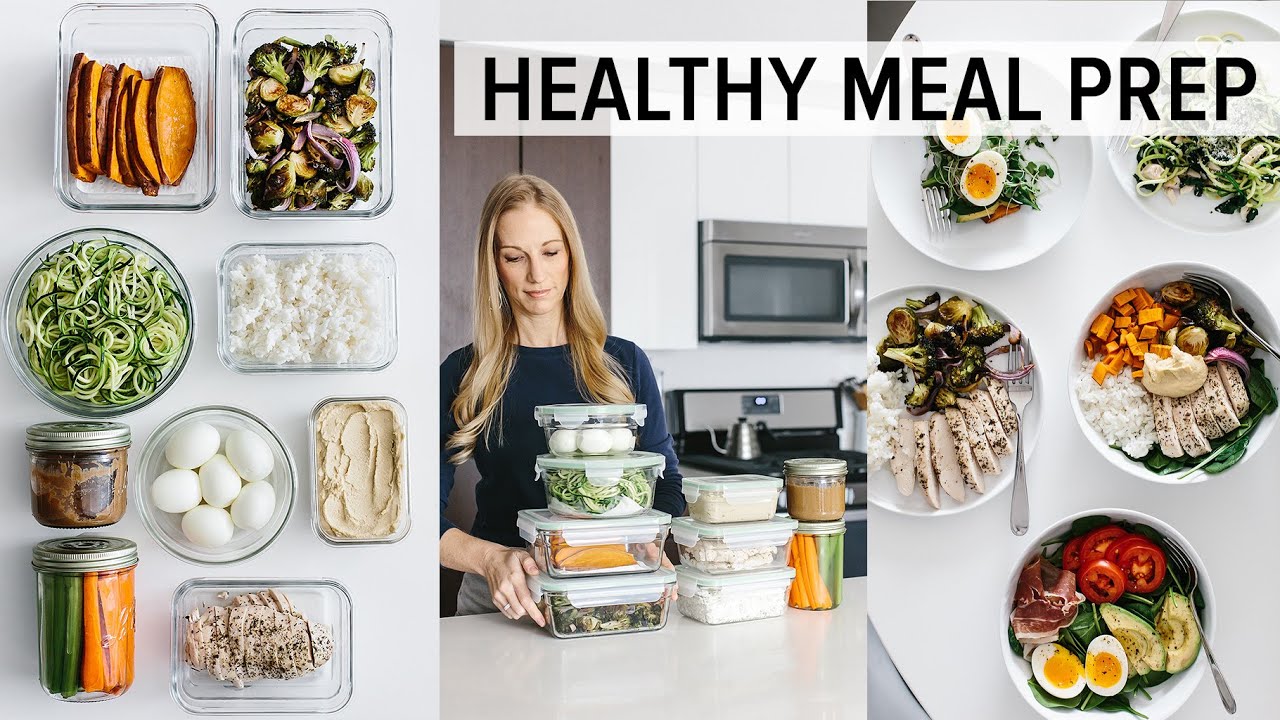
Container Strategy Is Half the Recipe
Assembled and dressed containers taste fine on Monday and are inedible by Thursday. The layering that feels convenient — dressing already on, toppings already distributed — accelerates degradation in every ingredient simultaneously. Acid in the dressing breaks down the vegetables. Moisture migrates from wet components into the grains. Crispy elements go soft. By day four, you're eating a uniform beige texture regardless of what you originally put in the container.
The solution is component storage with assembly at point of consumption. Grains in the base, protein on top, roasted vegetables in a separate smaller container or a distinct section, dressing in a 2-oz cup with a lid. This takes 90 seconds to assemble at your desk and produces a lunch that genuinely tastes like it was just made. The small inconvenience is the entire reason your Friday meal prep lunch is worth eating.
The Vegetable Selection Logic
Not all vegetables hold for five days. The prep fails if you choose the wrong ones. Cucumbers release water and go limp within 36 hours. Dressed leafy greens wilt within 24. Tomatoes become mealy and wet. These are restaurant vegetables — designed for same-day service. For a five-day prep, you need structural vegetables that don't collapse: broccoli, carrots, snap peas, roasted bell peppers, cabbage, blanched green beans. Roasting concentrates these vegetables by removing water, which is the same property that makes them shelf-stable across the week.
The rule: if the vegetable has high water content when raw, it's a same-day vegetable. If it has dense fiber and low surface moisture, it's a prep vegetable. Build your weekly container around the second category and treat the first as fresh additions you make the day you eat.
Where Beginners Mess This Up
Before we start, read this. These are the 4 reasons your the weekly meal prep system (5 days of lunches in 2 hours) will fail:
- 1
Prepping everything at the same time instead of sequencing: The biggest time-waster in meal prep is not having things running in parallel. Grains take 20-40 minutes unattended. Proteins roast for 25-35 minutes unattended. If you're standing over the stove the whole time instead of stacking tasks, a two-hour prep becomes four hours. Sequence your tasks around your longest passive cooks first.
- 2
Using watery vegetables that degrade by day three: Cucumbers, tomatoes, and dressed leafy greens turn to wet pulp within 48 hours. Your Thursday lunch should taste as good as your Monday lunch. Build your prep around vegetables that hold structure — roasted broccoli, carrots, cabbage, snap peas, and blanched green beans all survive five days in the fridge without texture collapse.
- 3
Storing everything assembled instead of in components: A fully assembled grain bowl with dressing is soggy by Tuesday. Store components separately and assemble at the office or right before eating. Three extra 30-second assemblies per week is a small price for food that actually tastes like food.
- 4
Making too much of one thing: Five identical protein portions from the same marinade is efficient but demoralizing. Split your protein batch at the seasoning stage — half gets one treatment, half gets another. Same cook time, same oven, genuinely different flavor profiles. This single habit is the difference between a functional prep and one you abandon by Wednesday.
The Video Reference Library
Want to see it in action? Here are the exact videos we analyzed and combined to build this foolproof recipe translation:
The foundational video for understanding parallel cooking sequencing. Clear breakdown of which tasks to start first and how to stack passive cook times so everything finishes together.
Focused on container strategy and component storage. Covers the exact separation logic that prevents soggy lunches by midweek and extends fridge life to the full five days.
Demonstrates the split-seasoning technique for getting two distinct protein flavors from one batch cook. Practical breakdown of macros per container for tracking purposes.
🛠️ Core Equipment
- Sheet pans (two minimum)Two sheet pans means roasting proteins and vegetables simultaneously on different oven racks. One sheet pan forces you to work in shifts, doubling your oven time. Use rimmed half-sheet pans — the raised edges prevent juices from dripping and burning.
- Airtight meal prep containers (glass preferred)Glass containers are oven-safe, microwave-safe, and don't absorb odors or stain from turmeric and tomato-based sauces. Invest once in a matching set with locking lids. Mismatched containers waste five minutes every Sunday hunting for the right lid.
- Instant-read thermometerChicken roasted to 165°F is the baseline food safety requirement. Overcooked chicken at 180°F is dry and inedible by day three. The margin between safe and good is narrow enough that guessing by color alone consistently produces one or the other extreme.
- Large pot with lidFor simultaneously cooking two grain types in separate inserts, or for batch-cooking legumes from dry. A [Dutch oven](/kitchen-gear/review/dutch-oven) works well — it maintains steady simmer temperature without needing constant adjustment.
The Weekly Meal Prep System (5 Days of Lunches in 2 Hours)
🛒 Ingredients
- ✦2 pounds boneless skinless chicken thighs
- ✦1 cup dry brown rice
- ✦1 cup dry quinoa
- ✦1 can (15 oz) chickpeas, drained and rinsed
- ✦1 large head broccoli, cut into florets
- ✦3 medium carrots, peeled and sliced on the diagonal
- ✦2 cups snap peas, trimmed
- ✦1 large red bell pepper, sliced
- ✦1 medium red onion, cut into wedges
- ✦3 tablespoons olive oil, divided
- ✦2 tablespoons low-sodium soy sauce
- ✦1 tablespoon honey
- ✦1 teaspoon sesame oil
- ✦2 teaspoons smoked paprika
- ✦1 teaspoon garlic powder
- ✦1 teaspoon onion powder
- ✦1/2 teaspoon ground cumin
- ✦1/2 teaspoon ground turmeric
- ✦Sea salt and freshly ground black pepper to taste
- ✦1 lemon, zested and juiced
- ✦1/4 cup tahini
- ✦2 tablespoons apple cider vinegar
- ✦1 clove garlic, minced
- ✦2-3 tablespoons water (to thin dressing)
- ✦Fresh parsley and sesame seeds for garnish
👨🍳 Instructions
01Step 1
Preheat the oven to 425°F. While it heats, cook the brown rice according to package directions (typically 2.25 cups water per 1 cup rice, bring to boil, reduce and simmer covered for 40-45 minutes). Start this first — it's your longest passive cook.
02Step 2
While the rice simmers, cook the quinoa in a separate small pot: combine 1 cup quinoa with 1.75 cups water, bring to a boil, reduce to low, cover, and cook for 15 minutes. Remove from heat and let steam, covered, for 5 minutes.
03Step 3
Pat the chicken thighs completely dry with paper towels. Divide into two equal portions. Season the first half with smoked paprika, garlic powder, salt, and pepper. Season the second half with turmeric, cumin, lemon zest, salt, and pepper. Drizzle both with 1 tablespoon olive oil.
04Step 4
Arrange the two chicken portions on separate halves of a sheet pan. Place on the top oven rack. Roast at 425°F for 25-30 minutes until an instant-read thermometer reads 165°F at the thickest point.
05Step 5
On a second sheet pan, toss the broccoli florets, carrots, red bell pepper, and red onion wedges with 2 tablespoons olive oil, salt, and pepper. Spread in a single layer — overcrowding causes steaming instead of roasting. Place on the bottom rack.
06Step 6
While the oven works, make the tahini dressing: whisk together tahini, apple cider vinegar, minced garlic, lemon juice, and water until smooth. The dressing should coat a spoon but pour easily. Season with salt and set aside. Store separately — never pre-dress containers.
07Step 7
At the 20-minute mark, check the vegetables. They should be caramelizing at the edges. Add the snap peas to the pan and toss — they only need 8-10 minutes and will shrivel and burn if added at the start.
08Step 8
When the chicken reaches 165°F, remove from the oven and let rest for 5 minutes before slicing. Resting redistributes juices — slicing immediately drains them onto the cutting board and dries out the meat by day two.
09Step 9
Whisk together the soy sauce, honey, and sesame oil in a small bowl. Toss the cooked chickpeas in this mixture and warm in a skillet over medium heat for 3-4 minutes until glazed and slightly caramelized. These become a protein topper for the quinoa-base containers.
10Step 10
Fluff both the rice and quinoa with a fork. Divide the grains across five containers: three with a base of brown rice, two with a base of quinoa.
11Step 11
Divide and portion: paprika chicken over the rice containers, turmeric chicken over the quinoa containers. Distribute the roasted vegetables evenly. Add glazed chickpeas to the quinoa containers for additional protein.
12Step 12
Garnish with fresh parsley and sesame seeds. Store the tahini dressing in a small separate container. Refrigerate all containers immediately. Consume within five days.
Nutrition Per Serving
Estimates based on standard preparation. Adjustments alter macros.
🔄 Substitutions
Instead of Chicken thighs...
Use Salmon fillets or extra-firm tofu
Salmon roasts at the same temperature but only needs 12-15 minutes. Press tofu for 20 minutes before seasoning and roast for 30-35 minutes at 425°F for firm, slightly crispy cubes. Both maintain good texture through day three.
Instead of Brown rice...
Use Cauliflower rice or farro
Cauliflower rice dramatically lowers the carb count and takes 8 minutes in a skillet. Farro has a pleasantly chewy texture that holds up better than brown rice over five days — less likely to become mushy.
Instead of Tahini dressing...
Use Miso-ginger dressing or a simple lemon-herb vinaigrette
Combine 1 tablespoon white miso, 1 tablespoon rice vinegar, 1 teaspoon grated ginger, 1 teaspoon honey, and 2 tablespoons olive oil for the miso version. Keeps five days refrigerated.
Instead of Chickpeas...
Use Edamame or white beans
Frozen edamame can be added directly to containers straight from the freezer — it thaws by lunchtime and adds clean plant protein without any extra cooking. White beans can be pan-seared with the same soy-honey glaze.
🧊 Storage & Reheating
In the Fridge
Store all components in airtight containers for up to 5 days. Keep dressings in separate small containers. Do not pre-dress containers — dressed containers degrade significantly by day two.
In the Freezer
Cooked grains and roasted chicken freeze well for up to 3 months. Roasted vegetables lose texture when frozen and thawed — prep those fresh each week. Freeze in individual portions for best results.
Reheating Rules
Microwave grain and protein components with a damp paper towel draped over the container to retain moisture. 90 seconds on medium power, stir, another 30 seconds. Add fresh dressing and cold vegetables after reheating — not before.
❓ Frequently Asked Questions
How do I keep the chicken from drying out by day four?
Two things: chicken thighs instead of breasts, and resting before slicing. Thighs have a higher fat content that keeps them moist even after reheating. Breasts go dry by day two consistently. Resting the chicken for five minutes before slicing keeps the juices inside the meat rather than on your cutting board.
Can I prep everything on a weeknight instead of Sunday?
Yes, but adjust your expectations. A weeknight prep has less margin for error because you're cooking while tired with limited time. Do a smaller prep — three days instead of five — and refresh midweek. The Sunday-to-Friday system works because it's the longest stretch where most people have unstructured time.
My roasted vegetables get soggy in the containers. What am I doing wrong?
Two likely causes. First, you're trapping steam — let the vegetables cool completely before sealing the containers. Hot vegetables release steam inside a sealed container, which then condenses and soaks back in. Second, you may be over-crowding the sheet pan. Vegetables need space around each piece to roast instead of steam.
Is it safe to eat meal-prepped chicken on day five?
The USDA guideline is 3-4 days for cooked poultry in the refrigerator. Day five is pushing the limit. If you want the full five-day spread, keep the day-four and day-five containers near the back of the fridge where temperature is most stable, and do a smell-and-visual check before eating. When in doubt, freeze the last two containers on Sunday and pull them out Wednesday.
How do I add variety without doing a completely different prep every week?
Rotate one element per week while keeping the others constant. Week one: paprika chicken and brown rice. Week two: same chicken, swap to farro. Week three: same farro, swap to lemon-herb roasted salmon. By changing one variable instead of everything, you get variety without the planning overhead of starting from scratch.
What containers should I buy?
Glass containers with locking lids — specifically 3-cup and 5-cup sizes. The [glass meal prep containers](/kitchen-gear/review/meal-prep-containers) are microwave-safe without lids, oven-safe up to 400°F, and do not stain or absorb odors. A matching set of 10 containers (five 3-cup, five 5-cup) covers a full week of lunches and dinners. Plastic is cheaper but degrades over time and warps in the microwave.

The Science of
The Weekly Meal Prep System (5 Days of Lunches in 2 Hours)
We turned everything on this page into a beautiful, flour-proof PDF cheat sheet. Print it out, stick it to your fridge, and never mess up your the weekly meal prep system (5 days of lunches in 2 hours) again.
*We'll email you the high-res PDF instantly. No spam, just perfectly cooked meals.
AlmostChefs Editorial Team
We translate the internet's most popular cooking videos into foolproof, beginner-friendly written recipes. We analyze multiple methods, test them in our kitchen, and engineer a single "Master Recipe" that gives you the best possible result with the least possible stress.