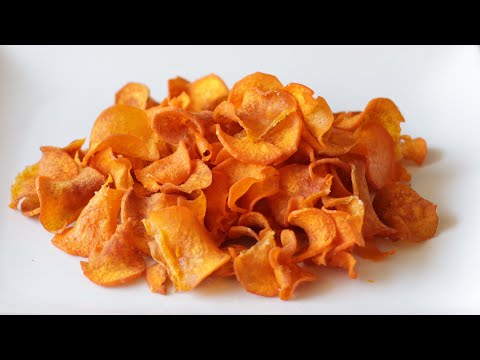
Crispy Homemade Sweet Potato Chips (The Snack You'll Stop Buying)
Thinly sliced sweet potatoes baked low and slow until the edges crisp and the centers turn tender-sweet. We mapped every failure point — uneven slicing, wrong oven temp, cooling too soon — so you don't have to. Healthier than the bag, better than the bag.

“Every bag of sweet potato chips at the grocery store costs $5 and tastes like cardboard with ambitions. Making them at home takes 45 minutes, costs less than a dollar per serving, and produces a chip with actual flavor — earthy sweetness, a whisper of heat, and that satisfying crunch that holds up to real snacking. The secret isn't the seasoning blend. It's the temperature, the thickness, and understanding that the chips aren't done when they come out of the oven.”
Why This Recipe Works
The grocery store sweet potato chip exists in a strange purgatory — marketed as health food, priced like a luxury item, and tasting like someone described a sweet potato to a factory that had never seen one. Making them at home collapses all three problems simultaneously. You get a better chip, for less money, in less time than it takes to drive to the store. The technique is not complicated. But it is specific.
The Temperature Problem
Most chip recipes run hot — 400°F or 425°F — because high heat crisps things fast. Sweet potatoes are not most things. They contain roughly 4-5 grams of natural sugar per 100 grams of flesh, and that sugar behaves exactly the way sugar does in a hot oven: it caramelizes rapidly and then burns. At 400°F, you have a 3-minute window between "golden" and "charred." Most people miss it.
At 325°F, you have no window problem. The low, sustained heat dries moisture out of the slices gradually — the same principle behind properly dehydrated food — allowing the chip to stiffen before the sugar has time to burn. The chips look underdone for most of the bake. They're not. They're losing water. The crisping comes at the end and during the cooling phase when the last of the internal moisture escapes. Patience is the technique.
Why Thickness Is Non-Negotiable
A mandoline slicer set to 1/8 inch is not a suggestion. At that thickness, moisture has a short path to the surface and a quick escape route. At 1/4 inch — which is what most knife cuts produce — that escape route doubles in length, meaning the outer surface sets and stiffens while the interior stays moist. You get a chip with a crispy shell and a chewy core. Some people want that. If you're reading this recipe, you probably don't.
Consistency matters as much as thickness. A perfectly 1/8-inch slice and a 3/16-inch slice from the same potato will bake at different rates. By the time the thick one crisps, the thin one is burnt. Every slice needs to be the same, which is a mechanical problem with exactly one mechanical solution.
The Coating Architecture
The liquid coating — olive oil, maple syrup, rice vinegar — does three jobs. The oil provides a heat-conductive medium that promotes even browning across the surface. The maple syrup amplifies the natural sweetness and promotes caramelization at the edges. The rice vinegar does something less obvious: it sharpens the flavor. Sweet potato chips made without acid taste flat and one-dimensional. The vinegar cuts through the richness and makes the chip taste more potato and less candy. You won't taste the vinegar. You'll taste its absence if you skip it.
The dry seasoning — smoked paprika, cinnamon, cayenne, garlic powder — goes on both sides, applied after arrangement. Don't mix the spices into the wet coating. Spices dispersed in liquid pool in the bowl and distribute unevenly. Applied dry over arranged chips, you control exactly where they land.
The Cooling Phase Is Part of the Recipe
Take the chips out of the oven when the edges are golden brown and the surfaces feel firm to the touch. Leave them on the baking sheet for 10 minutes before moving or eating them. This is not a cooling suggestion — it is the final stage of cooking. As the chips sit, residual heat drives out the last internal moisture and the structure fully sets. A chip pulled from the oven at minute 28 and eaten at minute 29 will be soft. The same chip eaten at minute 38 will be crisp. Nothing changed except time.
Store them right and they stay crisp for five days. But they won't last five days.
Where Beginners Mess This Up
Before we start, read this. These are the 4 reasons your crispy homemade sweet potato chips (the snack you'll stop buying) will fail:
- 1
Slicing inconsistently: Thick slices stay chewy in the center while their edges burn. Thin slices crisp perfectly. Without a mandoline, you will get both in the same batch — some burnt, some limp. A mandoline set to 1/8 inch is not optional; it's the entire technique.
- 2
Baking at too high a temperature: Sweet potatoes contain significant natural sugar. At 400°F, that sugar caramelizes and then burns before the interior has time to dry out and crisp. The 325°F slow bake is the opposite of intuitive — it feels too low — but it's the only way to drive out moisture without torching the edges.
- 3
Pulling the chips too early: Chips look done before they are done. The crisping happens during the cooling phase as residual moisture escapes. If you eat them hot off the pan, you will eat a soft chip and conclude the recipe failed. Leave them on the pan for at least 10 minutes. They will harden as they cool.
- 4
Overlapping chips on the pan: Overlapping traps steam between slices. Steam is the enemy of crispness. Every chip needs its own space on the pan, touching nothing. Use two full baking sheets. Crowding is always a mistake.
The Video Reference Library
Want to see it in action? Here are the exact videos we analyzed and combined to build this foolproof recipe translation:
The reference video for this recipe. Demonstrates the mandoline technique, the single-layer arrangement, and exactly what color the edges should be before you pull them.
2. Baked Sweet Potato Chip Technique
Covers the science of low-temperature baking for naturally sweet vegetables and why high heat is a common failure point for home bakers.
3. Air Fryer vs. Oven Sweet Potato ChipsSide-by-side comparison of air-frying and oven-baking methods, with texture and timing notes for each approach.
🛠️ Core Equipment
- Mandoline slicer ↗Consistent 1/8-inch slices are the foundation of this recipe. Human hands and a knife produce uneven cuts that bake at different rates. A mandoline eliminates variability entirely. Use the hand guard — every time.
- Two large rimmed baking sheets ↗Single-layer baking requires real estate. One pan forces you to overlap chips, which guarantees soft spots. Two pans solve this immediately.
- Parchment paper ↗Sweet potatoes coated in maple syrup will weld themselves to bare metal. Parchment prevents sticking and makes cleanup instantaneous. Do not substitute foil — it promotes bottom burning.
- Wire cooling rack ↗Optional but useful. Transferring chips from the hot pan to a rack allows airflow underneath, accelerating the final crisping. If you leave them sitting in residual pan heat, they can over-soften.
Crispy Homemade Sweet Potato Chips (The Snack You'll Stop Buying)
🛒 Ingredients
- ✦2 large sweet potatoes, approximately 1 pound total
- ✦2 tablespoons extra virgin olive oil
- ✦2 tablespoons maple syrup or raw honey
- ✦1 tablespoon rice vinegar
- ✦1 teaspoon sea salt
- ✦1/2 teaspoon ground cinnamon
- ✦1/2 teaspoon smoked paprika
- ✦1/4 teaspoon cayenne pepper
- ✦1/4 teaspoon freshly ground black pepper
- ✦1/4 teaspoon garlic powder
👨🍳 Instructions
01Step 1
Preheat your oven to 325°F and line two large baking sheets with parchment paper.
02Step 2
Rinse the sweet potatoes thoroughly under cold running water and pat completely dry with a clean kitchen towel.
03Step 3
Using a mandoline slicer set to 1/8 inch, slice the sweet potatoes into uniform thin rounds. Work carefully and use the hand guard.
04Step 4
Whisk together the olive oil, maple syrup, and rice vinegar in a small bowl until emulsified into a light coating.
05Step 5
Toss the sweet potato slices in the oil mixture until every slice is evenly coated, working in batches to prevent clumping.
06Step 6
Whisk together the sea salt, cinnamon, cayenne pepper, black pepper, smoked paprika, and garlic powder in a separate small bowl.
07Step 7
Arrange the coated slices in a single layer across both baking sheets with no overlap. Every chip needs its own space.
08Step 8
Sprinkle half the seasoning blend evenly over the chips. Carefully flip each chip and sprinkle the remaining seasoning over the other side.
09Step 9
Bake for 25-35 minutes until the edges are golden brown and the chips feel firm when touched. Start checking at 22 minutes — oven variance is real.
10Step 10
Remove from the oven and leave the chips undisturbed on the pans for at least 10 minutes. They will continue crisping as they cool.
11Step 11
Transfer the fully cooled chips to an airtight container for storage, or eat immediately.
Nutrition Per Serving
Estimates based on standard preparation. Adjustments alter macros.
🔄 Substitutions
Instead of Olive oil...
Use Avocado oil or coconut oil
Both have higher smoke points, which matters more in an air fryer than an oven at 325°F. Coconut oil adds subtle sweetness that works well with the cinnamon.
Instead of Maple syrup...
Use Coconut sugar dissolved in 1 tablespoon warm water
Lower glycemic index than maple syrup. The liquid component is necessary for coating — don't use dry coconut sugar without dissolving it first.
Instead of Sea salt...
Use Nutritional yeast plus a pinch of salt
Reduces sodium by roughly 60% while adding umami depth and B vitamins. Use 2 tablespoons nutritional yeast plus 1/4 teaspoon salt.
Instead of Ground cinnamon and cayenne...
Use Ginger powder, turmeric, and black pepper
Shifts the flavor profile from sweet-spicy to warming and earthy. Adds anti-inflammatory compounds. Use 1/4 teaspoon each.
🧊 Storage & Reheating
In the Fridge
Not recommended — refrigeration introduces moisture and softens chips rapidly.
In the Freezer
Not ideal. Freezing and thawing destroys the crisp texture irreversibly.
Reheating Rules
If chips soften during storage, spread on a baking sheet and bake at 300°F for 5-8 minutes. They will re-crisp. Do not microwave.
❓ Frequently Asked Questions
Why are my sweet potato chips chewy instead of crispy?
Three possible causes: slices too thick, oven too hot (causes the outside to set before interior moisture escapes), or chips eaten before fully cooling. Check your mandoline setting — 1/8 inch is thinner than most people expect. And always wait the full 10 minutes after pulling from the oven.
Do I need to peel the sweet potatoes?
No. The skin is thin, becomes fully crisp during baking, and contains a significant portion of the fiber and nutrients. Most people can't tell the skin from the flesh once baked. If you prefer peeled chips, the texture will be slightly more uniform.
Can I make these without a mandoline?
Technically yes. Practically, no. A knife produces slices of varying thickness that bake at wildly different rates — some will burn while others stay soft. If you don't own a mandoline, a vegetable peeler can produce very thin lengthwise strips that work as a rough substitute.
My chips are burnt on the edges but soft in the center. What happened?
Your oven is running hot or your slices are too thick. Use an oven thermometer — most home ovens are 25-50°F hotter than the dial indicates. If your slices are uneven, the thin edges cook faster than the thick centers. Mandoline consistency solves this.
How long do homemade sweet potato chips stay crispy?
Up to 5 days in an airtight container at room temperature with a paper towel inside. Avoid the refrigerator — cold air introduces humidity that softens chips within hours.
Can I use purple or Japanese sweet potatoes?
Yes. Purple sweet potatoes have lower natural sugar content, which means they're more forgiving at higher temps and produce a less sweet chip. Japanese sweet potatoes (white flesh) crisp exceptionally well and have a chestnut-like flavor. Both work with the same technique.

The Science of
Crispy Homemade Sweet Potato Chips (The Snack You'll Stop Buying)
We turned everything on this page into a beautiful, flour-proof PDF cheat sheet. Print it out, stick it to your fridge, and never mess up your crispy homemade sweet potato chips (the snack you'll stop buying) again.
*We'll email you the high-res PDF instantly. No spam, just perfectly cooked meals.
AlmostChefs Editorial Team
We translate the internet's most popular cooking videos into foolproof, beginner-friendly written recipes. We analyze multiple methods, test them in our kitchen, and engineer a single "Master Recipe" that gives you the best possible result with the least possible stress.