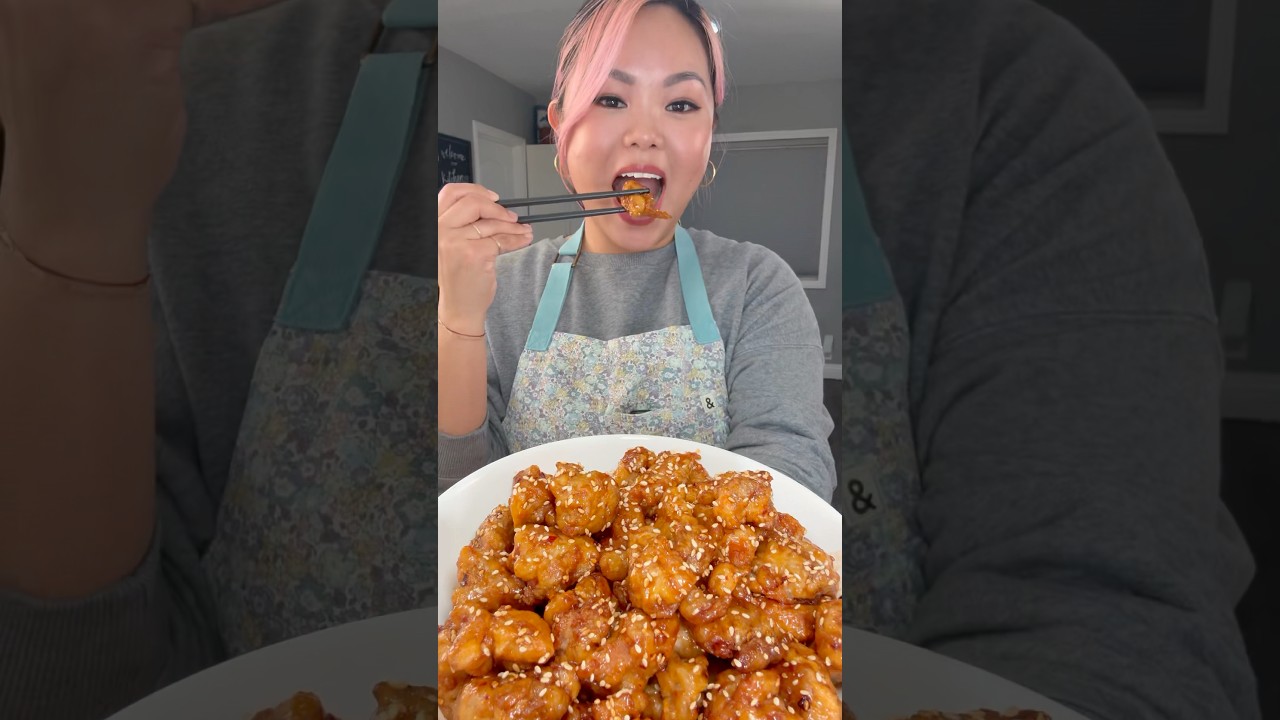
Crispy Sesame Chicken (Better Than Takeout in 35 Minutes)
Tender pan-seared chicken coated in a sticky, savory-sweet sesame glaze with fresh ginger and garlic. We stripped the deep fryer, cut the sodium, and kept every bit of the flavor. This is the weeknight sesame chicken that actually delivers.
“Takeout sesame chicken is usually deep-fried, sugar-bombed, and reheated under a heat lamp. It tastes great because fat and sugar taste great — not because anyone thought carefully about the dish. This version earns its flavor differently: a hard sear on dry chicken, aromatics bloomed in the fond, and a sauce balanced between umami, acid, and sweetness without leaning on a cup of added sugar to carry it. The result is a plate that tastes like a decision, not a shortcut.”
Why This Recipe Works
Sesame chicken has a reputation problem it mostly deserves. It arrives in a styrofoam container, lukewarm, sitting in a pool of sauce that's 40% corn syrup by volume, coated in a batter that was crispy forty-five minutes ago and is now a collapsed, soggy shell. The delivery app charges you $22 for the privilege, and you eat it anyway because fat and sugar work on the nervous system regardless of quality. The dish isn't bad. The execution is. There's a meaningful difference, and closing that gap requires understanding what the dish is actually doing — and what it's been doing wrong at scale for decades.
This version is built on four mechanical decisions: a dry sear over a wet batter, aromatics bloomed in residual fond, a sauce balanced across four flavor axes instead of one, and garnish applied with intent rather than reflex. None of this is complicated. All of it requires patience, which is the one ingredient reliably missing from the takeout pipeline.
The Physics of the Sear
Pan-searing is not a compromise for people who don't own a deep fryer. It is, executed correctly, a better technique for this application — because it applies Maillard browning directly to the protein surface rather than to a batter shell surrounding it. Deep frying creates an exterior crust. Searing creates surface character on the meat itself. The flavor is in different places, and for a sauce-coated dish where the crust dissolves anyway, direct browning on the protein is the superior approach.
The tool is not negotiable. You need a cast iron skillet or a heavy stainless steel pan that can absorb and hold heat through the cold mass of raw chicken. Non-stick pans are thermally inadequate for this task — the coating degrades at high heat, and non-stick surfaces are engineered to prevent the Maillard bonding you're trying to achieve. Use a pan that can run screaming hot and hold it.
Batch cooking is the step where home cooks lose the dish. Every piece of chicken carries surface moisture. In a crowded pan, that moisture vaporizes and has nowhere to go — it condenses against neighboring pieces, raises the humidity in the pan, and the entire surface steams instead of sears. You get grey, yielding protein with no crust, no color, and no flavor development. Sear in two batches with space between every piece. Use kitchen tongs to flip individually — a spatula compresses the pieces and breaks whatever crust has started to form. Four extra minutes of patience is the entire difference between a dish worth eating and a dish worth throwing out.
The chicken must be completely dry before it touches the oil. Surface moisture is the enemy of browning. Press firmly with paper towels — they should come away damp. If you skip this, you've already decided the outcome.
The Fond Is Not Optional
After two rounds of searing, the bottom of your pan is coated in dark, caramelized protein — fond. Most home cooks look at this and worry they've burnt the pan. They haven't. That layer is the most concentrated flavor in the entire recipe. When you add the garlic and ginger and scrape, you're dissolving weeks of culinary chemistry into your base. When you deglaze with broth and scrape again, you're pulling every remaining molecule into the sauce.
This is why restaurant sesame chicken tastes more dimensionally complex than home versions that use identical ingredients. Not better sourcing. Better extraction of what's already there. The fond step costs you nothing. Skipping it costs you the dish.
Aromatics and Why Grating Matters
Fresh ginger is not interchangeable with ground ginger or jarred paste. The volatile aromatic compounds in fresh ginger — primarily gingerol and shogaol — degrade rapidly after cutting and more rapidly under heat. You want maximum surface area and even distribution so no single piece of the dish is hit with a concentrated pocket of intensity while the rest gets nothing.
A Microplane grater produces a fine paste that suspends evenly through the sauce rather than sitting in discrete chunks. This is not a preference — it's physics. Minced ginger in a 35-minute recipe means some bites are sharp and overwhelming, others are background noise. Grated ginger means every bite is calibrated. The same logic applies to the garlic. Bloom both in the residual oil and fond at medium heat for exactly one minute. You want softened and fragrant, not brown — browning garlic at this stage introduces bitterness you cannot cook out.
The Sauce Architecture
The failure mode of most sesame chicken sauce is structural: too much sugar, no acid, no umami backbone, cornstarch added to cold liquid. The result is a sauce that tastes like sweetened soy — one-dimensional, cloying by the third bite, and gluey in texture.
This sauce runs on four axes: umami from the tamari, acid from the rice vinegar, sweetness from a calibrated volume of maple syrup, and aromatic depth from sesame oil added raw. The last point is critical and routinely botched. Sesame oil's aromatic compounds are highly volatile. They dissipate under prolonged heat faster than almost any other culinary oil. If you add sesame oil to the pan while it's on the burner, you're burning off what you're trying to taste. The slurry method — mixing the sesame oil into the sauce concentrate before it hits the pan — preserves those aromatics. You taste sesame rather than the idea of sesame.
The cornstarch slurry must be completely dissolved before it contacts heat. Use a whisk and a bowl with enough volume to work in. Lumpy slurry makes lumpy sauce. The starch granules that don't dissolve in cold liquid will not dissolve when hot — they'll gelatinize into discrete masses. Whisk until it's visually homogeneous, then stir it again right before you pour, because cornstarch settles to the bottom faster than you expect.
Bring the broth to a simmer before adding the sauce. This is not a stylistic preference. The thickening reaction requires a hot, moving liquid to distribute the starch evenly as it gelatinizes. Cold liquid into hot pan causes rapid, uneven seizing at the contact point — the sauce thickens in patches, producing a gluey rather than glossy result. Temperature sequence is causation, not correlation.
The Garnish Has a Function
Black and white sesame seeds are not decoration. Raw sesame seeds have a mild, slightly fatty flavor that contributes almost nothing to a dish with this much happening. Toast them in a dry pan for two minutes until golden and fragrant — the pyrazines and furans produced during toasting give toasted sesame its characteristic nutty intensity. The aroma difference is not subtle; you will smell it clearly when the seeds are ready.
The green onions serve a structural purpose: freshness and mild sharpness against the sticky glaze. Without them, the dish reads as one-dimensional — savory, sticky, monotone. With them, there's a counterpoint that makes the glaze taste richer by contrast. This is culinary framing, and it works.
This is not a lighter version of sesame chicken. It is a more technically rigorous version of sesame chicken. The calorie reduction is a byproduct of removing the deep fryer and calibrating the sweetener — not the goal. The goal is a dish that tastes like someone thought carefully about it, because they did.
Where Beginners Mess This Up
Before we start, read this. These are the 4 reasons your crispy sesame chicken (better than takeout in 35 minutes) will fail:
- 1
Not drying the chicken before searing: Surface moisture is the enemy of browning. Wet chicken steams in the pan instead of searing — you get grey, rubbery pieces with no crust instead of golden, caramelized edges. Pat every piece completely dry with paper towels before it touches the oil. This is non-negotiable.
- 2
Crowding the pan: Packing all the chicken in at once drops the pan temperature dramatically and — again — steams instead of sears. Work in two batches, giving each piece room to breathe. The extra four minutes is worth it every single time.
- 3
Adding the sauce too early: The cornstarch slurry thickens rapidly once it hits heat. If you add it before the broth has come to a simmer, it seizes unevenly and turns the sauce gluey rather than glossy. Bring the broth up first, then stir the sauce in.
- 4
Skipping the second deglaze pass: After searing two batches of chicken, the pan has a layer of browned fond. That fond is concentrated sesame chicken flavor. When you add the garlic and ginger, scrape it up. When you add the broth, scrape it again. If you miss this step, the flavor stays stuck to the pan.
The Video Reference Library
Want to see it in action? Here are the exact videos we analyzed and combined to build this foolproof recipe translation:
The source video for this recipe. Covers the pan-sear technique and sauce consistency clearly.
🛠️ Core Equipment
- Large stainless steel or cast iron skilletYou need a pan that holds high heat without temperature drops when the chicken goes in. Non-stick doesn't sear — it protects. Use a [cast iron skillet](/kitchen-gear/review/cast-iron-skillet) or heavy stainless for actual browning.
- Microplane or fine graterGrating fresh ginger on a microplane gives you a fine paste that distributes evenly through the sauce. Minced chunks create hot spots of intensity. A box grater's fine side works too.
- Small mixing bowl and whiskThe cornstarch needs to be fully dissolved before the sauce hits the hot pan. A fork and a glass work fine — the point is that lumpy slurry makes lumpy sauce.
- TongsFor turning chicken pieces individually during the sear. A spatula flattens the pieces and breaks the developing crust. [Kitchen tongs](/kitchen-gear/review/kitchen-tongs) let you flip precisely without losing the sear.
Crispy Sesame Chicken (Better Than Takeout in 35 Minutes)
🛒 Ingredients
- ✦1.5 pounds boneless, skinless chicken breasts, cut into 1-inch pieces
- ✦3 tablespoons low-sodium tamari or soy sauce
- ✦2 tablespoons rice vinegar
- ✦1 tablespoon pure maple syrup
- ✦1 tablespoon sesame oil
- ✦2 teaspoons cornstarch
- ✦3 cloves fresh garlic, minced
- ✦1 tablespoon fresh ginger, finely grated
- ✦2 green onions, sliced into 1-inch pieces
- ✦2 teaspoons white sesame seeds
- ✦1 teaspoon black sesame seeds
- ✦2 tablespoons avocado oil, divided
- ✦1 cup low-sodium chicken broth
- ✦1 teaspoon red pepper flakes, optional
- ✦2 teaspoons honey or additional maple syrup for glaze
👨🍳 Instructions
01Step 1
Pat the chicken pieces completely dry with paper towels on all sides.
02Step 2
Whisk together the tamari, rice vinegar, maple syrup, sesame oil, and cornstarch in a small bowl until no cornstarch lumps remain. Set aside.
03Step 3
Heat 1 tablespoon avocado oil in a large skillet over medium-high heat for about 2 minutes until shimmering.
04Step 4
Add half the chicken pieces in a single layer with space between each. Sear for 3-4 minutes per side until deep golden brown and cooked through. Transfer to a clean plate. Repeat with remaining oil and chicken.
05Step 5
Reduce heat to medium. Add garlic and ginger to the same pan and sauté for 1 minute, scraping up the brown fond, until fragrant.
06Step 6
Pour in the chicken broth and bring to a gentle simmer, scraping up any remaining fond from the bottom of the pan.
07Step 7
Re-stir the sauce mixture, then pour into the simmering broth. Stir to combine.
08Step 8
Return the chicken to the pan and toss to coat. Simmer for 2-3 minutes, stirring occasionally, until the sauce thickens and glosses.
09Step 9
Remove from heat. Stir in red pepper flakes if using.
10Step 10
Transfer to a serving platter. Garnish with green onions and both white and black sesame seeds. Serve immediately over steamed jasmine rice or cauliflower rice.
Nutrition Per Serving
Estimates based on standard preparation. Adjustments alter macros.
🔄 Substitutions
Instead of Cornstarch...
Use Arrowroot powder or tapioca starch
Equal substitution. Arrowroot produces a slightly clearer, glossier sauce. Don't boil aggressively after adding — arrowroot breaks down under prolonged high heat.
Instead of Maple syrup...
Use Honey, or allulose for zero-glycemic
Honey produces a slightly floral sweetness and browns faster. Allulose behaves nearly identically to sugar in sauces and leaves no aftertaste.
Instead of Tamari...
Use Coconut aminos
Slightly sweeter and lower sodium than tamari. Reduce maple syrup by half a teaspoon to compensate. Good option for gluten-free households.
Instead of Avocado oil...
Use Ghee or light olive oil
Ghee adds a nutty richness and handles the high sear heat well. Olive oil works but smoke point is lower — watch the heat carefully.
🧊 Storage & Reheating
In the Fridge
Store in an airtight container for up to 4 days. The sauce re-emulsifies when reheated gently.
In the Freezer
Freeze without the garnish for up to 2 months. Sauce texture holds well after thawing.
Reheating Rules
Reheat in a skillet over medium-low with a splash of chicken broth to loosen the sauce. Microwave works but tends to toughen the chicken — stovetop is worth the extra two minutes.
❓ Frequently Asked Questions
Why is my sesame chicken sauce gluey instead of glossy?
The cornstarch was added before the liquid came to temperature, or the ratio is off. The sauce needs a hot, moving liquid to dissolve the starch evenly. Always bring the broth to a simmer first, and make sure the slurry is fully dissolved with no dry pockets before you pour it in.
Can I use chicken thighs instead of breasts?
Yes — and they're arguably better here. Thighs have more intramuscular fat, which means they stay juicy even if you push the cook time slightly. Cut them the same size as the breasts for even cooking.
How do I get the chicken crispy without deep frying?
Three things: completely dry chicken, a screaming hot pan, and no crowding. The Maillard reaction requires direct dry heat contact. Moisture, cool surfaces, or steam from a crowded pan all prevent it. Get those three right and you don't need a deep fryer.
My sauce didn't thicken. What went wrong?
Either the cornstarch wasn't fully dissolved before it hit the pan (clumped instead of thickened), or there was too much liquid relative to the starch. If the sauce is still thin after 3 minutes of simmering, mix an additional half teaspoon of cornstarch with one teaspoon of cold water and stir it in.
Is this actually healthier than takeout sesame chicken?
Meaningfully so. Typical restaurant sesame chicken runs 600-800 calories per serving and can hit 1,200mg of sodium. This version comes in at 342 calories and 380mg sodium — achieved by pan-searing instead of deep-frying and calibrating the sweetener rather than pouring in half a cup of sugar.
Can I make the sauce ahead of time?
Yes. The sauce mixture (tamari, vinegar, maple syrup, sesame oil, cornstarch) keeps in the fridge for up to 3 days. Give it a thorough whisk before using — the cornstarch settles completely when cold.

The Science of
Crispy Sesame Chicken (Better Than Takeout in 35 Minutes)
We turned everything on this page into a beautiful, flour-proof PDF cheat sheet. Print it out, stick it to your fridge, and never mess up your crispy sesame chicken (better than takeout in 35 minutes) again.
*We'll email you the high-res PDF instantly. No spam, just perfectly cooked meals.
AlmostChefs Editorial Team
We translate the internet's most popular cooking videos into foolproof, beginner-friendly written recipes. We analyze multiple methods, test them in our kitchen, and engineer a single "Master Recipe" that gives you the best possible result with the least possible stress.