Roast Potatoes Three Ways (Pick Your Texture, Nail It Every Time)
Three distinct roast potato methods — shatteringly crispy, fluffy-centered, and herb-crusted — each engineered for a different result. We broke down the science behind starch, fat, and surface area to give you complete control over your potatoes every single time.
“Most people roast potatoes the same way every time and accept whatever comes out. Some batches are crispy. Some are soft. Some are inexplicably grey. None of it feels intentional. The reason is that roast potatoes are not a single technique — they're three completely different outcomes determined by the potato variety, the fat, the cut geometry, and whether or not you parboil. Learn those four variables and you stop leaving your potatoes to chance.”
Why This Recipe Works
Roast potatoes are one of the most democratic dishes in the English-speaking world and also one of the most misunderstood. The reason home cooks get inconsistent results is that they're trying to execute a single technique when they should be choosing between three fundamentally different ones, each with distinct physics, distinct purposes, and distinct failure modes. Understanding which method you're actually attempting — and why — is the difference between potatoes you're proud of and potatoes you apologize for.
Method 1: Crispy — Engineering Maximum Surface Area
The crispy roast potato is a structural achievement, not a culinary accident. Its crust is built in two separate phases that must be executed in sequence: a parboiling phase that softens and roughens the exterior, and a high-heat fat phase that seizes those rough edges into a rigid, shatteringly thick shell.
The roughing-up step — shaking the parboiled potatoes in the pot until they look almost damaged — is where most cooks hold back. They're afraid of breaking the potatoes. This is the wrong instinct. What you want is maximum surface disruption: frayed edges, powdery surfaces, ragged protrusions. Each of those irregularities represents a fold of surface area that the hot fat will penetrate and solidify into crust. A smooth-edged parboiled potato produces a thin, uniform crust that peels away from the interior the moment you bite into it. A thoroughly roughed potato produces a crust that is integrated into the starch structure itself.
The fat matters more than most recipes admit. Duck fat and goose fat contain a specific blend of monounsaturated and saturated fats with a high smoke point and a flavor profile built for potatoes. The rendered animal fat penetrates the roughed surface differently than plant oils, bonding with the starch granules in the outer layer to create a crust that doesn't just coat the potato — it becomes part of it. A heavy roasting tray preheated until the fat is shimmering completes the circuit. That aggressive sizzle when the potatoes hit the tray is the crust forming in real time. Miss it, and you're making braised potatoes.
Method 2: Fluffy-Centered — Starch Gelatinization as the Goal
The fluffy-centered roast potato is a completely different engineering problem. Here, the objective is total internal starch gelatinization — every starch granule in the center of the potato must swell and absorb water until they form a light, cohesive, cloud-like mass. The exterior still needs to brown and develop flavor through the Maillard reaction, but the interior is the product.
High-starch potatoes are non-negotiable here too, but for a different reason. In a waxy potato, the cells hold together during cooking. In a high-starch potato like a Russet or Yukon Gold, the cells separate cleanly as the starch gelatinizes, producing that characteristically fluffy pull-apart interior. Yukon Golds sit in the middle of the starch spectrum — creamy enough to pull apart, waxy enough to hold their shape. They are the most forgiving choice for this method.
The parboil for Method 2 is less aggressive than for Method 1. You're cooking the exterior until it's fully tender while the center remains just firm — the opposite of the crispy method's 70% target. During the subsequent high-heat roast, the center finishes cooking while the exterior browns. The heavy-bottomed pot ensures the parboil is even — if some potatoes are underdone and some overdone going into the oven, no amount of roasting technique corrects for that disparity.
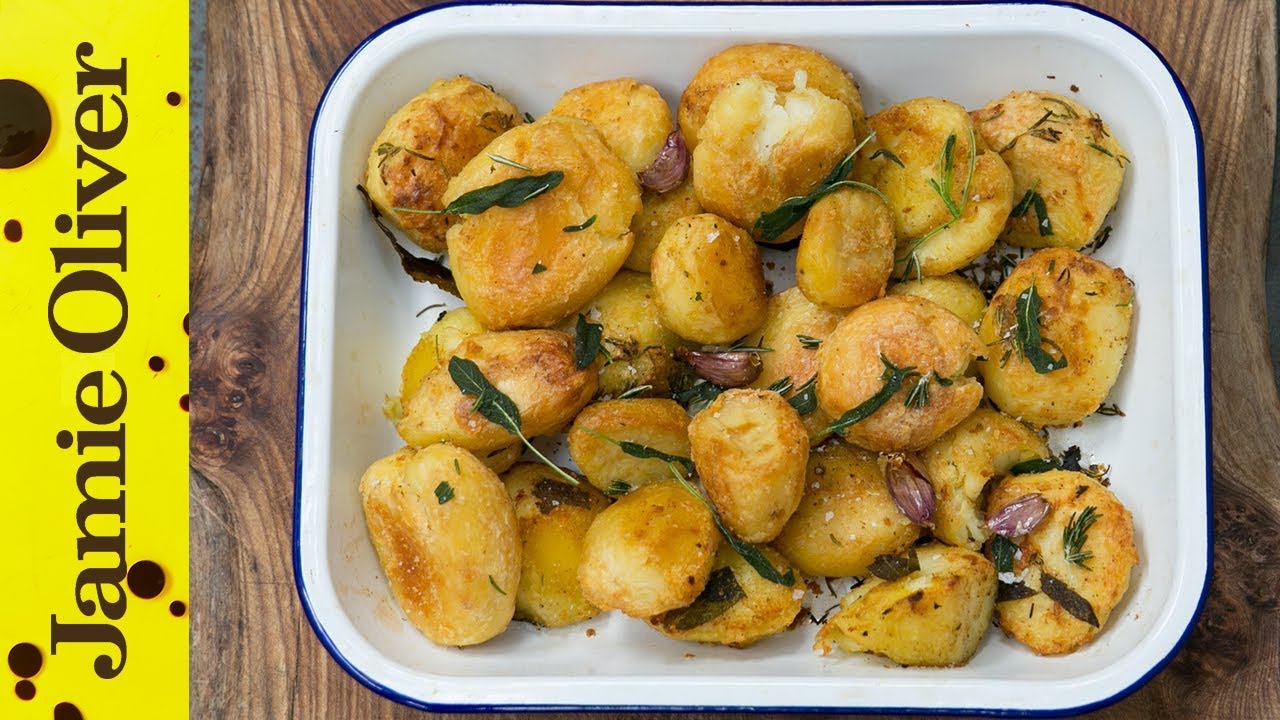
Method 3: Herb-Crusted — The Planks and the Timing Problem
The herb-crusted method introduces a new variable that the other two don't deal with: the interaction between a delicate aromatic coating and an oven hot enough to burn it. The solution is sequencing. The potatoes must be 20 minutes into their roast — partially cooked, surface dried, hot enough to accept and bond with the coating — before the herb-panko crust goes on. Too early and the moisture from the raw potato surface turns the crust soggy before it can set. Too late and there isn't enough residual roast time to develop color and crunch in the crust.
The flat plank geometry is specifically designed for this method. Maximum flat surface area means maximum crust-to-potato ratio in every bite. A thick cut or a round chunk would give you excessive potato for the amount of herb crust available — the flavors fall out of balance. The spider strainer for rapid draining is critical if you choose to parboil the Method 3 potatoes: you need them out of the water and drying immediately, because even an extra minute of standing causes the flat surfaces to become fragile and prone to breaking under the weight of the crust.
The distinction between hardy herbs — rosemary, thyme, sage — and soft herbs — parsley, chives, tarragon — is especially important at 425°F. Hardy herbs contain higher concentrations of terpenes and essential oils that are stable at high heat and actually intensify during roasting. Soft herbs are primarily water and chlorophyll, both of which destroy rapidly above 300°F. Scatter the parsley over the tray the moment it comes out of the oven, while the residual heat is enough to wilt it gently without burning it, and the color and freshness are preserved.
The Universal Variable: Salt and Temperature
Across all three methods, two variables are always in play: the temperature of the oven and the timing of the salt. Oven temperature below 400°F means the surface moisture evaporates too slowly — by the time the potato surface is dry enough to brown, the interior has already overcooked. Above 450°F and the exterior chars before the interior finishes. The 425°F window is where the Maillard reaction runs fastest without outpacing the internal cooking. Salt applied directly to the hot finished potato — immediately out of the oven — adheres to the surface and seasons it sharply, the same way finishing salt works on a steak. Salt applied before roasting dissolves into the surface moisture and migrates inward, which is why you salt your parboiling water heavily but apply flaky sea salt only at the end. These are not the same action. Both are necessary.
Where Beginners Mess This Up
Before we start, read this. These are the 4 reasons your roast potatoes three ways (pick your texture, nail it every time) will fail:
- 1
Using cold fat in a cold pan: Potatoes added to room-temperature fat never develop a crust — they absorb the fat slowly and steam instead of fry. The fat must be preheated in the oven until it shimmers and nearly smokes. When the potatoes hit it, you should hear an immediate aggressive sizzle. That sound is the crust forming. No sizzle means no crust.
- 2
Overcrowding the tray: Potatoes release steam as they cook. When they're packed together, that steam has nowhere to go and the potatoes braise each other into softness. Every potato needs at least a centimeter of breathing room on all sides. Use two trays before you accept a crowded one.
- 3
Skipping the roughing-up step for crispy method: For maximum crispiness, you need to shake the parboiled potatoes in the pot until their edges become fluffy and rough. Those ragged edges create exponentially more surface area, which the hot fat seizes immediately into a shatteringly thick crust. Smooth-edged potatoes produce a thin, papery shell that cracks and peels.
- 4
Not drying the potatoes before roasting: Surface moisture is the enemy of browning. Water on the surface of a potato must evaporate before the Maillard reaction can begin — and every second spent evaporating is a second not spent crisping. Pat them dry after parboiling and after any oil or seasoning application. The drier the surface, the faster the crust forms.
The Video Reference Library
Want to see it in action? Here are the exact videos we analyzed and combined to build this foolproof recipe translation:
The source video demonstrating all three roasting methods side by side. Essential for understanding how the visual cues differ across techniques and what each finished result should look like.
Deep dive into starch gelatinization and Maillard reaction as applied to high-heat potato cookery. Best viewed before attempting the crispy method for the first time.
Focused on the herb-and-breadcrumb crust technique for the third method. Clear breakdown of herb timing — which ones go in early, which go in at the last five minutes, and why it matters.
🛠️ Core Equipment
- Heavy roasting trayA thin baking sheet warps under high heat and creates hot spots. A [heavy roasting tray](/kitchen-gear/review/roasting-pan) distributes heat evenly across all the potatoes so every piece browns at the same rate. Dark-colored trays absorb more radiant heat — ideal for maximum crispiness.
- Large heavy-bottomed potFor parboiling. A [heavy-bottomed pot](/kitchen-gear/review/dutch-oven) maintains a consistent boil without scorching the bottom layer of potatoes. You need the water returning to a boil quickly after you add the potatoes — a thin pot stalls.
- Spider strainer or slotted spoonFor transferring parboiled potatoes without breaking them apart. You need speed — every second in the water after draining continues cooking the exterior. A [spider strainer](/kitchen-gear/review/spider-strainer) lifts all the potatoes cleanly in one pass.
- Meat thermometer (optional)For the fluffy-centered method, an internal temperature of 205°F confirms the starch granules have fully gelatinized. This is the difference between a potato that looks done and one that actually is. Not essential, but it removes all guesswork.
Roast Potatoes Three Ways (Pick Your Texture, Nail It Every Time)
🛒 Ingredients
- ✦3 pounds Maris Piper, Yukon Gold, or Russet potatoes, peeled
- ✦4 tablespoons duck fat, goose fat, or beef tallow (for Method 1: Crispy)
- ✦3 tablespoons extra-virgin olive oil (for Method 2: Fluffy-Centered)
- ✦3 tablespoons olive oil (for Method 3: Herb-Crusted)
- ✦1/2 cup panko breadcrumbs (for Method 3)
- ✦4 cloves garlic, minced (for Method 3)
- ✦2 tablespoons fresh rosemary leaves, finely chopped
- ✦2 tablespoons fresh thyme leaves
- ✦2 tablespoons flat-leaf parsley, finely chopped
- ✦1 teaspoon smoked paprika
- ✦1 teaspoon garlic powder
- ✦2 teaspoons flaky sea salt, plus more for parboiling water
- ✦1 teaspoon freshly cracked black pepper
- ✦1 tablespoon white wine vinegar (for parboiling — Method 1 only)
- ✦1 lemon, zested (for Method 3)
👨🍳 Instructions
01Step 1
Preheat your oven to 425°F (220°C). Place your roasting tray in the oven while it heats — it must be scorching hot before the potatoes touch it.
02Step 2
Peel the potatoes and cut them according to the method: Method 1 (Crispy) — cut into large, irregular 2-inch chunks. Method 2 (Fluffy-Centered) — halve or quarter into uniform pieces. Method 3 (Herb-Crusted) — cut into flat planks, roughly 3/4-inch thick.
03Step 3
For Methods 1 and 2: Bring a large pot of heavily salted water to a boil. For Method 1, add 1 tablespoon white wine vinegar to the water — this firms the pectin in the potato exterior so it doesn't fall apart during roughing up. Add the potatoes and parboil for 8-10 minutes until the outer 1/4 inch is cooked through but the center is still firm.
04Step 4
Drain the potatoes immediately and return the pot to low heat for 1 minute to steam off any remaining moisture. For Method 1: replace the lid and shake the pot vigorously for 20-30 seconds until all edges are visibly fluffy and rough. For Method 2: simply let the potatoes sit uncovered for 2 minutes to air-dry.
05Step 5
For Method 1 (Crispy): Carefully remove the tray from the oven. Working quickly, add the roughed-up potatoes to the hot fat — they should sizzle loudly on contact. Turn each piece to coat thoroughly in fat. Season with flaky salt and black pepper.
06Step 6
For Method 2 (Fluffy-Centered): Toss the air-dried potatoes in olive oil, garlic powder, smoked paprika, salt, and pepper in a bowl until thoroughly coated. Transfer to the hot tray in a single layer.
07Step 7
For Method 3 (Herb-Crusted): Toss potato planks in olive oil, salt, and pepper. Lay flat on the tray. In a bowl, combine panko, minced garlic, rosemary, thyme, lemon zest, and a drizzle of olive oil. After the potatoes have roasted for 20 minutes, press the herb-panko mixture firmly onto the top surface of each plank.
08Step 8
Roast all methods at 425°F: Method 1 — 45-55 minutes, turning twice, until deep mahogany. Method 2 — 40-45 minutes, turning once at the halfway point. Method 3 — 35-40 minutes total (20 minutes plain, 15-20 minutes with crust), until crust is golden and potatoes are tender.
09Step 9
Remove from oven. For Method 1, transfer immediately to a wire rack or paper towel-lined tray — leaving them on the hot fat causes the bottom to steam and lose crispness. For Methods 2 and 3, let rest on the tray for 3 minutes before serving.
10Step 10
Season all methods with additional flaky salt immediately after removing from the oven. For Method 3, scatter fresh parsley over the top. Serve immediately.
Nutrition Per Serving
Estimates based on standard preparation. Adjustments alter macros.
🔄 Substitutions
Instead of Duck fat...
Use Refined coconut oil
Higher smoke point than olive oil and produces reasonable browning. No animal flavor, which changes the character of Method 1 noticeably. Works best when the herbs provide strong enough flavor compensation.
Instead of Maris Piper / Russet potatoes...
Use Yukon Gold
Medium starch content — works for all three methods but performs best for Method 2. Produces a slightly creamier interior than Russets and a thinner, less dramatic crust on Method 1. The color is deeper gold throughout.
Instead of Fresh rosemary and thyme...
Use Dried herbs at half the quantity
Dried rosemary and thyme hold up to high heat reasonably well. Use half the amount since drying concentrates flavor. Avoid dried parsley — it adds nothing and turns dusty.
Instead of Panko breadcrumbs (Method 3)...
Use Crushed crackers or stale sourdough breadcrumbs
Panko's larger, airier flakes create a crunchier crust. Crushed sourdough breadcrumbs produce a denser, chewier crust with more complexity from the fermentation flavor. Both work — the texture differs more than the flavor.
🧊 Storage & Reheating
In the Fridge
Store cooled potatoes in an airtight container for up to 3 days. Method 1 loses crispness after a few hours regardless — accept it and reheat properly.
In the Freezer
Freeze parboiled-and-roughed potatoes (Method 1) before roasting for up to 1 month. Roast directly from frozen at 425°F — add 10-15 minutes to the cook time. Fully cooked potatoes freeze poorly.
Reheating Rules
Reheat in a 400°F oven on a wire rack set over a tray for 12-15 minutes. The wire rack keeps the underside from steaming. The microwave turns all three methods into soft, grey disappointments — avoid entirely.
❓ Frequently Asked Questions
Why are my roast potatoes soft instead of crispy?
Almost always one of three causes: the fat wasn't hot enough when you added the potatoes, the tray was overcrowded so the potatoes steamed each other, or you didn't rough up the edges enough. Fix all three and you fix the problem.
Do I have to parboil for Method 2 or Method 3?
For Method 2, yes — parboiling is what creates the fluffy interior by fully gelatinizing the interior starch before the exterior crisps. For Method 3, you can skip it since the planks are thin enough to cook through at 425°F in 35 minutes. Parboiling Method 3 makes the potatoes too fragile to hold the crust.
What's the best potato for crispy roast potatoes?
High-starch varieties: Maris Piper in the UK, Russet (Idaho) in the US, or King Edward. Their high starch content means they fluff dramatically when roughed up and produce a thick, rigid crust. Waxy potatoes — red, fingerling, new — have too much moisture and not enough starch to crisp properly.
Can I make these ahead for a dinner party?
For Methods 2 and 3, yes — they hold reasonably well and reheat well. For Method 1, the honest answer is no. The crust deteriorates within 20 minutes of leaving the oven. The workaround: parboil and rough up the potatoes up to 24 hours ahead, refrigerate uncovered, then roast fresh while guests arrive.
Why does white wine vinegar go in the parboiling water?
Vinegar lowers the pH of the cooking water, which strengthens the pectin network in the potato's cell walls. This makes the outer layer more structurally robust during the aggressive shaking step — so you can really thrash the potatoes without them disintegrating. Without vinegar, the parboiled exterior can break apart before you've properly roughed up the surface.
Can I use an air fryer for any of these methods?
Method 2 adapts well to an air fryer — 380°F for 25-30 minutes with a flip halfway through produces a solid result in a fraction of the time. Method 1 works in an air fryer but the batch size is limited, which is a problem for a side dish. Method 3's herb crust can burn in the aggressive circulating heat — reduce temperature to 350°F and watch carefully after 15 minutes.

The Science of
Roast Potatoes Three Ways (Pick Your Texture, Nail It Every Time)
We turned everything on this page into a beautiful, flour-proof PDF cheat sheet. Print it out, stick it to your fridge, and never mess up your roast potatoes three ways (pick your texture, nail it every time) again.
*We'll email you the high-res PDF instantly. No spam, just perfectly cooked meals.
AlmostChefs Editorial Team
We translate the internet's most popular cooking videos into foolproof, beginner-friendly written recipes. We analyze multiple methods, test them in our kitchen, and engineer a single "Master Recipe" that gives you the best possible result with the least possible stress.