Perfect Prime Rib (The Reverse-Sear Method That Actually Works)
A bone-in standing rib roast cooked low and slow to a perfect medium-rare throughout, finished with a screaming-hot sear for a lacquered mahogany crust. We broke down the most-watched YouTube methods to build one reliable technique that eliminates the gray band and guarantees edge-to-edge pink.

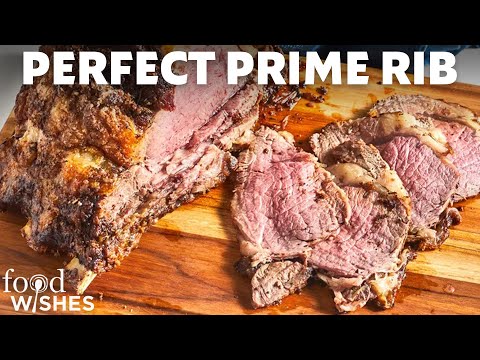
“Prime rib is the most expensive cut most people will ever cook, which makes it the most stressful. The anxiety is understandable — you have a $90 piece of beef sitting on your counter and absolutely no margin for error. The gray band problem is what ruins most roasts: that thick ring of overcooked meat surrounding a small pink center. The reverse sear eliminates it entirely. Low oven first, hot sear last. Every slice, edge to edge, comes out the same color.”
Why This Recipe Works
Prime rib is the test of whether you actually understand how heat moves through meat. Most roasts fail not because the cook made a mistake in the kitchen but because they accepted the wrong premise going in — that high heat is how you get a crust, and that a crust is how you know the roast is done. Both assumptions are wrong, and they compound into a gray, overcooked exterior wrapped around a small, embarrassed pink center.
The Gray Band Problem
Every poorly cooked prime rib has the same failure mode: a wide ring of gray, overcooked beef surrounding a smaller core of pink. This is the direct result of applying high surface heat to a thick piece of cold meat. The exterior hits 165°F before the interior reaches 100°F — the thermal gradient is too steep. The surface overcooks first, and by the time the center reaches your target temperature, everything within an inch of the exterior is well-done.
The reverse sear eliminates this physics problem entirely. At 225°F, heat moves slowly and evenly through the roast. The entire piece rises toward your target temperature at nearly the same rate. The temperature gradient between surface and center stays narrow throughout the cook — maybe 10-15 degrees rather than 50-60. When you pull the roast at 120°F, it is pink from edge to edge, with no gray band. The sear in a screaming-hot cast iron skillet happens afterward, for 2-3 minutes total, and adds the lacquered mahogany crust without adding any meaningful heat to the interior.
The Dry Brine Science
Salting a roast 48 hours in advance is not a flavor preference — it is a structural intervention. In the first hour after salting, the salt draws moisture out of the meat through osmosis. In the following hours, that moisture reabsorbs, now carrying dissolved salt back into the muscle fibers. The result is meat that is seasoned from within, not just coated on the surface.
The second function of the dry brine is more immediately visible: drying. A roast left uncovered in the refrigerator for 48 hours arrives at the oven with a surface that looks almost papery — pale and very dry to the touch. This is exactly what you want. Moisture is the enemy of crust. Water on the surface of meat must evaporate before the Maillard reaction can begin, and the Maillard reaction is the entire mechanism behind a proper crust. A wet roast spends the first 20 minutes of oven time steaming itself. A dry-brined roast begins browning almost immediately.
Temperature Is the Only Metric That Matters
Prime rib is cooked to temperature, not to time. A 4-pound roast and a 6-pound roast do not scale linearly — bone mass, fat content, and the thickness-to-volume ratio all affect heat transfer in ways that time estimates cannot account for. The rule of thumb (30 minutes per pound at 225°F) is a planning tool, not a cooking instruction. Pull the roast when it hits 120°F for medium-rare, and trust carry-over to do the rest.
An instant-read thermometer like a Thermapen is not a luxury item in this context. It is the difference between a $90 roast cooked correctly and a $90 roast served well-done to silent, polite guests who do not want to hurt your feelings. Insert it into the thickest part of the meat, away from the bone, and pull when the number reads 120°F. That is the entire doneness protocol.
The Rest Is Not Optional
Twenty minutes of resting after the low-oven phase, then another five after the sear. This is not a suggestion from cautious food writers — it is the mechanical consequence of how proteins behave under heat. When muscle fibers are heated, they contract and force internal juices toward the center of the roast, where they become pressurized. Cutting immediately releases that pressure and every tablespoon of flavor-carrying liquid ends up on the cutting board as pink puddle.
During the rest, the fibers gradually relax and the juices redistribute evenly throughout the meat. Slice after 20 minutes and the knife meets almost no resistance, the meat stays on the board, and each slice is uniformly moist from edge to edge. The rest is also when the interior temperature stabilizes — a roast pulled at 120°F will coast to 127-130°F during a proper rest, landing exactly in the medium-rare window without any additional action from the cook.
This is a dish that rewards preparation over technique. The dry brine requires two days of nothing. The low-and-slow cook requires patience and a thermometer. The sear requires a hot skillet and 10 minutes of attention. Everything else is just slicing.
Where Beginners Mess This Up
Before we start, read this. These are the 4 reasons your perfect prime rib (the reverse-sear method that actually works) will fail:
- 1
Skipping the dry brine: Salting the roast uncovered in the refrigerator for at least 24 hours (ideally 48-72) is not optional. The salt draws out surface moisture, then reabsorbs it into the muscle fibers. This seasons the meat from within and dramatically improves the crust by drying the surface before it ever sees heat. A roast salted right before cooking has a steamed exterior, not a seared one.
- 2
Cooking at a single high temperature: The traditional high-heat method — blast it at 450°F and then reduce — concentrates heat at the surface and leaves a massive gray band of overcooked meat around a small pink core. Low-and-slow at 225°F allows the entire roast to come to temperature gradually and evenly. The sear at the end is purely for crust. The interior is already done.
- 3
Pulling the roast at the wrong temperature: For medium-rare, pull the roast at 120°F internal — not 130°F, not 125°F. The carry-over cooking from the finishing sear will add another 5-8 degrees. If you wait until 130°F to pull it, you're eating medium-well by the time it hits the table. An instant-read thermometer is not optional for this cook.
- 4
Cutting too soon: Prime rib needs a minimum 20-minute rest after the final sear. The muscle fibers are fully contracted from the heat and the internal juices are pressurized. Cut immediately and every drop of that liquid ends up on the cutting board instead of in the meat. Rest on a rack, tented loosely — not wrapped tight, which traps steam and softens the crust you just built.
The Video Reference Library
Want to see it in action? Here are the exact videos we analyzed and combined to build this foolproof recipe translation:
The source video that this recipe is built on. Clear instruction on the reverse-sear technique, internal temperature targets, and why carry-over cooking determines the final doneness. Watch before you start.
2. Dry Brine vs. Wet Brine — Which Actually Works?
Side-by-side comparison that validates the dry brine method for thick cuts. Critical context for understanding why the 48-hour salt rest transforms the crust on a rib roast.
3. The Science of Resting MeatExplains the fiber contraction and juice redistribution mechanics that make the rest period non-negotiable. Useful for anyone who has ever cut into a roast too early and watched it bleed out onto the board.
🛠️ Core Equipment
- Instant-read thermometerPrime rib cannot be cooked by time alone. Roasts vary in thickness and bone density. Without a reliable thermometer like a Thermapen, you are guessing, and guessing on a $90 roast is how Thanksgiving dinners get ruined.
- Wire rack set inside a rimmed baking sheetElevating the roast allows hot air to circulate beneath it, preventing the bottom from stewing in its own juices. Direct contact with a pan surface creates a steamed underside — no crust, uneven cooking.
- Cast iron skillet or heavy roasting panFor the finishing sear, you need something that can hold extreme heat without warping. Cast iron retains temperature when cold meat hits it, ensuring the sear is immediate and forceful rather than slow and gray.
- Carving knife with a long bladeA short knife forces you to saw, which compresses the muscle and pushes juices out. A long carving knife lets you slice in a single clean draw, preserving texture and moisture.
Perfect Prime Rib (The Reverse-Sear Method That Actually Works)
🛒 Ingredients
- ✦1 bone-in standing rib roast (4-5 pounds, 2-bone section)
- ✦2 tablespoons kosher salt
- ✦1.5 tablespoons freshly cracked black pepper
- ✦1 tablespoon garlic powder
- ✦1 teaspoon dried rosemary, finely crushed
- ✦1 teaspoon dried thyme
- ✦2 tablespoons neutral oil (avocado or grapeseed)
- ✦4 tablespoons unsalted butter, softened
- ✦6 garlic cloves, minced
- ✦1 tablespoon fresh rosemary, finely chopped
- ✦1 tablespoon fresh thyme leaves
- ✦1 teaspoon Worcestershire sauce
- ✦Flaky sea salt, for finishing
👨🍳 Instructions
01Step 1
48 hours before cooking, combine kosher salt, black pepper, garlic powder, dried rosemary, and dried thyme. Pat the roast completely dry with paper towels. Rub the seasoning mixture evenly over every surface, including the bone side. Place on a wire rack over a baking sheet and refrigerate uncovered.
02Step 2
Two hours before cooking, remove the roast from the refrigerator and let it sit at room temperature. This reduces the temperature differential between the surface and center, promoting more even cooking.
03Step 3
Preheat the oven to 225°F. Combine softened butter, minced garlic, fresh rosemary, fresh thyme, and Worcestershire sauce. Spread this herb butter evenly over the top and sides of the roast.
04Step 4
Place the roast bone-side down on a wire rack set inside a rimmed baking sheet. Insert a probe thermometer into the thickest part of the roast, avoiding the bone.
05Step 5
Roast at 225°F until the internal temperature reaches 120°F for medium-rare, approximately 2.5-3 hours depending on thickness. Do not open the oven repeatedly — every peek drops the temperature and extends the cook time.
06Step 6
When the roast hits 120°F, remove it from the oven and rest it uncovered on a cutting board for 20 minutes. Do not tent tightly — loose tenting is acceptable, but sealed foil traps steam and softens the crust.
07Step 7
While the roast rests, heat a cast iron skillet over the highest heat your stove allows for 3-4 minutes. Add neutral oil and let it approach smoking.
08Step 8
Sear the roast fat-side down for 2-3 minutes until a deep mahogany crust forms. Sear the remaining sides for 1-2 minutes each. Work quickly — this step is about crust only, not cooking.
09Step 9
Transfer the roast back to the cutting board and rest for an additional 5 minutes after the sear.
10Step 10
Slice along the bones to remove them in one piece, then carve the roast into thick slices against the grain. Finish each slice with a pinch of flaky sea salt immediately before serving.
Nutrition Per Serving
Estimates based on standard preparation. Adjustments alter macros.
🔄 Substitutions
Instead of Bone-in rib roast...
Use Boneless rib roast (ribeye roast)
Cooks slightly faster due to the absence of bone mass. Reduce the oven time estimate by 20-30 minutes and rely entirely on the thermometer. The flavor will be good but not identical — the bone contributes measurably.
Instead of Unsalted butter...
Use Ghee or beef tallow
Ghee has a higher smoke point and a deeper nutty flavor. Beef tallow amplifies the beefy richness and produces an exceptional crust. Either is a legitimate upgrade.
Instead of Fresh rosemary and thyme...
Use Dried herbs at half the quantity
Dried herbs are more concentrated — use half the volume. Rub them between your fingers before applying to release their volatile oils. The result is slightly less bright but entirely acceptable.
Instead of Neutral oil for searing...
Use Beef tallow or clarified butter
Both have high smoke points suitable for the screaming-hot sear and contribute complementary flavors. Regular butter will burn at the required temperature and produce acrid smoke.
🧊 Storage & Reheating
In the Fridge
Store leftover prime rib in an airtight container or tightly wrapped in butcher paper for up to 3 days. The cold will firm the fat cap — this is normal.
In the Freezer
Freeze individual slices wrapped in plastic then foil for up to 2 months. Thaw overnight in the refrigerator. The texture is slightly softer after freezing but the flavor holds well.
Reheating Rules
The only acceptable reheating method is low and slow: place slices in a 250°F oven on a rack, covered with foil, for 20-25 minutes until warmed through. Microwaving destroys the texture. A hot skillet sear for 30 seconds per side after low-oven warming restores some crust.
❓ Frequently Asked Questions
What's the difference between prime rib and ribeye steak?
They come from the same primal cut — the rib section (ribs 6-12). Prime rib is the whole roast, cooked bone-in as a single piece. Ribeye steak is prime rib that has been sliced into individual steaks before cooking. Same muscle, different format, different cooking logic.
Do I need USDA Prime grade beef?
USDA Prime has more marbling and produces a more tender, flavorful result, but it is expensive and sometimes hard to source. USDA Choice is the standard supermarket grade and produces an excellent roast when the technique is correct. The reverse-sear method and the dry brine matter more than the grade stamp.
How do I know how long to cook it without a probe thermometer?
You don't, reliably. The general estimate is 30-35 minutes per pound at 225°F for medium-rare, but this varies with bone mass, fridge temperature, and oven calibration. A roast cooked by time alone has maybe a 60% chance of hitting your target. Buy the thermometer.
Can I do the low-and-slow phase the day before?
Yes — this is the 'reverse sear make-ahead' method. Cook to 110°F, pull it, refrigerate overnight, and do the final sear 30 minutes before serving. The cold roast going into a hot skillet produces an exceptional crust because the surface is bone dry. Bring it to room temperature for 30 minutes before searing.
Why does my prime rib have a huge gray band around the outside?
This is the result of conventional high-heat roasting, where the exterior overcooks before the heat reaches the center. The reverse-sear method (low oven first, sear last) solves this entirely because the meat comes to temperature slowly and evenly throughout. The sear is only for the crust — the interior is already done before the skillet ever touches it.
How much prime rib per person?
For a bone-in roast, calculate one rib for every two people as a general rule, or approximately 12-14 ounces of raw bone-in weight per person. For a boneless roast, budget 8-10 ounces per person. If prime rib is the main event with minimal sides, go heavier. These cuts shrink less than you expect — a 4-pound roast will yield close to 3.5 pounds after cooking.

The Science of
Perfect Prime Rib (The Reverse-Sear Method That Actually Works)
We turned everything on this page into a beautiful, flour-proof PDF cheat sheet. Print it out, stick it to your fridge, and never mess up your perfect prime rib (the reverse-sear method that actually works) again.
*We'll email you the high-res PDF instantly. No spam, just perfectly cooked meals.
AlmostChefs Editorial Team
We translate the internet's most popular cooking videos into foolproof, beginner-friendly written recipes. We analyze multiple methods, test them in our kitchen, and engineer a single "Master Recipe" that gives you the best possible result with the least possible stress.