Homemade Pepperoni Pizza (Better Than Delivery, Every Time)
A crispy-chewy homemade pizza with tangy tomato sauce, bubbling mozzarella, and savory pepperoni — made from scratch in under an hour. We broke down the most-watched YouTube pizza methods to find the technique that nails crust texture without a pizza stone or special equipment.
“Delivery pizza has one advantage over homemade: convenience. On every other metric — crust texture, cheese quality, ingredient control — homemade wins. The problem is that most homemade pizza recipes produce a limp, doughy crust that confirms every doubt you had about doing it yourself. The fix isn't a pizza stone or a wood-fired oven. It's oven temperature, rack position, and not skimping on the dough rest. Get those three right and you're eating better pizza than anything that arrives in a box.”
Why This Recipe Works
Pizza is one of those recipes where everyone assumes the restaurant version is beyond replication at home. It isn't. The gap between delivery pizza and homemade pizza is almost entirely explained by three variables: oven temperature, rack position, and respecting the dough rest. Everything else is details.
The Crust Problem
Most home ovens run between 350-400°F by default, which is wrong for pizza. Pizzerias use wood-fired ovens at 700-900°F; commercial deck ovens at 500-600°F. The high heat does two things simultaneously: it creates rapid steam inside the dough that puffs the crust open before the exterior sets, and it drives the Maillard reaction on the bottom and edges that produces color, chew, and that faintly charred flavor that makes a crust worth eating.
At 350°F, neither of those things happens properly. The crust bakes through before it can puff, and the bottom never browns — it just firms up. The result is bread topped with sauce and cheese rather than actual pizza. The fix: 475°F minimum, rack in the lower third, full 20-minute preheat so the pan is hot when the pizza lands on it.
The dough itself requires two structural decisions. First, the gluten network. Kneading for 8-10 full minutes develops the protein strands that give the crust its chew. Under-kneaded dough tears when stretched, bakes up crumbly, and lacks the satisfying resistance you want in a crust. The windowpane test — stretching a small piece until light passes through without tearing — is the objective indicator that the gluten is properly developed.
Second, the yeast rest. Instant yeast produces carbon dioxide at room temperature over 30-45 minutes, creating the bubbles that give the crust its open, airy crumb. Cut this short and you get dense, bready results. Extend it too long and the dough over-proofs, loses structure, and spreads out flat rather than holding its shape. The window is generous — 30 to 45 minutes covers most kitchen temperatures.
The Sauce Architecture
Raw sauce is the correct choice here. When you spread uncooked tomato sauce onto raw dough, it goes into the oven as-is and concentrates during the 12-15 minute bake — the water evaporates, the sugars caramelize lightly, and the acidity mellows into something deeper and more complex than what came out of the can. Pre-cooked sauce enters the oven already reduced, bakes again, and turns sharp. One pass through the heat. That's the rule.
The garlic goes in raw as well. Minced garlic added to a cold sauce blooms in the oven's heat rather than browning in a pan first. It's subtler and more integrated into the sauce than if you'd sautéed it separately.
The Cheese and Pepperoni Logic
Whole milk mozzarella has higher fat content than part-skim, which means it melts more completely and produces the elastic stretch that signals a well-made pizza. It also releases more moisture as it cooks — which is why the two-layer technique matters. Putting two-thirds of the cheese directly on the onions anchors the toppings and provides an absorbent layer beneath the pepperoni. The remaining third goes over the pepperoni, sealing it partially in place and giving the top surface its bubble.
Pepperoni between cheese layers crisps on the exposed top while staying fatty and juicy underneath. On top of everything, it can dry out and harden. Buried under everything, it steams instead of crisps. The split position is the engineering solution.
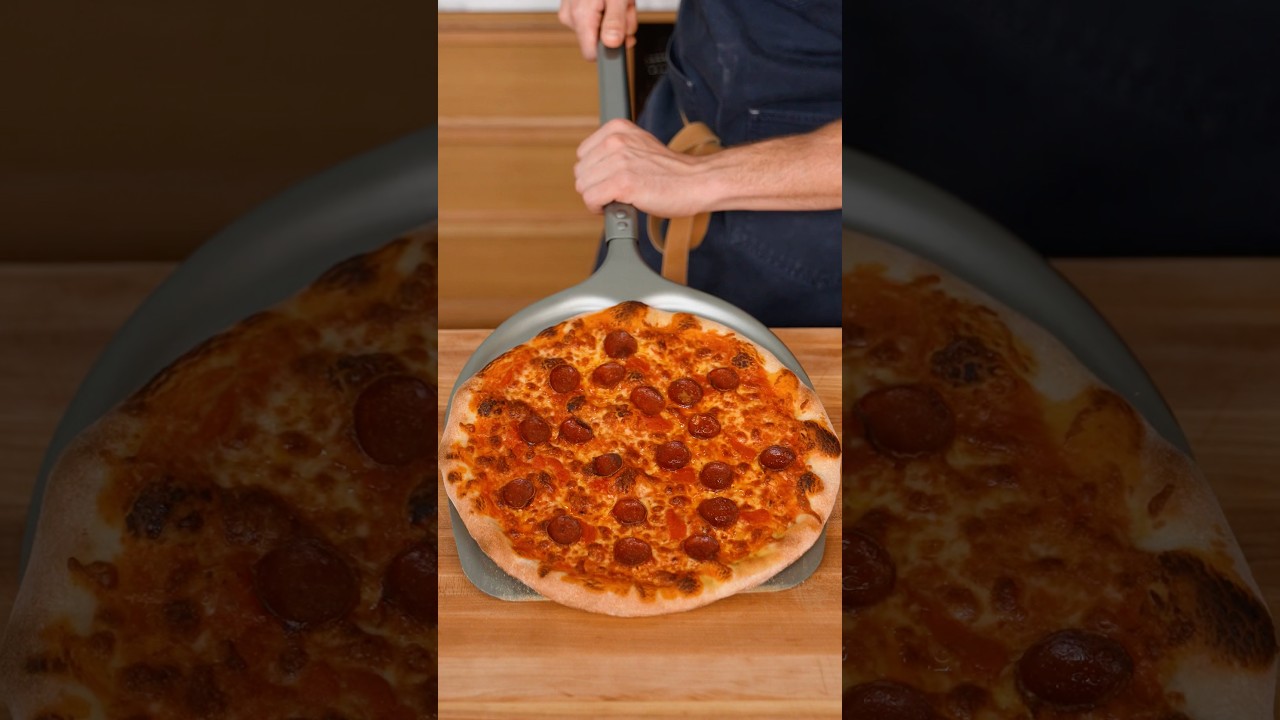
The pizza pan choice matters more than most recipes admit. A dark, heavy pan absorbs heat aggressively and transfers it directly to the crust base — this is where the bottom browning happens. A shiny, thin pan reflects heat and produces a pale, soft underside regardless of oven temperature. If you have a cast iron skillet large enough, it's the single best tool for homemade pizza: preheated in the oven, it delivers pizzeria-level bottom crust without any special equipment.
The cornmeal dusting is both functional and textural. It prevents sticking by creating a layer of tiny ball bearings between dough and pan. It also toasts against the hot pan surface during baking, adding a gritty, slightly nutty crunch to the base that you don't get from flour alone. Don't skip it.
Where Beginners Mess This Up
Before we start, read this. These are the 4 reasons your homemade pepperoni pizza (better than delivery, every time) will fail:
- 1
Oven temperature too low: Pizza needs aggressive heat — 475°F minimum. A moderate oven produces soft, pale crust that steams instead of crisps. The bottom third rack position is equally important: it puts the crust closest to the heating element where the browning actually happens. If your oven runs cool, crank it as high as it goes and let it preheat for at least 30 minutes.
- 2
Not letting the dough rest long enough: Rushing the rise produces dense, bready crust with no chew. The yeast needs 30-45 minutes to generate carbon dioxide bubbles that give the crust its open crumb. Cutting this short is the single most common reason homemade pizza disappoints. You cannot speed this up by adding more yeast — you'll just get a yeasty flavor without the texture.
- 3
Overloading toppings: More toppings sounds better until you cut into the pizza and the center is raw dough under a pile of wet ingredients. Sauce should be a thin layer — not a spread. Cheese should cover but not smother. Pepperoni goes on last so it crisps rather than steaming under mozzarella.
- 4
Skipping the cornmeal on the pan: Cornmeal creates a non-stick barrier between dough and pan while also adding a crunch to the base that mimics pizzeria results. Without it, the bottom sticks and tears when you try to slice. It's not optional.
The Video Reference Library
Want to see it in action? Here are the exact videos we analyzed and combined to build this foolproof recipe translation:
The source video for this recipe. Clear technique on dough consistency and how to read the crust color for doneness. Useful for first-time pizza makers who want to see the texture checkpoints in real time.
🛠️ Core Equipment
- 14-inch pizza pan or heavy baking sheetA wide, flat surface allows even heat distribution across the entire base. Dark pans absorb more heat and produce crispier crusts. Avoid thin, shiny pans — they reflect heat and produce soft bottoms.
- Stand mixer with dough hook (optional)Hand kneading works fine, but a [stand mixer](/kitchen-gear/review/stand-mixer) reduces kneading time to 5 minutes versus 10 by hand. More consistent gluten development means more reliable crust texture.
- Damp kitchen towel or plastic wrapCovers the rising dough to trap moisture and heat. A dry surface on the dough creates a skin that prevents even expansion. No special equipment needed — just something that seals the bowl.
- Pizza cutter or sharp chef's knifeA dull blade drags cheese off the pizza instead of cutting through it. A [pizza wheel](/kitchen-gear/review/pizza-cutter) applies even rolling pressure that keeps every topping in place.
Homemade Pepperoni Pizza (Better Than Delivery, Every Time)
🛒 Ingredients
- ✦3 cups all-purpose flour
- ✦1 packet (2.25 teaspoons) instant yeast
- ✦1 tablespoon honey
- ✦1 teaspoon sea salt
- ✦2 tablespoons extra virgin olive oil
- ✦1 cup warm water
- ✦1 cup tomato sauce
- ✦2 cloves garlic, minced
- ✦1 teaspoon dried oregano
- ✦1/2 teaspoon red pepper flakes
- ✦2.5 cups whole milk mozzarella cheese, shredded
- ✦6 ounces natural pepperoni, sliced thin
- ✦1 medium sweet onion, thinly sliced
- ✦1/4 cup fresh basil leaves
- ✦1 tablespoon cornmeal for dusting
- ✦1/2 teaspoon black pepper
- ✦Pinch of sea salt for finishing
👨🍳 Instructions
01Step 1
Combine the warm water, honey, and yeast in a large mixing bowl. Let sit for 5 minutes until foamy and fragrant.
02Step 2
Stir the olive oil into the yeast mixture until fully incorporated.
03Step 3
Add the flour and sea salt, then mix with a wooden spoon until a shaggy dough forms.
04Step 4
Turn the dough onto a lightly floured surface and knead for 8-10 minutes until smooth and elastic. Add flour one tablespoon at a time only if the dough sticks aggressively to your hands.
05Step 5
Place the dough in a lightly oiled bowl, cover with a damp kitchen towel, and let rise at room temperature for 30-45 minutes until roughly doubled.
06Step 6
Preheat your oven to 475°F and position the rack in the lower third. Let the oven preheat for at least 20 minutes.
07Step 7
Combine the tomato sauce, minced garlic, oregano, red pepper flakes, black pepper, and a pinch of salt in a small bowl. Stir to blend.
08Step 8
Dust a 14-inch pizza pan or baking sheet with cornmeal. Gently stretch the risen dough over the surface, pressing from the center outward to create even thickness. Leave a half-inch raised border for the crust.
09Step 9
Spread the seasoned tomato sauce over the dough using the back of a spoon, leaving the border clean.
10Step 10
Distribute the sliced sweet onion evenly across the sauce.
11Step 11
Sprinkle two-thirds of the mozzarella over the onions. Arrange the pepperoni slices across the cheese in slightly overlapping circles. Top with the remaining mozzarella.
12Step 12
Bake for 12-15 minutes until the crust is deep golden brown and the cheese is bubbling vigorously at the edges.
13Step 13
Remove from the oven and let rest 2 minutes. Scatter fresh basil leaves over the top and finish with a pinch of sea salt.
14Step 14
Slice into 8 portions and serve immediately.
Nutrition Per Serving
Estimates based on standard preparation. Adjustments alter macros.
🔄 Substitutions
Instead of All-purpose flour...
Use 2 cups whole wheat flour + 1 cup all-purpose flour
Nuttier flavor and slightly denser crumb. Extend the rest time to 50 minutes to compensate for the heavier flour absorbing water more slowly.
Instead of Whole milk mozzarella...
Use Part-skim mozzarella or a blend of part-skim mozzarella and ricotta
Less grease release, marginally lighter flavor. Still melts well and delivers the pull. The ricotta blend adds a creamy, mild richness that works particularly well with spicy pepperoni.
Instead of Regular pepperoni...
Use Uncured, nitrate-free pepperoni or turkey pepperoni
Cleaner flavor with less processed saltiness. Turkey pepperoni crisps beautifully but has a slightly different fat content — it may not cup the same way. Both are valid.
Instead of Canned tomato sauce...
Use Fresh tomato sauce: 3-4 ripe tomatoes blended with 2 tablespoons tomato paste
Brighter, more acidic flavor. Blend until smooth, season with salt, and use immediately. Moisture content varies by tomato — if the sauce looks watery, simmer for 5 minutes to reduce before spreading.
🧊 Storage & Reheating
In the Fridge
Store leftover slices in an airtight container or wrapped in foil for up to 3 days. The crust softens but the flavor holds.
In the Freezer
Freeze fully baked slices on a sheet pan until solid, then transfer to a zip-lock bag. Keeps for up to 2 months. Reheat directly from frozen in a 400°F oven for 8-10 minutes.
Reheating Rules
Skillet method: place a slice in a dry pan over medium heat, cover with a lid, and heat for 2-3 minutes. The base crisps while the cheese melts from trapped steam. Avoid the microwave — it produces soft, rubbery crust.
❓ Frequently Asked Questions
Why is my pizza crust soft and doughy in the middle?
Two causes: oven too cool, or too many toppings trapping moisture. Make sure your oven is fully preheated to 475°F and the rack is in the lower third. If the oven is correct, reduce the sauce layer — excess moisture steams the center instead of letting it crisp.
Can I make the dough ahead of time?
Yes. After kneading, place the dough in an oiled container, cover tightly, and refrigerate for up to 24 hours. Cold fermentation actually improves flavor — the yeast works slowly overnight and develops more complexity. Remove from the fridge 30 minutes before shaping to let it come to room temperature.
Do I need a pizza stone?
No. A preheated heavy baking sheet or dark pizza pan achieves comparable results. If you own a [pizza stone](/kitchen-gear/review/pizza-stone), preheat it in the oven for 45 minutes before baking — that extra thermal mass produces a crispier bottom. But it's not required for a great result.
Why does my cheese slide off when I slice?
You're cutting too soon. The cheese needs 2 full minutes to set after coming out of the oven. Cut immediately and the molten cheese slides with every knife stroke. Wait, and it holds.
Can I freeze the raw dough?
Yes. After the first rise, punch the dough down, portion it, and freeze in oiled zip-lock bags for up to 3 months. Thaw overnight in the refrigerator, then bring to room temperature for 45 minutes before shaping.
My pepperoni is greasy — how do I fix it?
Blot sliced pepperoni between paper towels before layering to remove surface fat. Alternatively, use thin-sliced pepperoni and place it between two layers of cheese rather than on top — the cheese absorbs some of the rendered fat as it bakes.

The Science of
Homemade Pepperoni Pizza (Better Than Delivery, Every Time)
We turned everything on this page into a beautiful, flour-proof PDF cheat sheet. Print it out, stick it to your fridge, and never mess up your homemade pepperoni pizza (better than delivery, every time) again.
*We'll email you the high-res PDF instantly. No spam, just perfectly cooked meals.
AlmostChefs Editorial Team
We translate the internet's most popular cooking videos into foolproof, beginner-friendly written recipes. We analyze multiple methods, test them in our kitchen, and engineer a single "Master Recipe" that gives you the best possible result with the least possible stress.