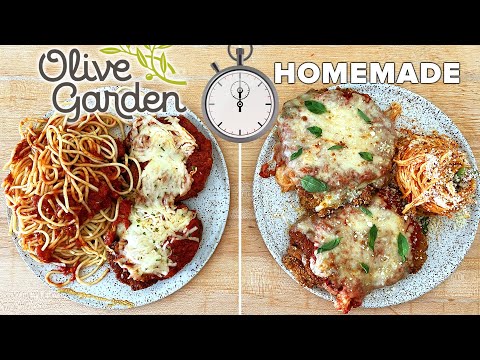
Copycat Olive Garden Chicken Parm (Better Than the Restaurant)
Crispy breaded chicken breast topped with marinara, melted mozzarella, and Parmesan, served over pasta — all in 35 minutes at home. We analyzed the technique behind Olive Garden's signature dish and built a foolproof method that nails the crust without a deep fryer.

“Olive Garden's Chicken Parm is the dish that half their customer base orders every single visit. The secret isn't the marinara or the cheese — it's the crust. A dry, uneven crust drowns under sauce and turns into paste. A proper crust holds its structure through the oven phase and gives you that crackling bite even under a half-cup of mozzarella. Getting there takes three shallow bowls and a meat mallet, not a restaurant kitchen.”
Why This Recipe Works
Olive Garden's Chicken Parmigiana has a 30-year stranglehold on the American comfort food imagination, and it's not because the recipe is complicated. It's because the restaurant does three things consistently that home cooks routinely skip: even thickness, high-heat searing, and a disciplined oven finish. When any one of those three breaks down, the whole dish collapses.
The Crust Is the Whole Game
Chicken Parm is a textural dish masquerading as a flavor dish. The marinara and cheese are simple — you can buy both. The differentiator is the crust: whether it holds its structure under a quarter-inch of melted cheese and hot sauce, or whether it dissolves into a wet, gray layer that makes the whole plate feel heavy and sad.
The three-stage breading is engineering, not tradition. Flour first — it dries the surface of the chicken and gives the egg something to adhere to. Without flour, the egg slides off the protein surface and the breadcrumbs have nothing to bond to. Egg second — it's the adhesive layer that cements the crumbs in place. Breadcrumbs last, pressed firmly against the egg wash, not just dropped on.
The pressing step is where most home cooks are too gentle. You need to push the crumbs flat against the surface so every grain makes full contact with the egg wash below. Any air pockets become failure points under heat.
Temperature Is Non-Negotiable
The skillet needs to be hot — genuinely hot, not "medium because I'm nervous about burning things" hot. The instant the chicken hits the oil, the moisture on the surface needs to flash to steam and drive outward. If the pan isn't hot enough, that moisture stays in the crust and turns it into a paste.
A heavy-bottomed skillet solves the heat recovery problem automatically. When cold chicken hits a thin pan, the temperature crashes and the crust has no chance. A thick-bottomed pan absorbs the thermal shock and bounces back within seconds. That sustained heat is what produces the deep golden color that stays golden even after the sauce goes on.
Work in batches without apology. Two perfect cutlets are worth more than four mediocre ones.
The Oven Finish Is Not the Main Cook
This is the most commonly misunderstood part of the technique. By the time the chicken enters the oven, it should be 85-90% cooked. The oven's only job is to melt the cheese, marry the sauce to the crust, and push the internal temperature to 165°F. It is not a second cooking stage for underdone chicken.
Twelve to fifteen minutes at 400°F is the window. Beyond that, the cheese goes from golden and bubbling to brown and chewy, and the crust loses the structural integrity you built in the pan. If you're worried the chicken isn't cooked through, use a meat thermometer rather than extending the oven time.
The Pasta Is Infrastructure
The pasta isn't a side dish — it's the platform the chicken rests on, and it needs to be seasoned to match. Salt your pasta water aggressively. A pound of pasta needs at least a tablespoon of salt in the boiling water — the water should taste like mild seawater, not faintly salted. This is the only opportunity to season the pasta itself, and most recipes tell you to add a pinch and call it done.
Cook to al dente, not soft. The pasta will continue to absorb heat from the sauce and chicken after plating. If it's already soft when it hits the bowl, it's overcooked before anyone picks up a fork.
The whole dish comes together in 35 minutes. The techniques aren't hard. The margin for error is wide. The only thing standing between you and a plate that rivals the original is a meat mallet and a hot pan.
Where Beginners Mess This Up
Before we start, read this. These are the 4 reasons your copycat olive garden chicken parm (better than the restaurant) will fail:
- 1
Skipping the pounding step: Chicken breasts are uneven by nature — thick in the center, tapered at the edges. An unpounded breast gives you dried-out thin edges by the time the center is cooked through. Pounding to an even 1/2-inch thickness ensures every part of the chicken finishes at the same moment, both in the skillet and the oven.
- 2
Under-seasoning the breadcrumb coating: The breading is the only layer where you can season the crust directly. If you salt only the outside after frying, the crust tastes flat no matter how good the sauce is. Every layer — flour, egg wash, and especially the breadcrumb mixture — needs proper seasoning before the chicken touches it.
- 3
Crowding the pan during the sear: Adding too many cutlets at once drops the pan temperature dramatically. Instead of searing, the chicken steams in its own moisture and the crust turns gray and soft instead of golden and crisp. Work in batches if necessary — a good crust requires sustained high heat.
- 4
Overbaking after adding sauce and cheese: The chicken is already mostly cooked when it enters the oven. The oven phase is about melting and browning the cheese, not finishing the protein. Twelve to fifteen minutes at 400°F is the window. Beyond that, the cheese burns and the crust softens beyond recovery.
The Video Reference Library
Want to see it in action? Here are the exact videos we analyzed and combined to build this foolproof recipe translation:
The source video for this technique. Covers the breading station setup, pan temperature cues, and the cheese-browning window that makes or breaks the final dish.
2. Perfect Chicken Parmesan — Step by Step
Detailed breakdown of the three-dredge method and why flour before egg before breadcrumbs is not optional. Good close-ups of what properly golden crust looks like before it goes in the oven.
3. How to Get Crispy Chicken Parm at HomeFocused on pan temperature management and batch cooking. Explains why crowding kills the crust and how to time two batches so everything finishes together.
🛠️ Core Equipment
- Meat mallet ↗Essential for pounding the chicken to an even thickness. Without it, the edges overcook while the center is still underdone. A rolling pin works in a pinch, but a mallet gives controlled, even pressure.
- Large heavy-bottomed skillet ↗Maintains high, even heat during the sear. A thin pan creates hot spots that burn parts of the crust while leaving others pale. Cast iron or heavy stainless are ideal for consistent browning.
- Baking dish ↗For the oven phase with sauce and cheese. A shallow, even dish ensures uniform heat around each cutlet. Nesting the chicken too deep in a tall dish traps steam and softens the crust.
- Three shallow bowls or plates ↗The breading station needs clear separation — flour, egg, breadcrumbs. Mixing stations or using deep bowls creates clumping and uneven coating. Shallow dishes let you press the breadcrumbs flat against the chicken without wrestling the cutlet.
Copycat Olive Garden Chicken Parm (Better Than the Restaurant)
🛒 Ingredients
- ✦4 boneless, skinless chicken breasts (6 oz each)
- ✦1 cup all-purpose flour
- ✦2 large eggs
- ✦1 cup Italian breadcrumbs
- ✦1 teaspoon garlic powder
- ✦1 teaspoon dried Italian seasoning
- ✦1 teaspoon salt
- ✦1/2 teaspoon black pepper
- ✦3 tablespoons olive oil
- ✦2 cups marinara sauce (preferably low-sodium)
- ✦1.5 cups part-skim mozzarella cheese, shredded
- ✦1/2 cup grated Parmesan cheese
- ✦1 pound pasta (spaghetti or penne)
- ✦2 tablespoons fresh basil, chopped
- ✦1 tablespoon fresh parsley, chopped
- ✦Salt and pepper for pasta water
👨🍳 Instructions
01Step 1
Pound each chicken breast to an even 1/2-inch thickness using a meat mallet, working from the center outward. Take your time — don't tear through the meat.
02Step 2
Set up your breading station: flour in the first shallow bowl, beaten eggs in the second, and breadcrumbs mixed with garlic powder, Italian seasoning, salt, and pepper in the third.
03Step 3
Coat each breast in flour and shake off the excess. Dip in the beaten egg, letting the excess drip off. Press firmly into the seasoned breadcrumb mixture, coating all sides.
04Step 4
Heat olive oil in a large heavy-bottomed skillet over medium-high heat until shimmering but not smoking.
05Step 5
Cook each breaded breast for 4-5 minutes on the first side until deep golden brown. Flip and cook another 3-4 minutes on the second side. Work in batches if needed.
06Step 6
Preheat oven to 400°F. Transfer the seared chicken to a baking dish in a single layer.
07Step 7
Spoon about 1/2 cup of marinara sauce over each breast, spreading evenly to cover the top surface.
08Step 8
Top each breast with about 1/3 cup of shredded mozzarella and 2 tablespoons of grated Parmesan.
09Step 9
Bake for 12-15 minutes until the cheese is fully melted, bubbling, and lightly golden on the edges.
10Step 10
While the chicken bakes, cook the pasta in heavily salted boiling water until al dente. Drain and reserve.
11Step 11
Divide pasta among plates. Place one chicken cutlet on top of each portion. Spoon any pan sauce over the pasta. Garnish with fresh basil and parsley. Serve immediately.
Nutrition Per Serving
Estimates based on standard preparation. Adjustments alter macros.
🔄 Substitutions
Instead of All-purpose flour...
Use Whole wheat flour or a 50/50 chickpea flour blend
Slightly nuttier flavor with a denser coating. More fiber and a lower glycemic impact. The crispness is comparable when the oil is at the right temperature.
Instead of Italian breadcrumbs...
Use Whole grain panko breadcrumbs
Lighter, airier crunch with added nutritional benefit. Lower sodium than most commercial Italian breadcrumbs. Add your own Italian seasoning to compensate for the lost herb blend.
Instead of Part-skim mozzarella...
Use Fresh buffalo mozzarella, sliced
Creamier and more delicate texture. Slightly lower sodium. Slice thin and layer rather than shredding — it melts differently and may need 2-3 fewer minutes in the oven.
Instead of Regular pasta...
Use Whole wheat pasta or legume-based pasta (lentil or chickpea)
Earthier flavor with significantly better satiety. Chickpea pasta adds roughly 6g extra protein per serving. Cook chickpea pasta 1-2 minutes less than the package says — it goes soft quickly.
🧊 Storage & Reheating
In the Fridge
Store chicken and pasta separately in airtight containers for up to 3 days. Storing together causes the pasta to absorb all the sauce overnight.
In the Freezer
Freeze the cooked chicken cutlets (without pasta) for up to 2 months. Lay flat on a baking sheet to freeze solid before transferring to a bag, so they don't stick together.
Reheating Rules
Reheat the chicken on a wire rack set over a baking sheet at 375°F for 10-12 minutes. This keeps the bottom crust from getting soggy. Microwave reheating makes the crust rubbery — avoid it.
❓ Frequently Asked Questions
Why does my breading fall off during frying?
Two causes: either the flour layer was too thick (shake off excess aggressively), or the egg wash didn't fully coat the flour before the breadcrumbs went on. The sequence is structural — flour gives the egg something to grip, egg gives the breadcrumbs something to bond to. Any gap in that chain and the crust separates under heat.
Can I make this without frying first?
You can bake only, but the crust will be different — paler, slightly softer, and less structured. If you go oven-only, brush the coated chicken with olive oil on all sides and bake at 425°F for 20 minutes before adding the sauce and cheese. It won't replicate the pan-seared version, but it's a reasonable compromise.
What pasta shape works best?
Spaghetti is the classic. Penne holds sauce in its tubes and gives you a more substantial bite alongside the chicken. Rigatoni works well if you want something heartier. Avoid fresh pasta here — it gets lost under the richness of the cheese and sauce.
Can I use chicken thighs instead of breasts?
Yes, and many cooks prefer them. Thighs have more fat, which means more flavor and a much higher margin for error on cooking time. Pound boneless thighs to an even thickness just like breasts. They may take 1-2 extra minutes in the oven to fully cook through.
Why is my chicken still pink in the center after the full bake time?
The pan sear temperature was too low or the cutlet wasn't pounded thin enough. At 1/2-inch even thickness, 4-5 minutes per side in the skillet plus 12-15 minutes at 400°F should bring every breast to 165°F internal. Use an instant-read thermometer to verify — don't rely solely on time.
Can I make this ahead for a dinner party?
Sear the cutlets up to 4 hours ahead and keep them at room temperature. When guests arrive, add the sauce and cheese and run them through the oven fresh. Do not fully assemble ahead of time — the sauce softens the crust rapidly. The best chicken parm is one that just came out of the oven.

The Science of
Copycat Olive Garden Chicken Parm (Better Than the Restaurant)
We turned everything on this page into a beautiful, flour-proof PDF cheat sheet. Print it out, stick it to your fridge, and never mess up your copycat olive garden chicken parm (better than the restaurant) again.
*We'll email you the high-res PDF instantly. No spam, just perfectly cooked meals.
AlmostChefs Editorial Team
We translate the internet's most popular cooking videos into foolproof, beginner-friendly written recipes. We analyze multiple methods, test them in our kitchen, and engineer a single "Master Recipe" that gives you the best possible result with the least possible stress.