No-Knead Bread (The 15-Minute Loaf That Embarrasses Bakers)
A high-hydration artisan loaf that develops gluten and complex flavor through an 18-hour cold fermentation — no kneading, no special skills, no excuses. We broke down the technique to show exactly why this method works and where most home bakers still manage to get it wrong.
“The bread aisle at a bakery charges twelve dollars for what costs forty cents to make at home. The reason most people don't bake their own is the myth that bread requires skill. It doesn't. It requires heat, hydration, and one overnight window you were already going to waste sleeping. This recipe uses an 18-hour fermentation and a Dutch oven to produce a crackly, open-crumbed loaf that would embarrass most home bakers who spent years learning to knead.”
Why This Recipe Works
No-knead bread is not a shortcut. It is a different theory of breadmaking entirely — one that replaces mechanical labor with time and heat. Understanding why the method works tells you exactly what not to mess with.
The Fermentation Engine
Traditional bread dough relies on kneading to align gluten strands into an organized network capable of trapping carbon dioxide gas. Knead for ten minutes and you've built a structure. Skip the kneading and you have a wet, disorganized mass that won't hold its shape.
Except: gluten develops on its own given enough time. Flour proteins glutenin and gliadin bond with water and slowly organize themselves over many hours without any mechanical help. Eighteen hours at room temperature produces gluten development equivalent to eight minutes of vigorous kneading — with one critical difference. The extended fermentation also produces organic acids (acetic and lactic) that create the tangy complexity no amount of kneading can fake.
This is why the low yeast quantity matters. A quarter teaspoon of instant yeast can barely keep up with a standard hour rise, but given eighteen hours, it does exactly what you want: a slow, controlled fermentation that builds flavor compounds the whole time it's working. Use a full packet of yeast and you'll have a doubled dough in ninety minutes — technically leavened, substantively flavorless.
The Dutch Oven as Deck Oven
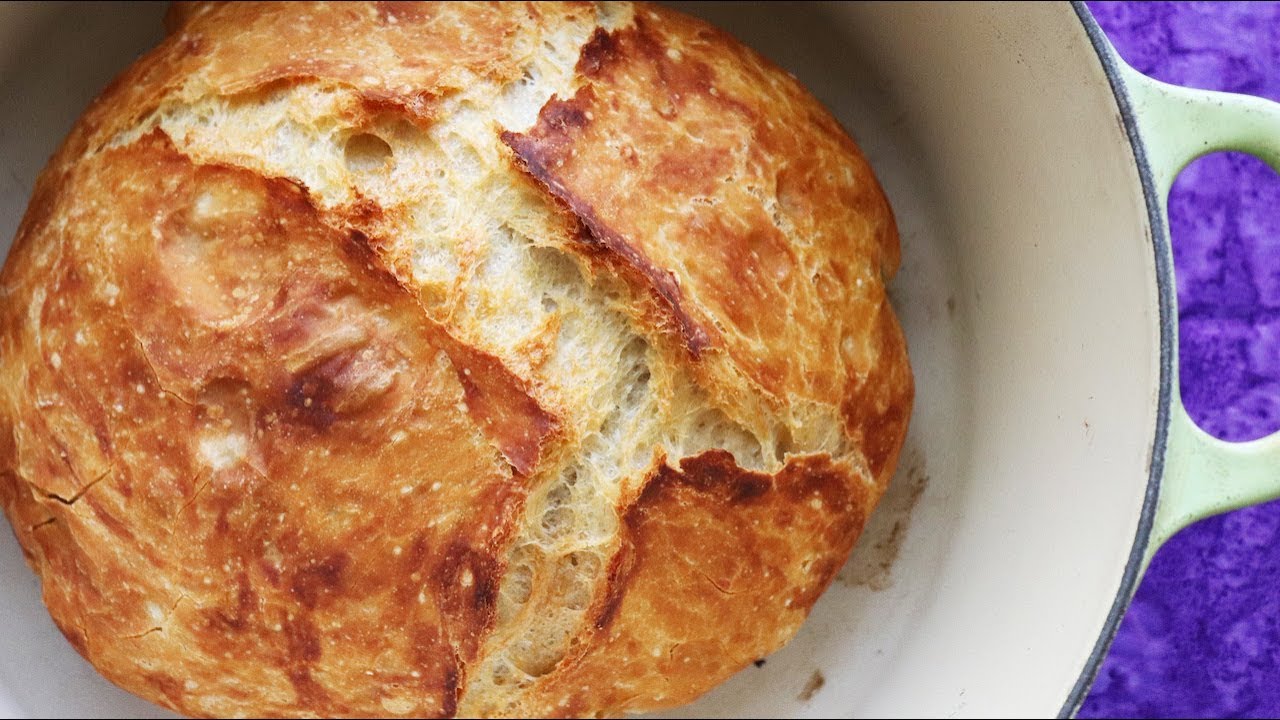
Professional bakeries inject steam into their ovens for the first twelve minutes of every bread bake. The steam keeps the crust supple while the interior expands — this is called oven spring, and it's what produces the dramatic domed loaf with the open crumb. Home ovens can't inject steam. They vent it.
A Dutch oven solves this by trapping whatever steam the dough releases from its own moisture. In the first twenty to thirty minutes, the sealed cast iron vessel creates a miniature deck oven environment around the loaf. The crust stays soft long enough for the bread to fully expand. Then you remove the lid and let the dry heat of the oven do what dry heat does: brown the sugars, set the crust, and produce the crackle that makes people tear off pieces before the loaf has cooled.
The preheating requirement is not optional. Cold cast iron won't produce the violent bottom heat that drives initial oven spring. The Dutch oven needs thirty full minutes at 450°F before the dough ever goes near it. A instant-read thermometer cannot measure the vessel temperature, so you rely on time — thirty minutes, not "pretty much thirty."
The Science of Doing Nothing
The hands-on time for this recipe is genuinely fifteen minutes. Everything else is waiting: twelve to eighteen hours of fermentation, thirty minutes of resting after shaping, thirty minutes of oven preheating, thirty-five minutes of baking, sixty minutes of cooling. The waiting is not dead time — it is the cooking. The bread is actively developing during every one of those hours, and interrupting any phase (pulling the dough before it's bubbly, rushing the cool-down, skimping on preheat) produces a proportionally worse loaf.
This is the counterintuitive truth that makes no-knead bread difficult for experienced bakers: doing less is better. Resist the urge to check the dough during fermentation, fold it more aggressively than necessary, add flour to control stickiness, or slice it while it's warm. The recipe already solved those problems with time. Your job is to not undo the solutions.
Where Beginners Mess This Up
Before we start, read this. These are the 4 reasons your no-knead bread (the 15-minute loaf that embarrasses bakers) will fail:
- 1
Water that's too hot: Lukewarm means 95-105°F — the temperature of a comfortable bath. Hotter than 115°F kills the yeast outright before the fermentation even starts. Too cool and the yeast stays dormant and the dough barely rises. Use a thermometer or run water over your wrist; it should feel neutral, not warm.
- 2
Under-fermenting the dough: Twelve hours is the floor, not the target. At cooler room temperatures (65°F or below), the dough needs closer to 18 hours. The tell is visual: the surface should be covered in bubbles and the dough should have at least doubled in size. If it looks the same as when you left it, it needs more time.
- 3
A cold Dutch oven: The Dutch oven must be fully preheated at 450°F before the dough goes in. The violent burst of bottom heat in the first 10 minutes is what creates the oven spring — the dramatic rise that gives the bread its open crumb. A cold pot produces a flat, dense loaf that bakes from the outside in.
- 4
Slicing before the loaf has cooled: The crumb is still setting for a full hour after the bread comes out of the oven. Steam is finishing its work. Cut into it early and you get a gummy, collapsed interior that no amount of good fermentation can fix. One hour minimum. Set a timer.
The Video Reference Library
Want to see it in action? Here are the exact videos we analyzed and combined to build this foolproof recipe translation:
The foundational walkthrough for understanding fermentation timing and Dutch oven technique. Shows exactly what the dough should look like at each stage — bubbly surface, shaggy texture, and the correct fold technique before shaping.
🛠️ Core Equipment
- Dutch oven with lid (5-7 quart)The enclosed vessel traps steam for the first 20-30 minutes of baking, replicating a professional deck oven's steam injection. This steam keeps the crust supple long enough for oven spring to happen before the crust sets hard. Without it, the crust forms too early and the loaf can't expand.
- Instant-read thermometerFor checking water temperature during mixing. Yeast activation is temperature-sensitive — a ten-degree error in either direction determines whether your dough rises or sits dead. Remove guesswork.
- Bread lame or sharp serrated knifeScoring the dough before baking is not decorative. It controls where the bread expands during oven spring. An unscored loaf tears unpredictably along the sides and produces an uneven crumb. One confident slash, half an inch deep.
- Wire cooling rackCooling on a solid surface traps moisture against the bottom crust and turns it soft. A rack lets air circulate on all sides, preserving the crackly exterior that makes this bread worth making.
No-Knead Bread (The 15-Minute Loaf That Embarrasses Bakers)
🛒 Ingredients
- ✦3 cups all-purpose flour
- ✦1.5 cups lukewarm water (95-105°F)
- ✦1.5 teaspoons fine sea salt
- ✦1/4 teaspoon instant yeast or active dry yeast
- ✦1 tablespoon whole wheat flour, optional (for dusting)
- ✦1 teaspoon extra virgin olive oil (for bowl)
- ✦1 tablespoon cornmeal or additional flour (for Dutch oven)
- ✦2-3 small fresh rosemary sprigs, optional garnish
👨🍳 Instructions
01Step 1
Whisk together the flour, sea salt, and instant yeast in a large mixing bowl until the dry ingredients are evenly combined.
02Step 2
Pour the lukewarm water into the flour mixture and stir vigorously with a wooden spoon or sturdy spatula for about 1 minute until a shaggy, wet dough forms with no dry flour remaining.
03Step 3
Cover the bowl tightly with plastic wrap and let the dough ferment at room temperature (68-75°F) for 12 to 18 hours until the surface is bubbly and the dough has at least doubled in size.
04Step 4
Lightly flour your work surface and turn the dough out gently, handling it carefully to preserve the gas bubbles that built up overnight.
05Step 5
Fold the dough inward from all four sides toward the center 4-5 times to build surface tension, then flip it seam-side down. Let it rest uncovered on the work surface for 30 minutes.
06Step 6
Place your Dutch oven (lid on) inside the oven and preheat to 450°F. Let it heat for at least 30 minutes — a full 30, not 20.
07Step 7
Lightly flour the top of the dough, then score a single diagonal slash across the surface about half an inch deep using a bread lame or sharp knife.
08Step 8
Using thick oven mitts, remove the Dutch oven from the oven. Carefully lift the dough and lower it into the hot vessel seam-side up. Replace the lid immediately.
09Step 9
Bake covered for 20-30 minutes, then remove the lid and bake for another 10-15 minutes until the crust is deep golden brown.
10Step 10
Transfer the bread to a wire cooling rack and let it cool completely for at least 1 hour before slicing.
Nutrition Per Serving
Estimates based on standard preparation. Adjustments alter macros.
🔄 Substitutions
Instead of All-purpose flour...
Use Bread flour or high-protein flour blend
Higher protein content develops more gluten structure without kneading. Produces a chewier texture and a crust that shatters instead of bends. Recommended if you can find it.
Instead of Instant yeast...
Use Active dry yeast (same quantity)
Works identically in long fermentation. Active dry yeast has slightly larger granules but activates just as well over 12+ hours. No need to proof it separately.
Instead of Water...
Use Whole milk or half milk, half water
Creates a slightly softer crumb with subtle sweetness. The lactobacillus cultures in milk contribute to flavor complexity similar to longer fermentation. Not traditional but not wrong.
Instead of Refined sea salt...
Use Himalayan pink salt or kosher salt
Kosher salt is the most common swap in professional bakeries. Use 2 teaspoons of kosher in place of 1.5 teaspoons fine sea salt — the larger crystal size means less salt by volume for the same weight.
🧊 Storage & Reheating
In the Fridge
Wrap in a clean kitchen towel (not plastic) and store at room temperature for up to 3 days. Plastic traps moisture and softens the crust. The towel breathes.
In the Freezer
Slice the cooled loaf and freeze individual slices in a zip-lock bag for up to 3 months. Pull slices directly from frozen and toast — they come back nearly identical to fresh.
Reheating Rules
Revive a day-old loaf by running the crust briefly under cold water, then placing directly on the oven rack at 350°F for 10 minutes. The steam from the water reignites the crust without drying the crumb.
❓ Frequently Asked Questions
Can I use more yeast to speed up the fermentation?
You can, but you shouldn't. More yeast means faster fermentation, which means less time for flavor to develop. The low yeast quantity (1/4 teaspoon) is intentional — it forces a slow, controlled rise that produces organic acids responsible for the tangy, complex flavor. Double the yeast and you get a bland, forgettable loaf in half the time.
Why is my bread dense with no holes?
Either the dough under-fermented (not enough bubble activity before shaping), the Dutch oven wasn't hot enough (insufficient oven spring), or you pressed the gas out of the dough while handling it. All three problems are avoidable: verify bubbles before shaping, preheat the Dutch oven fully, and fold gently.
Do I need a Dutch oven or can I use something else?
A [Dutch oven](/kitchen-gear/review/dutch-oven) is the right tool and nothing else replicates it exactly. If you don't have one, the closest substitute is a covered casserole dish rated to 450°F. Remove the lid for the final browning phase exactly as you would with cast iron. Do not use a glass lid — it can shatter at that temperature.
My dough is extremely sticky. Is that normal?
Yes. High-hydration doughs are inherently sticky and will not look or behave like traditional bread dough. Resist adding more flour during shaping. Wet hands or a light flour dusting on the work surface is all the help you need. The stickiness is why the bread has an open, irregular crumb.
What internal temperature should the bread reach?
200-210°F in the center. Below 195°F and the crumb is still gummy. An instant-read thermometer inserted through the bottom of the loaf gives you a clean read without marking the top crust.
Can I make this with sourdough starter instead of commercial yeast?
Yes. Replace the instant yeast with 2 tablespoons of active sourdough starter and extend the fermentation to 18-24 hours at room temperature. The flavor will be more aggressively sour and the crumb slightly more irregular. Everything else in the method stays the same.

The Science of
No-Knead Bread (The 15-Minute Loaf That Embarrasses Bakers)
We turned everything on this page into a beautiful, flour-proof PDF cheat sheet. Print it out, stick it to your fridge, and never mess up your no-knead bread (the 15-minute loaf that embarrasses bakers) again.
*We'll email you the high-res PDF instantly. No spam, just perfectly cooked meals.
AlmostChefs Editorial Team
We translate the internet's most popular cooking videos into foolproof, beginner-friendly written recipes. We analyze multiple methods, test them in our kitchen, and engineer a single "Master Recipe" that gives you the best possible result with the least possible stress.