Foolproof Chocolate Mug Cake (90 Seconds to Fudgy Perfection)
A single-serving chocolate cake mixed and cooked directly in a microwave-safe mug in under 10 minutes. We analyzed the most common failures — rubbery texture, overflowing batter, dry crumb — and built one technique that delivers a moist, fudgy center every time.
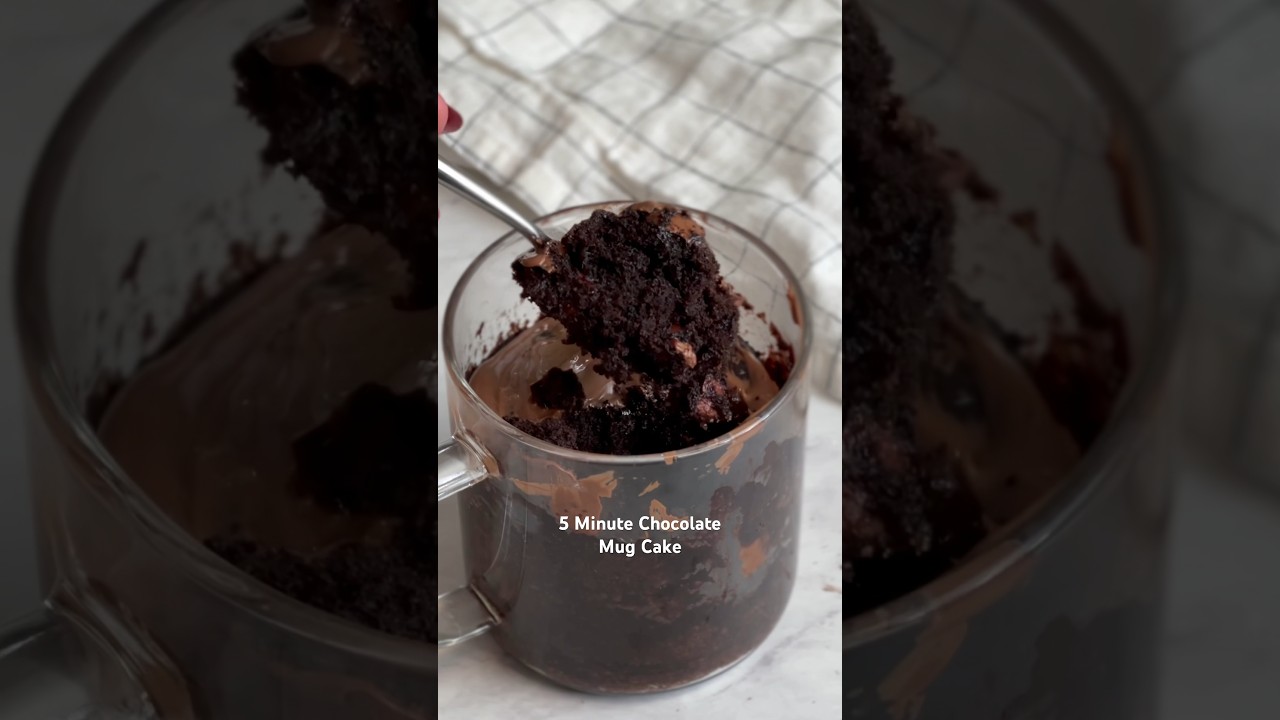
“Every dorm room, every late-night craving, every moment you need chocolate cake in under ten minutes — this is what the mug cake was invented for. The problem is that most versions come out rubbery, dry, or overflowing, which turns a two-minute win into a microwave mess and a disappointing sponge. The difference between a good mug cake and a bad one is not the recipe. It is the timing, the mug size, and knowing that underdone is always better than overdone.”
Why This Recipe Works
The mug cake exists at the intersection of laziness and genius. Someone looked at the problem of craving chocolate cake at 11pm and decided the correct solution was not to wait forty minutes for an oven — it was to engineer a dessert that fits in a vessel you already have and cooks faster than it takes to preheat anything. That person was right. The problem is that the mug cake's reputation has been destroyed by every bad version made in a mug that was too small, microwaved thirty seconds too long, and eaten straight out of a 900-watt appliance without resting.
The Wattage Problem Nobody Talks About
Mug cake recipes exist in a state of constant confusion because they were written for a single generic microwave that does not exist. Consumer microwave ovens range from 600 watts to 1250 watts, and that spread makes a recipe that says "90 seconds" wildly inconsistent. At 600 watts, 90 seconds barely finishes the outer centimeter. At 1200 watts, 90 seconds produces a hockey puck with chocolate chips embedded in it.
The only reliable method is to check early and check often. Sixty seconds is your first checkpoint. The cake should look set around the perimeter with a slightly underdone center — not wet, not dry, but somewhere in the middle where it glistens a little under the light. That underdone center is not a problem. It is the plan. The residual heat stored in the mug and the dense crumb will carry it across the finish line during the rest period.
Why Mixing Order Matters in a Mug
Standard cake baking gives you a stand mixer, a large bowl, and enough volume that small clumps get worked out over time. A mug gives you a fork and roughly two inches of working depth. This is why mixing the dry ingredients first — specifically the cocoa powder — is not a suggestion. Dutch-process or natural cocoa powder has a tendency to clump at particle level, and once those clumps are surrounded by wet batter, a fork cannot break them up. You end up with spots of raw, bitter cocoa in an otherwise finished cake. Thirty seconds of dry mixing with the fork tines eliminates this before the wet ingredients ever enter the picture.
The Mug as Architecture
The mug is not just a container — it functions as the baking vessel, the serving dish, and the insulating layer that controls how heat moves through the batter. Ceramic mugs, being thick and dense, retain heat longer than thin glass, which means they continue cooking the batter even after the microwave stops. This is thermal momentum, and it's working in your favor during the rest period. A microwave-safe ceramic mug with at least 12 ounces of capacity gives you the correct geometry: enough height for the cake to rise without overflowing, enough wall thickness to distribute heat evenly rather than cooking the outside in a ring while leaving the center raw.
The two-thirds fill rule exists because mug cake batter rises faster and more aggressively than oven cake batter. Microwave energy excites water molecules uniformly throughout the batter simultaneously — there is no "bottom heat" working its way up the way there is in an oven. The entire mass expands at once. If it has nowhere to go, it goes over the rim. Use a larger mug before you need to.
What Fudgy Actually Means
Every mug cake recipe promises "fudgy," and most deliver "dense." Fudgy means the crumb is moist, slightly sticky, and gives under pressure without springing back the way a properly aerated cake does. It is achieved here through two mechanisms: the relatively high ratio of fat to flour (the oil and egg yolk together), and intentional undercooking that leaves the interior just barely set. The chocolate chips, which melt during cooking and then partially re-solidify during the rest period, add pockets of concentrated chocolate that reinforce this texture throughout the crumb.
This is a seven-minute dessert. Treat it like one. It will never be a layer cake. It will always be the right answer at the right moment.
Where Beginners Mess This Up
Before we start, read this. These are the 4 reasons your foolproof chocolate mug cake (90 seconds to fudgy perfection) will fail:
- 1
Overfilling the mug: Mug cakes rise aggressively in the microwave before collapsing back down. If your batter fills more than two-thirds of the mug going in, it will overflow onto the turntable and you will spend more time cleaning than eating. Use a mug that holds at least 12 ounces — larger is always safer.
- 2
Microwaving past 90 seconds: Microwave ovens vary wildly in wattage. A 1200-watt microwave can fully cook a mug cake in 60 seconds flat. Most recipes say 90 seconds as a maximum, not a target. Check at 60 seconds. The cake should look set around the edges with a slightly underdone center — it continues cooking from residual heat for the next two minutes.
- 3
Skipping the rest period: Pulling the mug directly from the microwave and eating immediately gives you a cake that is still structurally liquid in the center. One to two minutes of resting allows the internal heat to finish the job and the crumb to set. This step costs you nothing and saves the texture.
- 4
Not mixing the dry ingredients first: Cocoa powder clumps aggressively when it hits wet ingredients. If you dump everything in at once, you end up with bitter pockets of dry cocoa in an otherwise finished cake. Thirty seconds of whisking the dry ingredients together before adding the wet ones eliminates this problem entirely.
The Video Reference Library
Want to see it in action? Here are the exact videos we analyzed and combined to build this foolproof recipe translation:
The primary reference for this technique. Clear demonstration of batter consistency, mug fill level, and the visual cues that tell you the cake is done without overcooking.
🛠️ Core Equipment
- 12-ounce microwave-safe ceramic or glass mugMinimum size to prevent overflow. Ceramic and glass heat evenly; thin plastic mugs create hot spots that cook the outside while leaving the center raw.
- ForkBetter than a spoon for breaking up cocoa clumps and producing a smooth, lump-free batter. The tines create shear force that a spoon cannot.
- Oven mittThe mug gets extremely hot — often hotter than the cake itself. Ceramic retains heat like a radiator. Handle it like you would a pot fresh off the stove.
Foolproof Chocolate Mug Cake (90 Seconds to Fudgy Perfection)
🛒 Ingredients
- ✦1/4 cup all-purpose flour
- ✦1/4 cup granulated sugar
- ✦2 tablespoons unsweetened cocoa powder
- ✦1 large egg, room temperature
- ✦3 tablespoons whole milk
- ✦2 tablespoons vegetable oil
- ✦1/4 teaspoon vanilla extract
- ✦1/4 teaspoon baking powder
- ✦pinch of salt
- ✦2 tablespoons chocolate chips
- ✦1 tablespoon butter for topping (optional)
👨🍳 Instructions
01Step 1
Combine the flour, cocoa powder, sugar, baking powder, and salt in a microwave-safe ceramic or glass mug.
02Step 2
Whisk the dry ingredients together with a fork until no lumps of cocoa powder remain, about 30 seconds.
03Step 3
Pour the milk, oil, vanilla extract, and egg into the mug with the dry mixture.
04Step 4
Stir vigorously with a fork for about 45 seconds until the batter is smooth and well combined with no visible streaks of flour.
05Step 5
Fold in the chocolate chips gently using about 10 stirs of your fork.
06Step 6
Check that the mug is only filled to about two-thirds full. If it's higher than that, transfer some batter to a second mug rather than risk overflow.
07Step 7
Microwave at full power for 60 seconds, then check doneness by inserting a toothpick into the center — it should come out with a few moist crumbs, not wet batter.
08Step 8
Remove the mug carefully using an oven mitt. The ceramic will be extremely hot.
09Step 9
Let the cake rest in the mug for 1 to 2 minutes to allow the structure to set and the residual heat to finish the center.
10Step 10
Top with whipped cream, powdered sugar, or a pat of butter if desired, and serve directly from the mug.
Nutrition Per Serving
Estimates based on standard preparation. Adjustments alter macros.
🔄 Substitutions
Instead of All-purpose flour...
Use Whole wheat pastry flour
Slightly nuttier flavor and marginally denser crumb. Higher fiber content. Use the same quantity.
Instead of Granulated sugar...
Use Coconut sugar or monk fruit sweetener (2 tablespoons)
Coconut sugar adds a caramel undertone. Monk fruit sweetener reduces calories to near zero. Both work at a 1:1 ratio by volume.
Instead of Whole milk...
Use Unsweetened almond milk or oat milk
Slightly lighter texture with minimal flavor change. Makes the recipe dairy-free. Oat milk produces a marginally richer result than almond.
Instead of Chocolate chips...
Use Dark chocolate chips (70% cacao or higher)
More intense chocolate flavor with a slight bitterness. Better antioxidant profile. Reduces added sugar in the finished cake.
🧊 Storage & Reheating
In the Fridge
Mug cake is a single-serving recipe designed to be eaten immediately. If you must store it, cover the mug with plastic wrap and refrigerate for up to 1 day — texture degrades significantly.
In the Freezer
Not recommended. The crumb structure breaks down completely on thawing and reheating.
Reheating Rules
If reheating from the fridge, microwave for 15-20 seconds only. Any longer and the egg proteins tighten and turn the cake rubbery.
❓ Frequently Asked Questions
Why did my mug cake overflow?
Your mug was too small or too full. The batter should never exceed two-thirds of the mug's capacity before cooking. Use a mug that holds at least 12 ounces. If you only have smaller mugs, split the batter between two.
Why is my mug cake rubbery?
It was overcooked. Microwave heat causes egg proteins to over-tighten when pushed past done, and there is no recovery. Next time, check at 60 seconds and stop the moment the toothpick reads moist crumbs rather than wet batter.
Can I make this without an egg?
Yes. Replace the egg with 3 tablespoons of unsweetened applesauce or a flax egg (1 tablespoon ground flaxseed mixed with 3 tablespoons water, rested for 5 minutes). The texture will be slightly denser and less structured, but it works.
My cake is raw in the center even after 90 seconds. What happened?
Either your microwave is low-wattage (under 800W) or the mug is too thick and insulating the center from heat. Continue in 15-second increments and let it rest fully before cutting in. A lower-wattage microwave may need up to 2 full minutes.
Can I double this recipe?
You can, but do not try to cook a doubled batch in a single mug — it will overflow and cook unevenly. Mix a double batch and divide between two mugs. Cook each separately for best results.
Do I need to grease the mug?
No. The oil in the batter is sufficient to prevent sticking. Greasing a microwave vessel can cause uneven heating. Eat directly from the mug and the cleanup is minimal.

The Science of
Foolproof Chocolate Mug Cake (90 Seconds to Fudgy Perfection)
We turned everything on this page into a beautiful, flour-proof PDF cheat sheet. Print it out, stick it to your fridge, and never mess up your foolproof chocolate mug cake (90 seconds to fudgy perfection) again.
*We'll email you the high-res PDF instantly. No spam, just perfectly cooked meals.
AlmostChefs Editorial Team
We translate the internet's most popular cooking videos into foolproof, beginner-friendly written recipes. We analyze multiple methods, test them in our kitchen, and engineer a single "Master Recipe" that gives you the best possible result with the least possible stress.