Homemade Hawaiian Pizza (Finally Worth the Controversy)
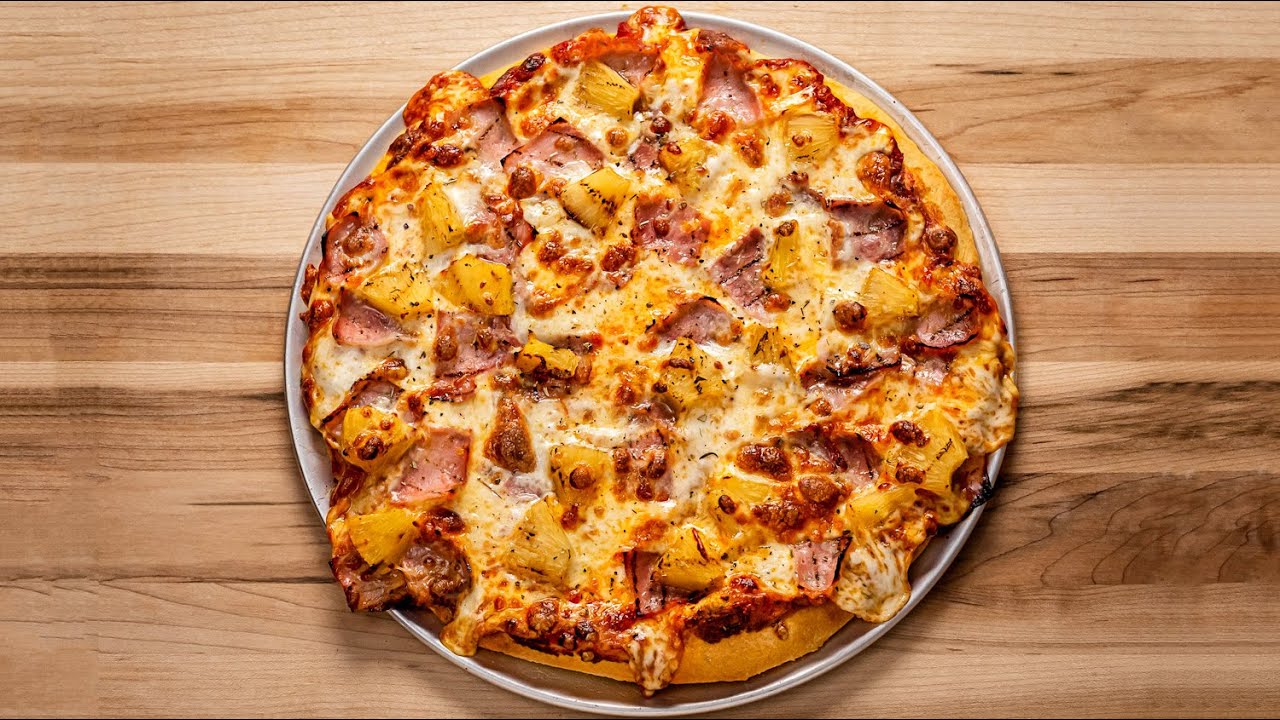
A sweet-savory homemade pizza with lean ham, fresh pineapple, and part-skim mozzarella on a crispy crust. We analyzed the real failures behind soggy Hawaiian pizza and built a method that delivers a golden crust, bubbling cheese, and pineapple that stays put.
“Hawaiian pizza has been relitigated on the internet for a decade. The argument is always about pineapple. The real problem is almost never the pineapple — it's a soggy crust caused by wet fruit, too much sauce, and an oven that wasn't hot enough. Solve those three things and the sweet-savory debate becomes irrelevant. This recipe solves all three.”
Why This Recipe Works
Hawaiian pizza is a structural problem disguised as a taste problem. The pineapple debate is a distraction. In fifteen years of internet arguments about whether fruit belongs on pizza, almost nobody has addressed the actual reason most Hawaiian pizza fails: physics.
The Moisture Problem
Pineapple is roughly 86% water by weight. Canned pineapple packed in syrup adds additional liquid on top of that. When you place wet pineapple on pizza dough and slide it into a 475°F oven, you are introducing a steam generator into the center of your food. That steam has one place to go: down, into the crust. The result is the soggy, gummy center that has convinced an entire generation of home cooks that the ingredient is the problem.
Fresh pineapple chunks, patted dry, behave entirely differently. Without the syrup, they have a lower surface moisture content, which means they roast and caramelize slightly at the edges rather than steaming out. The flavor concentrates rather than dilutes. The crust stays dry. The fruit-and-cheese interaction that people say they hate never actually forms.
This is a fixable problem. Blame the preparation, not the ingredient.
The Heat Architecture
Pizza is cooked from below. The crust needs direct heat to set before the toppings have time to weigh it down and release their moisture. This means two things: maximum oven temperature and correct rack position.
At 475°F with the rack in the lower third, the bottom of the pan gets close to the heating element. The crust sets in the first four minutes. After that, it's building structure, not fighting moisture. A 375°F oven — the temperature many home cooks default to because it feels "safer" — means the crust takes twice as long to set, and the toppings have twelve minutes to leak before anything firms up.
A pizza stone preheated for 30 minutes is the upgrade that makes this almost impossible to get wrong. The thermal mass of the stone delivers intense, even bottom heat the moment the pizza makes contact. The crust doesn't get a chance to go soft.
The Topping Philosophy
Canadian bacon over regular ham is not a small preference — it's a structural choice. Canadian bacon is lean, uniformly thick, and moderately salty. Diced deli ham varies in thickness, contains more sodium, and tends to release more water during cooking. On a pizza, where every drop of liquid goes somewhere undesirable, that distinction matters.
The red bell pepper and red onion aren't standard Hawaiian pizza ingredients, but they do something important: they char at the edges at 475°F, adding a slight bitterness that cuts through the sweetness of the pineapple and the fat of the mozzarella. Without them, the flavor profile is two-note — sweet and salty — and it gets monotonous by the third slice. The vegetables add a third note that makes the whole thing more interesting.
The Sauce Restraint
Half a cup. That's the upper limit for a 12-inch pizza, and it should be spread thin enough that you can almost see the dough beneath it. More sauce means more liquid. More liquid means more steam. More steam means a wet crust.
A no-sugar-added tomato sauce also lets the pineapple sweetness do its job without competition. Regular pizza sauce often contains added sugar — on a pizza where sweetness is already a design element, that sugar compounds into an unpleasant cloying quality. Let the fruit be the fruit.
The olive oil brushed directly on the dough before saucing creates a hydrophobic barrier — a thin layer of fat that resists moisture absorption from the sauce above. It's a restaurant technique that most home recipes omit, and it's the difference between a crust that holds together and one that tears when you pick it up.
Hawaiian pizza, done correctly, is not a compromise. It's contrast cooking: sweet against salt, fat against acid, soft fruit against crisped meat. That combination has been on menus across four continents for sixty years. It works. You just have to let it.
Where Beginners Mess This Up
Before we start, read this. These are the 4 reasons your homemade hawaiian pizza (finally worth the controversy) will fail:
- 1
Using canned pineapple straight from the can: Canned pineapple packed in syrup carries an enormous amount of liquid. The moment it hits a hot oven, that liquid steams out into your pizza, turning the crust from crisp to wet cardboard in minutes. Fresh pineapple chunks, patted thoroughly dry with paper towels, have far less liquid and a cleaner, less cloying flavor. This is the single most important prep step in the recipe.
- 2
Cold oven or wrong rack position: Pizza needs blast heat from below. A 475°F oven with the rack in the lower third gives the bottom of the crust the direct heat it needs to set before the toppings weigh it down. A moderate oven at 375°F produces pale, doughy results that no topping combination can save.
- 3
Too much sauce: Half a cup of tomato sauce for a 12-inch pizza is the upper limit. More than that and you're adding moisture that competes with the cheese and pineapple for evaporation during baking. Thin, even layer — you should be able to see the dough through it.
- 4
Overloading toppings: The temptation is to pile on. The result is steaming rather than baking — toppings sweat onto the cheese, which never properly melts, and the crust never crisps. Spread toppings in a single, even layer. Every ingredient should have direct contact with heat.
The Video Reference Library
Want to see it in action? Here are the exact videos we analyzed and combined to build this foolproof recipe translation:
The source video for this recipe. Clear breakdown of the stretching technique and topping distribution that prevents the classic soggy-center failure.
🛠️ Core Equipment
- Pizza pan or heavy baking sheetA dark, heavy pan absorbs and holds heat better than a light sheet pan, giving you a crisper bottom crust. A [pizza stone](/kitchen-gear/review/pizza-stone) is the upgrade — preheat it in the oven for 30 minutes before sliding the pizza on.
- Paper towelsFor patting the pineapple dry. Non-negotiable. A damp topping is the enemy of a crisp crust. Press firmly and repeat until the paper towel comes away nearly dry.
- Pastry brush or spoonFor applying the olive oil to the dough surface before saucing. A thin, even oil layer creates a moisture barrier between the sauce and the dough, protecting crust integrity.
Homemade Hawaiian Pizza (Finally Worth the Controversy)
🛒 Ingredients
- ✦1 pound pizza dough (store-bought or homemade)
- ✦1/2 cup tomato sauce (no added sugar)
- ✦2 cups part-skim mozzarella cheese, shredded
- ✦6 ounces lean ham or Canadian bacon, diced into small cubes
- ✦1.5 cups fresh pineapple chunks, patted thoroughly dry
- ✦1 medium red bell pepper, diced
- ✦1/4 cup red onion, thinly sliced
- ✦2 tablespoons extra virgin olive oil, divided
- ✦1 teaspoon dried oregano
- ✦1/2 teaspoon garlic powder
- ✦1/4 teaspoon black pepper
- ✦1/4 teaspoon sea salt
- ✦1 tablespoon fresh basil, chopped (optional garnish)
👨🍳 Instructions
01Step 1
Preheat your oven to 475°F and position the rack in the lower third of the oven.
02Step 2
Pat the fresh pineapple chunks firmly with paper towels until the towel comes away nearly dry. Set aside.
03Step 3
Stretch the pizza dough into a 12-inch circle on a lightly oiled pizza pan or baking sheet, working gently from the center outward.
04Step 4
Brush the entire dough surface with 1 tablespoon of olive oil, coating evenly to the edges.
05Step 5
Spread the tomato sauce in an even, thin layer across the dough, leaving about 1/2 inch around the edges for the crust.
06Step 6
Sprinkle oregano, garlic powder, and half the salt and pepper over the sauce.
07Step 7
Distribute the shredded mozzarella evenly across the sauce, using approximately 1.5 cups — reserve a small handful for the final top.
08Step 8
Scatter the diced ham across the cheese in an even single layer.
09Step 9
Arrange the dried pineapple chunks across the pizza, pressing each piece lightly so it doesn't shift during baking.
10Step 10
Distribute the diced red bell pepper and sliced red onion evenly over the top. Scatter the remaining mozzarella.
11Step 11
Drizzle the remaining tablespoon of olive oil over all toppings. Sprinkle remaining salt and pepper.
12Step 12
Bake for 12-15 minutes, until the crust is golden brown and the cheese is bubbling at the edges with light browning on top.
13Step 13
Remove from the oven and rest for 2 minutes before slicing. Garnish with fresh basil if desired. Cut into 8 slices and serve immediately.
Nutrition Per Serving
Estimates based on standard preparation. Adjustments alter macros.
🔄 Substitutions
Instead of Regular mozzarella...
Use Part-skim or low-fat mozzarella
Slightly less rich but still melts well and saves about 30 calories per serving. Don't use fat-free — it doesn't melt properly and turns rubbery.
Instead of Traditional pizza dough...
Use Whole wheat or cauliflower crust
Whole wheat adds a nutty flavor and more fiber. Cauliflower crust needs to be pre-baked for 10 minutes before topping to prevent sogginess — it carries even more moisture than pineapple.
Instead of Canned pineapple in syrup...
Use Fresh pineapple chunks, patted dry
Cleaner flavor, firmer crust, less residual sweetness. The syrup from canned pineapple soaks directly into the cheese and sauce layer. Fresh is not a suggestion — it's a structural upgrade.
Instead of Regular ham...
Use Canadian bacon or nitrate-free ham
Leaner protein with a cleaner flavor profile. Nitrate-free options are widely available at most grocery stores and pair better with the fresh pineapple's brightness.
🧊 Storage & Reheating
In the Fridge
Store leftover slices in an airtight container for up to 3 days. Stack with parchment paper between slices to prevent sticking.
In the Freezer
Freeze individual slices on a baking sheet until solid, then transfer to freezer bags for up to 2 months. Thaw at room temperature for 20 minutes before reheating.
Reheating Rules
Reheat in a dry skillet over medium heat, covered, for 3-4 minutes. The bottom crisps up and the cheese re-melts without the sogginess that microwave reheating guarantees.
❓ Frequently Asked Questions
Why does my Hawaiian pizza always have a soggy crust?
Almost always the pineapple. Canned pineapple in syrup holds a tremendous amount of liquid that releases during baking and soaks into the crust from above. Use fresh pineapple, pat it thoroughly dry, and your crust will hold. A too-cool oven and overloaded toppings are the other two culprits.
Can I use store-bought pizza dough?
Yes, and it works well. Let it come to room temperature for 30 minutes before stretching — cold dough resists and tears. Work from the center outward with your hands. Never use a rolling pin, which compresses the air out of the dough and produces a dense, cracker-like crust.
Does pineapple actually belong on pizza?
The flavor combination — sweet fruit, salty cured meat, fatty melted cheese, acidic tomato — is texbook contrast cooking. It works for the same reason a fruit chutney works with pork or mango works with fish. The controversy is cultural, not culinary.
How do I get the cheese to brown without burning the crust?
Lower rack position and the right temperature. At 475°F on the lower third of the oven, the crust gets direct heat from below while the cheese gets ambient heat from above. If your cheese browns before the crust is done, your oven temperature is uneven — rotate the pan 180 degrees halfway through.
Can I make this pizza ahead of time?
You can prep all the toppings ahead and store them separately in the fridge for up to a day. Don't assemble the pizza until you're ready to bake — sauced dough sitting at room temperature gets sticky and difficult to work with, and pre-assembled pizzas develop moisture at the sauce-dough interface.
What's the best way to cut pizza cleanly?
A [pizza wheel](/kitchen-gear/review/pizza-wheel) with a sharp blade, applied with a single decisive pass. Rocking back and forth drags the toppings and smears the cheese. Let the pizza rest 2 minutes after the oven so the cheese has time to firm up slightly — cutting immediately pulls everything off with it.

The Science of
Homemade Hawaiian Pizza (Finally Worth the Controversy)
We turned everything on this page into a beautiful, flour-proof PDF cheat sheet. Print it out, stick it to your fridge, and never mess up your homemade hawaiian pizza (finally worth the controversy) again.
*We'll email you the high-res PDF instantly. No spam, just perfectly cooked meals.
AlmostChefs Editorial Team
We translate the internet's most popular cooking videos into foolproof, beginner-friendly written recipes. We analyze multiple methods, test them in our kitchen, and engineer a single "Master Recipe" that gives you the best possible result with the least possible stress.