Perfect Garlic Butter Shrimp (Ready in 20 Minutes)
Succulent shrimp in a luxurious garlic-infused butter sauce with bright lemon and subtle heat. We broke down the technique behind every restaurant version to build one foolproof 20-minute method that delivers perfectly pink, tender shrimp every time — no rubbery disasters.
“Most garlic butter shrimp recipes fail at the same two points: wet shrimp that steam instead of sear, and garlic that burns into bitterness before the sauce comes together. The difference between rubbery gray shrimp and the kind that snap when you bite them is about 90 seconds of attention and one paper towel. We analyzed the most-watched YouTube methods to find what the restaurants actually do — and it's simpler than you think.”
Why This Recipe Works
Garlic butter shrimp has no business being this good for how fast it comes together. It is 20 minutes from cold pan to table, and yet when it's executed correctly, it produces a sauce complex enough that people ask what restaurant you ordered from. The reason it works — and the reason most home versions fail — comes down to one principle: you are not cooking shrimp. You are building a sauce. The shrimp are just the excuse.
The Dry Sear Problem
Shrimp are roughly 78% water by weight. When you cook them straight from the package or after a quick rinse, that surface moisture hits the hot pan and immediately converts to steam. Instead of making contact with the metal and browning, the shrimp float in a micro-cloud of their own vapor and cook gray. They taste fine. They don't taste great. And the fond — the browned bits on the pan surface that are the entire foundation of the sauce — never develops.
The paper towel step is not a suggestion. Press each shrimp on both sides until the towel comes away nearly dry. If you bought shrimp stored in liquid, do this twice. The 90 seconds this adds to prep translates directly into better color, better texture, and a richer sauce because you'll actually have something worth deglazing.
Heat Architecture
This recipe asks you to use high heat for the shrimp and medium heat for the sauce, and the sequence is not arbitrary. High heat for searing creates the Maillard browning that gives the shrimp their exterior character and deposits fond on the pan. Medium heat for the garlic prevents it from burning — because garlic contains simple sugars that caramelize and then scorch rapidly at temperatures above 300°F.
The transition between these two phases is the critical moment: after the shrimp come out, the pan is blazing hot. You add butter, which cools it immediately through the energy required to melt the fat. Then you reduce to medium. Then you add garlic. This sequencing is what prevents the single most common garlic butter shrimp failure — bitter, acrid sauce from overcooked garlic.
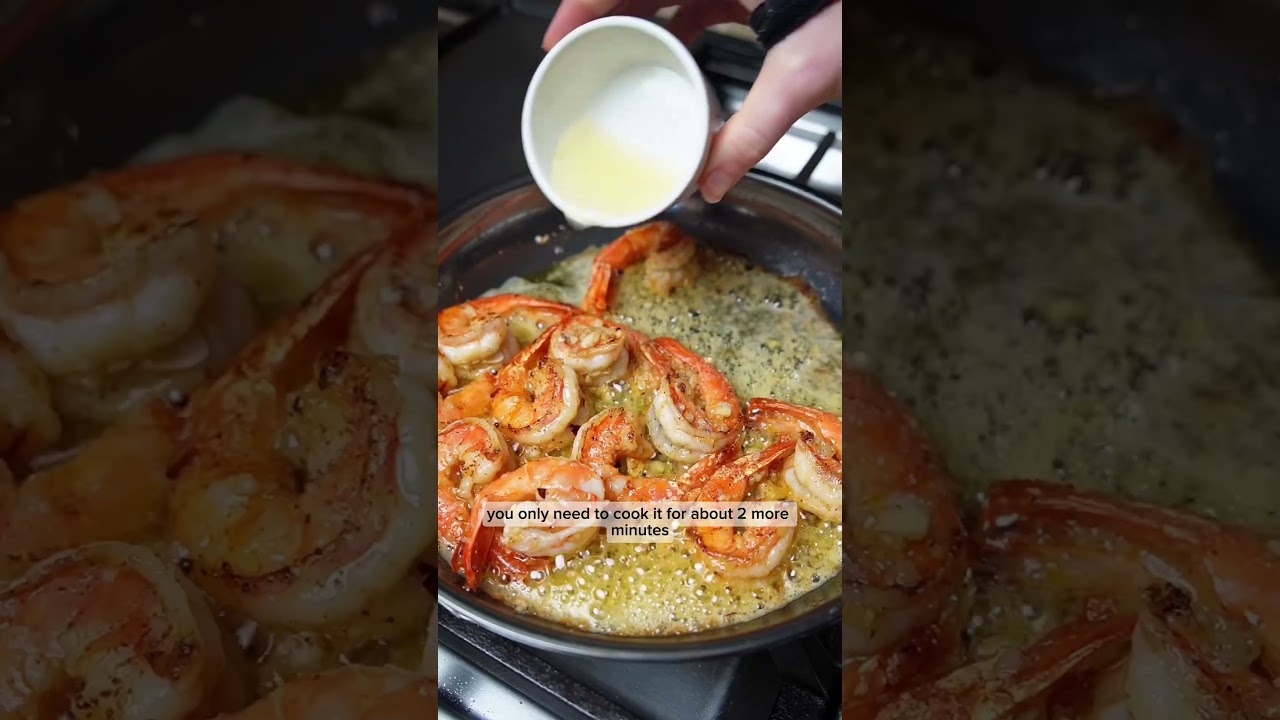
The Sauce Is the Point
White wine goes in after the garlic because its water content immediately drops the pan temperature and its acid lifts the fond. The 1-minute simmer cooks off the alcohol while the sugars in the wine concentrate slightly, adding body. When the shrimp return to the pan with their accumulated juices, those juices further enrich the sauce with the proteins and gelatin that cooked out during the initial sear.
The result is not just butter-and-garlic — it's butter, garlic, fond, wine, shrimp gelatin, lemon, and Worcestershire in a loose emulsion that coats everything it touches. This is why the recipe says to serve immediately: the emulsion is unstable at room temperature. The butter will separate as it cools, and you'll be left with a greasy pool instead of a cohesive sauce. Get it to the table while it's still moving.
A large stainless steel or cast iron skillet is the non-negotiable equipment here. The pan must hold enough heat when the shrimp land to maintain a true sear rather than dropping to steam temperature. If you're working with a small or thin pan, the shrimp will crowd each other and the temperature will collapse. Cook in batches. Use the right pan. The 20-minute promise is contingent on both.
Where Beginners Mess This Up
Before we start, read this. These are the 4 reasons your perfect garlic butter shrimp (ready in 20 minutes) will fail:
- 1
Not drying the shrimp before cooking: Shrimp hold significant surface moisture. When wet shrimp hit a hot pan, they steam in their own liquid instead of searing against the metal. You get pale, soft, textureless shrimp and a watery sauce. Pat each shrimp completely dry with paper towels before it touches the pan. This is the single step that separates restaurant shrimp from home shrimp.
- 2
Burning the garlic: Garlic goes from fragrant to acrid in about 15 seconds at the wrong temperature. You must reduce the heat to medium before adding garlic to the butter, and you must watch it constantly. The moment it smells fragrant and nutty — around 30 seconds — add the wine immediately to drop the pan temperature. Browned garlic is a mistake. Black garlic is a disaster.
- 3
Overcrowding the pan: When shrimp overlap, the pan temperature drops and they steam instead of sear. Cook in two batches, giving each shrimp its own real estate on the pan surface. Yes, this takes an extra two minutes. No, it is not optional if you want any color on the exterior.
- 4
Overcooking past the curl: Shrimp are done when they curl into a loose C-shape and turn opaque pink. If they curl into a tight O, they are overcooked and will be rubbery. The entire cook time per side is 1-2 minutes. Set a timer. These are not pork chops — they do not benefit from extra time on heat.
The Video Reference Library
Want to see it in action? Here are the exact videos we analyzed and combined to build this foolproof recipe translation:
The foundational technique video that nails the dry-sear method and explains exactly what color and shape you're looking for before pulling the shrimp off heat. Essential watch before your first attempt.
🛠️ Core Equipment
- Large stainless steel or cast iron skilletYou need a pan that retains high heat when the shrimp land. Nonstick pans don't get hot enough and won't give you any sear. Stainless or cast iron holds temperature and promotes the Maillard browning that makes the sauce taste like a restaurant made it.
- Paper towelsNon-negotiable for drying the shrimp. Every drop of surface moisture on the shrimp is the enemy of browning. Use generously.
- Wooden spoon or silicone spatulaFor deglazing the pan after searing. You want to scrape up every browned bit from the bottom — that's concentrated flavor. Metal utensils can scratch stainless steel and damage cast iron seasoning.
- TongsFlip shrimp individually with tongs for precise control. A spatula can jostle multiple shrimp at once and knock them off their sear before they're ready.
Perfect Garlic Butter Shrimp (Ready in 20 Minutes)
🛒 Ingredients
- ✦1.25 pounds large shrimp, peeled and deveined
- ✦5 tablespoons unsalted butter, divided
- ✦2 tablespoons extra-virgin olive oil
- ✦6 cloves garlic, minced
- ✦1/3 cup dry white wine or dry vermouth
- ✦3 tablespoons fresh lemon juice
- ✦1/2 teaspoon kosher salt
- ✦1/4 teaspoon freshly ground black pepper
- ✦1/4 teaspoon red pepper flakes
- ✦1/4 teaspoon paprika
- ✦1/2 teaspoon Worcestershire sauce
- ✦3 tablespoons fresh parsley, finely chopped
- ✦1 tablespoon fresh thyme leaves, optional
- ✦Lemon wedges for serving
👨🍳 Instructions
01Step 1
Pat the shrimp thoroughly dry using paper towels, pressing firmly on both sides.
02Step 2
Heat the olive oil in a large skillet over medium-high heat until it shimmers and moves easily across the pan, about 2 minutes.
03Step 3
Working in a single layer, add half the shrimp to the hot skillet and resist moving them for 1-2 minutes until the undersides turn golden and opaque.
04Step 4
Flip each shrimp carefully and cook the second side for another minute until the entire body shifts from translucent gray to coral pink. Transfer to a clean plate.
05Step 5
Repeat with the remaining shrimp, adding a tablespoon of butter to the pan if needed to prevent sticking.
06Step 6
Reduce the heat to medium. Add the remaining 4 tablespoons of butter to the empty skillet, swirling to coat the surface as it melts.
07Step 7
Add the minced garlic and let it toast gently in the foaming butter for about 30 seconds until fragrant but not browned.
08Step 8
Pour in the white wine and use a wooden spoon to scrape up any browned bits from the bottom of the pan.
09Step 9
Simmer the wine mixture for about 1 minute to slightly reduce and cook off the alcohol.
10Step 10
Return all the cooked shrimp to the skillet along with any accumulated juices from the plate.
11Step 11
Add the lemon juice, salt, black pepper, red pepper flakes, paprika, and Worcestershire sauce. Stir gently to coat the shrimp evenly.
12Step 12
Toss everything together over heat for 30 seconds to marry the flavors. Do not go longer — the shrimp are already cooked.
13Step 13
Remove from heat. Stir in fresh parsley and thyme if using. Adjust seasoning to taste.
14Step 14
Serve immediately in shallow bowls with plenty of pan sauce spooned over top and lemon wedges on the side.
Nutrition Per Serving
Estimates based on standard preparation. Adjustments alter macros.
🔄 Substitutions
Instead of Unsalted butter...
Use 3 tablespoons unsalted butter plus 2 tablespoons avocado oil
Reduces saturated fat while maintaining richness. Avocado oil has a higher smoke point, which actually makes the searing phase cleaner. Slight loss of pure buttery intensity.
Instead of Dry white wine...
Use Low-sodium vegetable or seafood stock
Eliminates alcohol entirely. The sauce becomes slightly more savory and less acidic. Add an extra half tablespoon of lemon juice to compensate for the brightness you lose.
Instead of Fresh parsley...
Use Fresh basil or chives
Basil skews the flavor profile Italian. Chives are milder and more onion-forward. Either works. Dried herbs do not — the finish needs fresh.
Instead of Extra-virgin olive oil...
Use Avocado oil with a few drops of sesame oil added off-heat
Avocado oil handles higher heat better. The sesame oil, added after cooking, replaces the grassy notes of olive oil with a subtle nuttiness. Do not cook with sesame oil — heat destroys it.
🧊 Storage & Reheating
In the Fridge
Store in an airtight container for up to 2 days. The sauce firms up as it cools — that's the butter solidifying, not spoilage.
In the Freezer
Not recommended. Shrimp texture degrades significantly after a second freeze-thaw cycle. Make only what you'll eat.
Reheating Rules
Warm gently in a skillet over low heat with a splash of water or stock to loosen the sauce. Microwave overheats the exterior and turns the shrimp rubbery — avoid entirely.
❓ Frequently Asked Questions
Why are my shrimp rubbery?
You overcooked them. Shrimp are done in 1-2 minutes per side. When they curl into a tight O-shape, they are already past the point of no return. Pull them the moment they form a loose C and turn opaque — carryover heat finishes the job.
Do I need to use wine?
No. Substitute an equal amount of low-sodium seafood or vegetable stock and increase the lemon juice slightly. The sauce will be more savory and less acidic but entirely functional.
Can I use frozen shrimp?
Yes — and honestly, most shrimp labeled 'fresh' at the seafood counter were previously frozen anyway. Thaw overnight in the fridge, then dry extremely well before cooking. Never thaw in hot water; it begins cooking the exterior.
Why did my garlic turn bitter?
It burned. Garlic in hot butter goes from golden to scorched in under a minute. You must reduce the heat to medium before adding garlic and add the wine the moment it turns fragrant. If your garlic is dark brown, start the sauce over — bitter garlic doesn't cook out.
Can I make this dairy-free?
Yes. Use a high-quality vegan butter (Miyoko's or Violife perform best here) and replace the butter-wine sauce ratios identically. The sauce will taste slightly different but will still emulsify and coat the shrimp properly.
What's the best pan for this recipe?
Stainless steel or cast iron. Both retain high heat when the shrimp land, which is what creates the sear. Nonstick pans don't get hot enough and won't give you the browning that makes the sauce taste restaurant-quality. If your pan isn't smoking hot before the shrimp go in, switch pans.

The Science of
Perfect Garlic Butter Shrimp (Ready in 20 Minutes)
We turned everything on this page into a beautiful, flour-proof PDF cheat sheet. Print it out, stick it to your fridge, and never mess up your perfect garlic butter shrimp (ready in 20 minutes) again.
*We'll email you the high-res PDF instantly. No spam, just perfectly cooked meals.
AlmostChefs Editorial Team
We translate the internet's most popular cooking videos into foolproof, beginner-friendly written recipes. We analyze multiple methods, test them in our kitchen, and engineer a single "Master Recipe" that gives you the best possible result with the least possible stress.