Crispy Falafel That Actually Stays Together (No Canned Chickpeas)
Homemade falafel made from soaked dried chickpeas blended with fresh herbs and warm spices — deep-fried until golden and crackling, with a fluffy herb-flecked interior. We broke down what separates street-stall falafel from the stuff that falls apart in the fryer so you don't have to.
“Most falafel fails before it ever hits the oil. The culprit is almost always canned chickpeas — pre-cooked, waterlogged, and completely incapable of holding structure at frying temperature. Authentic falafel uses raw soaked chickpeas, and the difference is not subtle. The texture, the crunch, the way the interior stays fluffy while the outside cracks — none of that happens with canned. Start here or don't start at all.”
Why This Recipe Works
Falafel is one of those dishes that looks deceptively simple — chickpeas, herbs, spices, hot oil — until you make it wrong and wonder what happened. The answer is almost always the chickpeas. Not the spice blend, not the herb ratio, not the frying temperature. The chickpeas.
The Canned Chickpea Problem
Every recipe that tells you to use canned chickpeas is lying to you about what falafel actually is. Canned chickpeas are fully cooked. Their starches are already gelatinized, their cell walls are softened by the canning process, and they contain far more moisture than their dried counterparts. When you blend cooked chickpeas and drop them into hot oil, there is no raw starch left to bind the mixture under heat. The steam generated by the trapped moisture has nowhere to go. The result is falafel that either explodes in the oil or emerges as a dense, gummy mass with no crunch and no structure.
Dried chickpeas soaked overnight are a fundamentally different ingredient. The soaking hydrates the chickpea evenly without cooking it, leaving the raw starch architecture intact. When those raw starches hit 350°F oil, they gelatinize rapidly and set into a firm, porous matrix — crispy outside, fluffy and slightly grainy inside. This is not a subtle difference. It is the entire texture of falafel.
The Texture Imperative
The food processor step is where most home cooks make their second mistake. The target is coarse — rough breadcrumb texture, visible herb flecks, small irregular chunks throughout. The moment the mixture becomes smooth or paste-like, you have lost the game. Smooth paste produces dense, chewy falafel with no internal variation. The rough grind creates the distinct layered texture: a crackling fried exterior giving way to a fluffy, irregular, herb-studded interior.
Pulse in short bursts. Stop and look. Stop and look. The instinct is to keep going until it looks "done," but done is the problem. Four or five pulses past coarse breadcrumbs and you have hummus with baking powder in it.
Cold Is Structural
The two-hour refrigeration step is not about flavor — though flavor improves. It's about structure. The cold firms the starch network and allows any surface moisture to distribute evenly through the mixture. A warm or room-temperature mixture will hold its shape in your palm but collapse the second it contacts hot oil, because the heat differential causes the exterior to contract before the interior sets.
The fridge rest is the single most skipped step in falafel recipes, and it's responsible for the single most common failure. Make the mixture the night before. Fry it the next evening. The difference in cohesion is immediately apparent.
Oil Temperature Is Non-Negotiable
Three hundred fifty to 375°F is the window. Below 350°F and the falafel absorbs oil rather than searing it off — the exterior turns greasy and soft, and the interior stays dense. Above 375°F and the exterior burns before the center has time to set. A Dutch oven holds temperature better than any other vessel because its mass acts as a thermal battery, absorbing the cold shock of each new batch and recovering quickly.
Work in small batches. Four or five pieces at a time. Let the oil come back to temperature between rounds. Overcrowding is what turns a confident frying session into a pot of oil-soaked wreckage.
The Herb Question
Fresh parsley and cilantro are load-bearing ingredients, not garnish. They contribute moisture, brightness, and the distinctive green interior color that signals a properly made falafel. Dried herbs do not substitute. They are flavorless dust by comparison, and they do nothing for the internal texture or color. If you cannot source fresh cilantro, fresh dill is the correct swap — not dried cilantro. The rule is fresh or nothing.
This is a dish with very few ingredients. Each one is doing structural or flavor work. Substituting dried herbs for fresh is like substituting flour for butter and expecting the same result.
Where Beginners Mess This Up
Before we start, read this. These are the 4 reasons your crispy falafel that actually stays together (no canned chickpeas) will fail:
- 1
Using canned chickpeas: Canned chickpeas have already been cooked, which means their starches are fully gelatinized and their cell structure is soft. When you blend and fry them, the excess moisture turns to steam and the falafel either explodes in the oil or falls apart on contact. Dried chickpeas, soaked overnight in cold water, retain raw starch that binds the mixture and firms up properly in hot oil.
- 2
Over-processing the mixture into a paste: The food processor should stop at coarse breadcrumbs — small pea-sized chunks still visible throughout. A smooth paste produces dense, gummy falafel with no interior texture. The irregular coarse grind is what creates the characteristic fluffy, slightly grainy center surrounded by a shatteringly crispy shell.
- 3
Skipping the refrigeration step: Two hours minimum in the fridge is not optional. The cold rest firms up the mixture so it holds its shape during forming and doesn't disintegrate the second it hits hot oil. It also lets the flavors meld — the difference between raw-tasting spice and integrated, rounded depth. Overnight rest produces noticeably better results.
- 4
Overcrowding the oil: Adding too many falafel at once drops the oil temperature below 350°F. Below that threshold, the exterior absorbs oil instead of searing it off — and you get greasy, soft falafel instead of crispy ones. Work in batches of four or five and let the oil recover between each batch.
The Video Reference Library
Want to see it in action? Here are the exact videos we analyzed and combined to build this foolproof recipe translation:
The foundational walkthrough that covers the soaked chickpea technique, proper pulse texture, and frying temperature management. Essential viewing before your first batch.
🛠️ Core Equipment
- Food processorThe only tool that creates the right coarse texture. A blender over-processes into paste. Manually chopping is tedious and uneven. Pulse in short bursts and stop often to check the texture.
- Heavy-bottomed pot or Dutch ovenMaintains stable oil temperature across the entire base. A thin pot creates hot spots that scorch the outside while leaving the center raw. A [Dutch oven](/kitchen-gear/review/dutch-oven) is the ideal vessel — heavy walls, deep capacity, even heat.
- Instant-read kitchen thermometerOil temperature is the single most controllable variable in frying. 350–375°F is the target window. Too low and the falafel absorbs fat. Too high and the exterior burns before the center sets. Don't guess.
- Falafel scoop or small ice cream scoopConsistent portion size means consistent cook time. Uneven balls mean some are overdone while others are still raw in the center. A [cookie scoop](/kitchen-gear/review/cookie-scoop) works equally well.
Crispy Falafel That Actually Stays Together (No Canned Chickpeas)
🛒 Ingredients
- ✦1 cup dried chickpeas, soaked overnight (not cooked)
- ✦½ cup fresh flat-leaf parsley, finely chopped
- ✦¼ cup fresh cilantro, finely chopped
- ✦½ medium yellow onion, minced
- ✦4 garlic cloves, minced
- ✦1½ teaspoons ground cumin
- ✦1 teaspoon ground coriander
- ✦½ teaspoon baking powder
- ✦¼ teaspoon cayenne pepper
- ✦¼ teaspoon black pepper
- ✦¾ teaspoon fine sea salt
- ✦3 tablespoons all-purpose flour
- ✦3 cups vegetable oil for frying (or cooking spray for baking)
- ✦2 tablespoons water, if needed for binding
👨🍳 Instructions
01Step 1
Drain the soaked chickpeas and thoroughly pat them dry with a clean kitchen towel, removing as much surface moisture as possible.
02Step 2
Combine the dried chickpeas, parsley, cilantro, minced onion, and minced garlic in a food processor.
03Step 3
Pulse until the mixture resembles coarse breadcrumbs with small pea-sized pieces still visible. Do not over-process into a smooth paste.
04Step 4
Transfer the mixture to a bowl and fold in the cumin, coriander, baking powder, cayenne, black pepper, and salt until evenly distributed.
05Step 5
Sprinkle the flour over the mixture and fold gently to combine. Add water one tablespoon at a time only if the mixture won't hold together when squeezed in your palm.
06Step 6
Cover the bowl with plastic wrap and refrigerate for at least 2 hours, or overnight for best results.
07Step 7
Remove from the refrigerator and let sit for 5 minutes at room temperature before forming.
08Step 8
Heat the vegetable oil in a heavy-bottomed pot to 350–375°F, monitoring with a kitchen thermometer.
09Step 9
Scoop 1½-tablespoon portions using a falafel scoop or small ice cream scoop, pressing into compact, uniformly sized balls.
10Step 10
Working in batches of 4–5, carefully lower falafel into the hot oil. Fry for 2–3 minutes until deep golden brown, then flip and fry 1–2 minutes more.
11Step 11
Transfer to a paper towel-lined plate immediately after frying.
12Step 12
For baking: Preheat oven to 375°F. Arrange on a parchment-lined baking sheet, spray lightly with oil, bake 10–12 minutes, flip, spray again, and bake another 10–12 minutes until golden.
13Step 13
Serve immediately in pita with tahini sauce, sliced tomatoes, cucumbers, and lettuce — or alongside hummus.
Nutrition Per Serving
Estimates based on standard preparation. Adjustments alter macros.
🔄 Substitutions
Instead of All-purpose flour...
Use Chickpea flour (garbanzo flour)
Slightly earthier flavor with better protein density. Binds equally well. The natural choice if you're already working with chickpeas and want to stay in the same flavor family.
Instead of Vegetable oil (deep frying)...
Use Air-frying with cooking spray
Reduces fat dramatically but the texture trade-off is real — air-fried falafel is crispy but lacks the deep shattering crunch of the fried version. Acceptable compromise, not an equal substitute.
Instead of Ground cumin and coriander...
Use Sumac and ground fennel in equal parts
Shifts the flavor profile from warm and earthy to bright and tangy. A lighter, more herbaceous result. Different, not better or worse — depends on how you're serving them.
Instead of Fresh parsley and cilantro...
Use Fresh dill and mint in equal parts
More Mediterranean-leaning flavor — cooler, brighter, slightly floral. Works particularly well in the baked version.
🧊 Storage & Reheating
In the Fridge
Store cooked falafel in an airtight container for up to 3 days. They will soften — that's unavoidable.
In the Freezer
Freeze uncooked formed falafel on a baking sheet until solid, then transfer to a freezer bag. Fry directly from frozen, adding 1–2 minutes to the cook time. Frozen uncooked falafel keeps for up to 3 months.
Reheating Rules
Re-crisp in a 375°F oven for 8–10 minutes on a wire rack set over a baking sheet. Avoid the microwave — it turns the exterior soft and the center rubbery.
❓ Frequently Asked Questions
Why does my falafel fall apart in the oil?
Almost always one of three causes: you used canned chickpeas (too wet, wrong starch structure), you skipped the refrigeration step (mixture too loose to hold shape under heat), or your oil temperature was too low (exterior never seared, allowing the ball to dissolve). Fix the chickpeas first, then the chill time, then check your oil temp with a thermometer.
Can I use canned chickpeas in an emergency?
Technically yes, but you'll need to compensate heavily. Drain and rinse them, then spread on paper towels and dry for at least 30 minutes. Add an extra tablespoon of flour to the mixture. The texture will still be denser and less crispy than the dried version — but it won't completely fall apart if you've dried them aggressively enough.
How do I know the oil is at the right temperature without a thermometer?
Drop a small piece of the mixture into the oil. If it sinks, the oil is too cold. If it immediately blackens, too hot. If it sinks slightly, then rises to the surface surrounded by a steady, aggressive bubble, you're in the 350–375°F range. A thermometer is still the better answer.
Is baked falafel worth making?
It's a different product. Baked falafel is good — particularly if you oil it generously and use a wire rack so hot air circulates underneath. But it lacks the crunch, the color, and the subtle richness that comes from proper frying. If calories are a concern, baked is a legitimate option. If you want falafel as it's meant to be eaten, fry it.
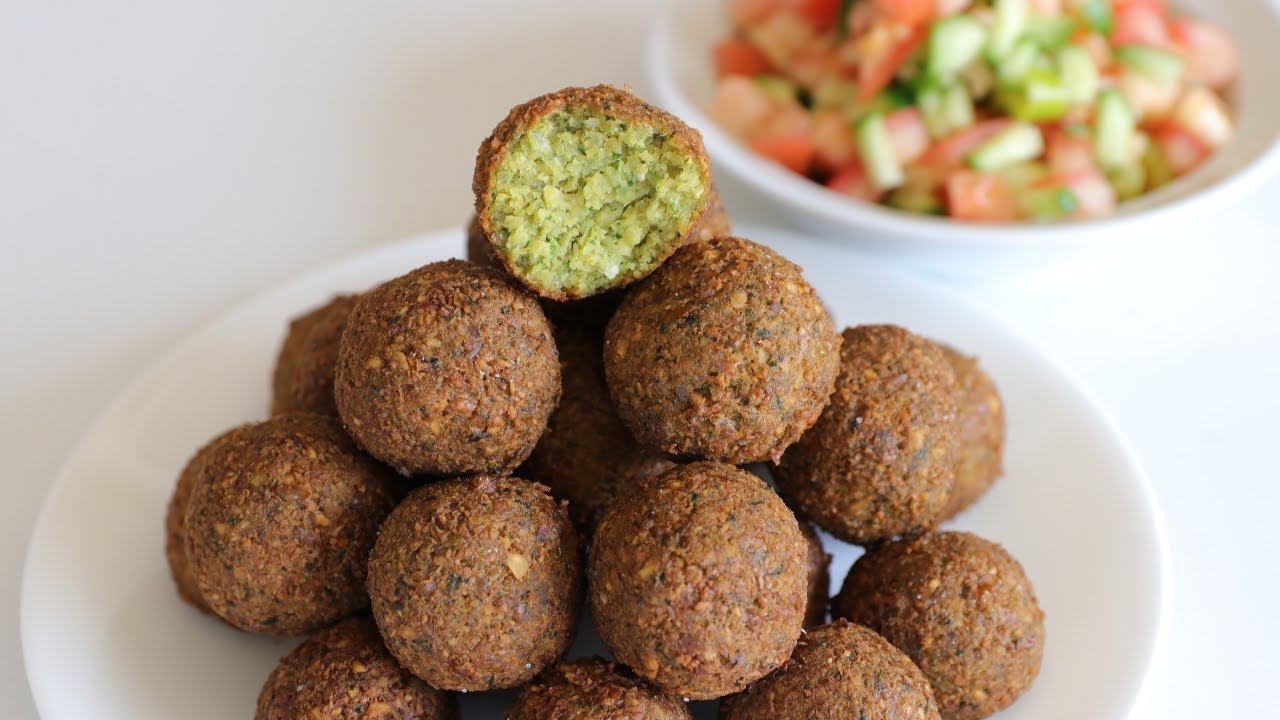
Why is my falafel green inside?
That's exactly what you want. The green interior comes from fresh parsley and cilantro that didn't oxidize during the quick fry time. It means your herbs were fresh, your falafel cooked quickly at the right temperature, and you didn't over-process the mixture. Green interior = success.
Can I make the mixture ahead of time?
Yes — up to 24 hours in the refrigerator before frying. Beyond that, the herbs start to oxidize and the flavors become muted. The formed, uncooked falafel balls also freeze well for up to 3 months if you need further-ahead prep.

The Science of
Crispy Falafel That Actually Stays Together (No Canned Chickpeas)
We turned everything on this page into a beautiful, flour-proof PDF cheat sheet. Print it out, stick it to your fridge, and never mess up your crispy falafel that actually stays together (no canned chickpeas) again.
*We'll email you the high-res PDF instantly. No spam, just perfectly cooked meals.
AlmostChefs Editorial Team
We translate the internet's most popular cooking videos into foolproof, beginner-friendly written recipes. We analyze multiple methods, test them in our kitchen, and engineer a single "Master Recipe" that gives you the best possible result with the least possible stress.