Whole Wheat Dinner Rolls (Soft, Pillowy, and Actually Worth Making)
Homemade dinner rolls with a tender, buttery crumb built on a whole wheat and all-purpose flour blend. Two rises, one pan, twelve rolls that pull apart like a dream. We broke down the most common yeast bread failures so you get it right on the first attempt.
“Most homemade dinner rolls fail in one of two places: the yeast proof or the second rise. Either the yeast never activates and you get dense hockey pucks, or the rolls over-proof and collapse into flat, gummy discs. This recipe removes both failure modes by teaching you exactly what to look for at each stage — so you spend less time guessing and more time pulling apart warm, buttered rolls.”
Why This Recipe Works
Dinner rolls occupy a deceptively simple category of bread. Flour, yeast, milk, butter — four ingredients that every home cook already owns, and yet the failure rate is disproportionately high. The reason is that yeast bread tolerates less improvisation than almost any other recipe. Miss a temperature window by twenty degrees or rush a rise by fifteen minutes and the result is categorically different. Understanding why each step exists is the difference between rolls you're proud of and rolls you apologize for.
The Yeast Foundation
Instant yeast is the right call here, and the proofing step — even though instant yeast technically doesn't require it — is the right call too. Proofing tells you before you invest two hours whether your yeast is alive. Dead yeast is invisible. It looks identical to active yeast and smells the same. Only one test reveals the truth: introduce it to warm sugar water and watch. A foamy bloom within five minutes means you're working with viable culture. No foam means you just saved yourself from a brick.
The milk temperature matters more than most recipes acknowledge. Yeast becomes active around 75°F, works optimally between 95-110°F, and dies above 120°F. The difference between 108°F and 122°F is almost imperceptible to your hand but is the difference between light, airy rolls and compact, chewless ones. An instant-read thermometer removes all ambiguity from this step.
The Whole Wheat Decision
Half a cup of whole wheat in a four-cup recipe is not a health statement. It's a flavor statement. Whole wheat flour contains the bran and germ of the grain — the parts that carry nutty, earthy, slightly mineral notes that straight all-purpose cannot replicate. At this ratio, it contributes enough complexity to taste intentional without changing the roll's texture in any meaningful way. Increase it beyond a cup and the rolls begin to densify as whole wheat's bran cuts through gluten strands like tiny knives. Keep it at a half cup and you get character without compromise.
The Gluten Window
Kneading is where most home bread bakers shortchange themselves. The goal of kneading is to develop gluten — the protein network formed when glutenin and gliadin in flour combine with water and are worked mechanically. This network is what traps carbon dioxide from the yeast, allowing the dough to rise. A weak gluten network can't hold gas, and the rolls deflate in the oven or produce a tight, crumbly crumb.
The windowpane test is the objective measure. Stretch a small piece of dough between your fingers. If it stretches thin enough to be translucent before tearing, your gluten is developed. If it tears immediately, keep kneading. No guesswork, no timer-watching — just a physical test with a binary answer.
The Two-Rise Architecture
The first rise is for flavor. Yeast fermentation produces not just carbon dioxide but alcohol and organic acids — the same compounds that give sourdough its tang and brioche its depth. More fermentation time means more of these compounds, which means more complexity in the finished roll. This is why overnight cold fermentation — retarding the dough in the refrigerator after the first rise — produces noticeably better rolls than a same-day bake.
The second rise is for structure. After shaping, the dough relaxes and re-inflates, producing the final form the roll will hold in the oven. This rise is shorter and more delicate. The dough must be watched, not timed, because over-proofing at this stage exhausts the yeast before the oven heat can set the structure. A roll that over-proofs will have used most of its gas reserves during the rise — when it hits the oven, there's nothing left to push the structure upward and it collapses into a flat, dense disk.
The Finishing Move
Butter on hot rolls is not a garnish. The heat from a freshly baked roll is sufficient to melt the fat immediately and drive it into the surface layer of the crust, transforming what would otherwise be a slightly tough, dry exterior into something glossy and tender. The difference takes ten seconds and costs a tablespoon of butter. It is the single highest-leverage action in this entire recipe. Don't skip it.
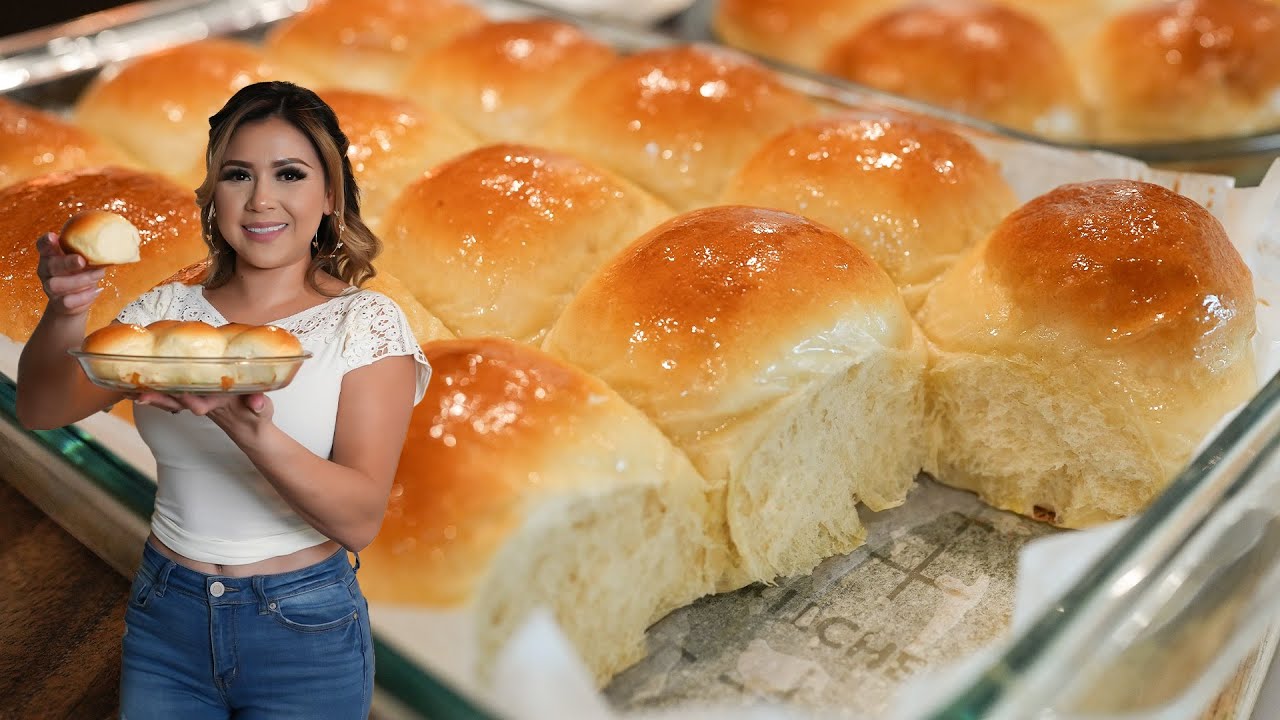
A 9x13 baking dish and tight spacing are the final pieces. Crowded rolls can only rise upward, which produces that tall, pull-apart geometry with pillowy soft sides where the rolls touched each other. This is not a happy accident — it's a deliberate structural choice that every good bakery uses. Space them apart and you get a crust all the way around. Space them together and you get the soft, tearing interior that makes people reach for a second roll before the first one is finished.
Where Beginners Mess This Up
Before we start, read this. These are the 4 reasons your whole wheat dinner rolls (soft, pillowy, and actually worth making) will fail:
- 1
Killing the yeast with milk that's too hot: Yeast dies above 120°F. Milk that feels 'comfortably warm' on your wrist — around 110°F — is the target. Too cool and fermentation stalls; too hot and you kill the culture entirely. If you don't own a thermometer, heat the milk until just barely steaming, then let it sit 2 minutes before adding the yeast.
- 2
Under-kneading the dough: Eight minutes by hand is not a suggestion. Gluten development is what gives dinner rolls their structure and soft chew. Under-kneaded dough tears instead of stretching, produces rolls that crumble apart, and rises unevenly. The dough is ready when it passes the windowpane test: stretch a small piece thin enough to see light through without it tearing.
- 3
Over-proofing the second rise: Puffy is good. Collapsed is not. The second rise is done when a light poke leaves an indent that springs back halfway in about 3 seconds. If the indent doesn't spring back at all, the dough has over-proofed and you'll get dense, gummy interiors after baking. Watch the dough, not the clock.
- 4
Skipping the butter finish: Brushing melted butter on the rolls immediately out of the oven is not optional if you want that glossy, tender crust. The residual heat melts the butter into the surface of the roll, softening the crust and adding richness. Skip it and you get a dry, crackly exterior that stales faster.
The Video Reference Library
Want to see it in action? Here are the exact videos we analyzed and combined to build this foolproof recipe translation:
The primary video reference for this recipe. Clear demonstration of dough consistency, shaping technique, and the visual cues for both rise stages.
🛠️ Core Equipment
- Stand mixer with dough hookMakes the 6-7 minute knead effortless and consistent. By hand works fine, but a stand mixer removes the guesswork about whether you've developed enough gluten. The dough should pull cleanly from the sides of the bowl when it's ready.
- 9x13-inch baking dishThe tight spacing in a 9x13 forces the rolls to rise upward instead of outward, producing tall, pull-apart rolls with soft sides. Use a dark pan for a slightly deeper golden bottom, or a light pan for a paler, softer crust.
- Instant-read thermometerTakes the guesswork out of milk temperature. One bad yeast proof wastes two hours. A thermometer costs less than the ingredients you'll throw away from a failed batch.
- Pastry brushFor the egg wash before baking and the butter finish after. Even coating matters — patchy egg wash produces uneven browning that looks amateurish on an otherwise beautiful roll.
Whole Wheat Dinner Rolls (Soft, Pillowy, and Actually Worth Making)
🛒 Ingredients
- ✦3.5 cups all-purpose flour
- ✦0.5 cup whole wheat flour
- ✦1 cup warm whole milk, 110°F
- ✦3 tablespoons unsalted butter, softened
- ✦2.25 teaspoons instant yeast (one 0.25 oz packet)
- ✦2 tablespoons honey
- ✦1.25 teaspoons fine sea salt
- ✦1 large egg
- ✦2 tablespoons vegetable oil
- ✦1 egg mixed with 1 tablespoon water, for egg wash
- ✦2 tablespoons melted butter, for finishing
- ✦1 teaspoon sesame seeds or poppy seeds, optional
👨🍳 Instructions
01Step 1
Combine the warm milk, honey, and instant yeast in a large mixing bowl. Let sit for 5 minutes until foamy.
02Step 2
Add the softened butter, egg, and vegetable oil to the yeast mixture. Stir until well incorporated.
03Step 3
Whisk together the all-purpose flour, whole wheat flour, and sea salt in a separate bowl.
04Step 4
Pour the dry ingredients into the wet mixture and stir until a shaggy dough forms.
05Step 5
Knead by hand for 8-10 minutes on a lightly floured surface, or use a stand mixer with a dough hook for 6-7 minutes, until smooth, elastic, and passing the windowpane test.
06Step 6
Shape the dough into a ball and place in a lightly oiled bowl, turning once to coat. Cover with a damp towel or plastic wrap.
07Step 7
Let rise at room temperature for 1-2 hours until doubled in size.
08Step 8
Gently punch down the dough to release excess gas, then divide into 12 equal portions.
09Step 9
Roll each portion into a smooth ball between your palms. Arrange in a greased 9x13-inch baking dish, leaving about 1 inch between rolls.
10Step 10
Cover loosely with a damp towel and let rise for 30-45 minutes until puffy. A poke should leave an indent that springs back halfway.
11Step 11
Preheat the oven to 375°F about 10 minutes before the second rise completes.
12Step 12
Brush each roll generously with egg wash using a pastry brush.
13Step 13
Sprinkle sesame or poppy seeds over the tops if using. Bake for 16-20 minutes until deep golden brown.
14Step 14
Remove from the oven and immediately brush each roll with melted butter while hot.
15Step 15
Cool in the pan for 5 minutes, then serve warm.
Nutrition Per Serving
Estimates based on standard preparation. Adjustments alter macros.
🔄 Substitutions
Instead of All-purpose flour...
Use Bread flour (3.5 cups)
Higher protein content builds stronger gluten. Rolls will have a chewier bite and better structure. Preferred if you like a more substantial, pull-apart texture.
Instead of Honey...
Use Maple syrup or brown sugar (2 tablespoons)
Both feed the yeast effectively. Maple syrup adds subtle warmth; brown sugar brings slight molasses depth. Minimal texture change.
Instead of Whole wheat flour...
Use Spelt or einkorn flour (0.5 cup)
Ancient grain alternatives with nuttier flavor. Spelt may require slightly less liquid — hold back 2 tablespoons of milk and add only if the dough feels too stiff.
Instead of Unsalted butter...
Use Coconut oil (3 tablespoons)
Works well for the dough. Loses the dairy richness but maintains tenderness. The finishing brush will have a subtle coconut undertone — use refined coconut oil if that's undesirable.
🧊 Storage & Reheating
In the Fridge
Store cooled rolls in an airtight container or zip bag for up to 3 days. They firm up slightly — reheat before serving.
In the Freezer
Freeze fully baked and cooled rolls in a zip bag for up to 2 months. Thaw at room temperature for 1 hour or overnight in the fridge.
Reheating Rules
Wrap in foil and heat in a 300°F oven for 8 minutes. Brush with a little more melted butter after reheating to restore the fresh-baked finish.
❓ Frequently Asked Questions
Why didn't my rolls rise?
Almost always a yeast problem. Either the yeast was expired, the milk was too hot (above 120°F) and killed it, or the kitchen was too cold for fermentation. Always proof your yeast first — if it doesn't foam within 5 minutes, start over. Yeast is cheap. Two hours of your time is not.
Can I make these ahead of time?
Yes. After the first rise, punch down the dough, cover tightly, and refrigerate for up to 24 hours. The cold slows fermentation without stopping it, and the extended time develops more complex flavor. Shape, do the second rise, and bake the next day.
Why are my rolls dense instead of fluffy?
Three possible causes: under-kneaded dough (not enough gluten development), over-proofed second rise (the structure collapsed), or too much flour added during kneading. Fluffy rolls require a slightly tacky dough — if it felt perfectly smooth and not sticky at all during kneading, you likely added too much flour.
Can I make these without a stand mixer?
Absolutely. Hand-kneading for 8-10 minutes produces identical results. The dough will feel sticky and frustrating for the first 3-4 minutes — that's normal. Keep going. It comes together.
Do I need to use whole wheat flour, or can I use all all-purpose?
All all-purpose flour works fine. The whole wheat contributes a subtle nuttiness and a small fiber bump, but it's a minor player at 0.5 cup out of 4 total. The texture difference is negligible. Full all-purpose produces a slightly lighter, more neutral roll.
How do I get an even golden-brown color on top?
Even egg wash coverage is the key. Apply it in thin, overlapping strokes with a pastry brush rather than dabbing. Patchy application leaves pale spots. Also make sure your oven is fully preheated — putting rolls into a cold or still-heating oven produces uneven color every time.

The Science of
Whole Wheat Dinner Rolls (Soft, Pillowy, and Actually Worth Making)
We turned everything on this page into a beautiful, flour-proof PDF cheat sheet. Print it out, stick it to your fridge, and never mess up your whole wheat dinner rolls (soft, pillowy, and actually worth making) again.
*We'll email you the high-res PDF instantly. No spam, just perfectly cooked meals.
AlmostChefs Editorial Team
We translate the internet's most popular cooking videos into foolproof, beginner-friendly written recipes. We analyze multiple methods, test them in our kitchen, and engineer a single "Master Recipe" that gives you the best possible result with the least possible stress.