Pull-Apart Cupcake Cakes (The Party Dessert You've Been Overthinking)
Individual cupcakes arranged and frosted together to look like a single showstopper cake — no slicing, no serving drama, no structural collapse. We broke down the technique behind clean pull-apart edges, stable buttercream joins, and designs that actually hold up on a table for three hours.
“The cupcake cake promises the drama of a decorated layer cake with none of the structural anxiety. No tiers to level, no dowels to cut, no catastrophic lean when the venue air conditioning hits. But most pull-apart cakes fail not because of the baking — that part is straightforward — but because of three fixable mistakes: inconsistent cupcake height, underthinned frosting used as the join layer, and piping that treats each cupcake as a separate unit instead of one continuous surface. Get those three things right and you have a dessert that photographs like a bakery showpiece and serves itself.”
Why This Recipe Works
The cupcake cake is not a lesser version of a real cake. It is a different object entirely — one engineered around a specific set of social problems that layer cakes consistently fail to solve. No one needs to find a knife. No one gets a crumbling end piece or a skimpy middle slice. Dietary restrictions can be accommodated by pulling specific cupcakes from a section made with different ingredients. And when the birthday child decides they want to "help," handing them a sprinkle shaker does not endanger the structural integrity of the entire dessert. This is functional design.
The Architecture of Illusion
What makes a cupcake cake work visually is the same thing that makes trompe l'oeil painting work: you are not looking at what you think you are looking at. Individual cupcakes become a single cake surface through two mechanisms — a thin crumb coat that bridges the gaps and unifies the texture, and continuous piping strokes that cross over the seams without acknowledging them. The moment your piping technique starts treating each cupcake as an individual unit, the illusion collapses and you have exactly what it looks like: twenty-four cupcakes on a tray.
The crumb coat is the foundational step that most home bakers skip entirely, and it explains why amateur pull-apart cakes look obviously different from professional ones. A crumb coat is simply a thin layer of soft buttercream spread across the entire top surface immediately after arrangement. It does three things: it locks in any loose crumbs so they don't contaminate the final decoration layer, it creates a slightly tacky surface that piped rosettes adhere to better than bare cake, and critically, it fills the small gaps between cupcake edges with frosting — making the surface read as one continuous plane rather than a grid of circles.
Why Batter Fill Percentage Is Not a Suggestion
Every cupcake in the arrangement must have the same height profile. If twelve of your cupcakes dome to a peak and twelve stay flat, your crumb coat will have the topography of a mountain range and no amount of piping skill will disguise it. The two-thirds fill rule exists precisely because at that volume, standard vanilla batter produces a gentle, uniform dome that rises just above the lip of the liner and then levels as it cools. The standard 12-cup muffin tin is your best ally here — consistent cup diameter means consistent heat distribution means consistent bake across every single cupcake.
Use a cookie scoop. Not a spoon, not a ladle, not "eyeballing it." A cookie scoop dispenses the same volume of batter every time and the difference in your final arrangement will be immediately visible.
The Buttercream Temperature Problem
American buttercream — powdered sugar beaten into fat — is a temperature-sensitive material that behaves completely differently at 60°F versus 75°F. Too cold and it shatters when piped, producing rough-edged rosettes that look broken rather than floral. Too warm and it slumps, losing definition within minutes and eventually pooling at the base of each piped star. The target is somewhere between those extremes: a temperature where the buttercream holds a crisp peak immediately after piping but softens slightly on contact with the cake surface, creating a slight crust after 15 minutes at room temperature.
This is why your butter for buttercream should be cool room temperature — around 65°F — not the soft, greasy warmth you use for creaming in cake batter. Beat it for a full three minutes before adding the powdered sugar. The goal is a pale, fluffy mass that has incorporated air. That air is what gives piped buttercream its light, stable texture. Dense, unbeaten butter produces dense, heavy frosting that pipes without definition and tastes like eating a cold stick of fat.
The Continuous Stroke Method
Fit your piping bag with a 1M star tip. Begin at one edge of the chilled, crumb-coated arrangement. Apply consistent pressure and pipe in a slow, continuous spiral or row — and when you reach the join between two cupcakes, do not stop. Do not pause. Do not acknowledge the seam. Keep the pressure and keep the motion going across it as if it does not exist. The frosting bridges the gap and the eye reads continuity rather than junction.
This single technique accounts for 80% of the visual difference between a homemade cupcake cake and a bakery one. It requires no special skill — only the awareness that you are not piping individual cupcakes, you are painting one continuous surface that happens to be made of twenty-four individual components underneath.
Where Beginners Mess This Up
Before we start, read this. These are the 4 reasons your pull-apart cupcake cakes (the party dessert you've been overthinking) will fail:
- 1
Uneven cupcake domes ruining the flat surface: If half your cupcakes dome aggressively and half stay flat, the frosting layer that creates the 'cake surface' will be lumpy and uneven regardless of how carefully you pipe. The fix is consistent batter fill — exactly two-thirds full per cup — and rotating the pan halfway through baking. A level surface is what makes the final design read as a single cake rather than a cluster of obvious cupcakes.
- 2
Using cold buttercream as the crumb coat: The thin layer of frosting that joins all the cupcakes into one unified surface must be spreadable at room temperature. Cold buttercream drags crumbs, tears the tops of your cupcakes, and creates visible seams between each unit. Let your buttercream sit at room temperature for 20 minutes and thin it slightly with a tablespoon of heavy cream before applying the base layer.
- 3
Piping each cupcake individually instead of across the whole surface: This is the most common cupcake cake mistake. If you pipe swirls on each individual cupcake and then arrange them, you get exactly that — a tray of individual cupcakes. The technique that creates the illusion of a single cake requires piping continuously across multiple cupcakes at once, letting the design span the joins. Large star tips and rose tips are essential for this.
- 4
Skipping the chilling step after arrangement: Once arranged and crumb-coated, the cupcake cake needs 20 minutes in the refrigerator before the final decoration layer. This sets the base, stabilizes the cupcakes relative to each other, and gives you a firm surface to pipe on. Without this chill, the cupcakes shift under pressure from the piping bag and the whole arrangement drifts.
The Video Reference Library
Want to see it in action? Here are the exact videos we analyzed and combined to build this foolproof recipe translation:
Clear demonstration of the arrangement technique, crumb coat application, and continuous piping method that makes individual cupcakes read as one unified cake surface.
Covers the 1M and 2D tip techniques in detail, including pressure control and how to pipe rosettes that span joins between cupcakes without breaking the pattern.
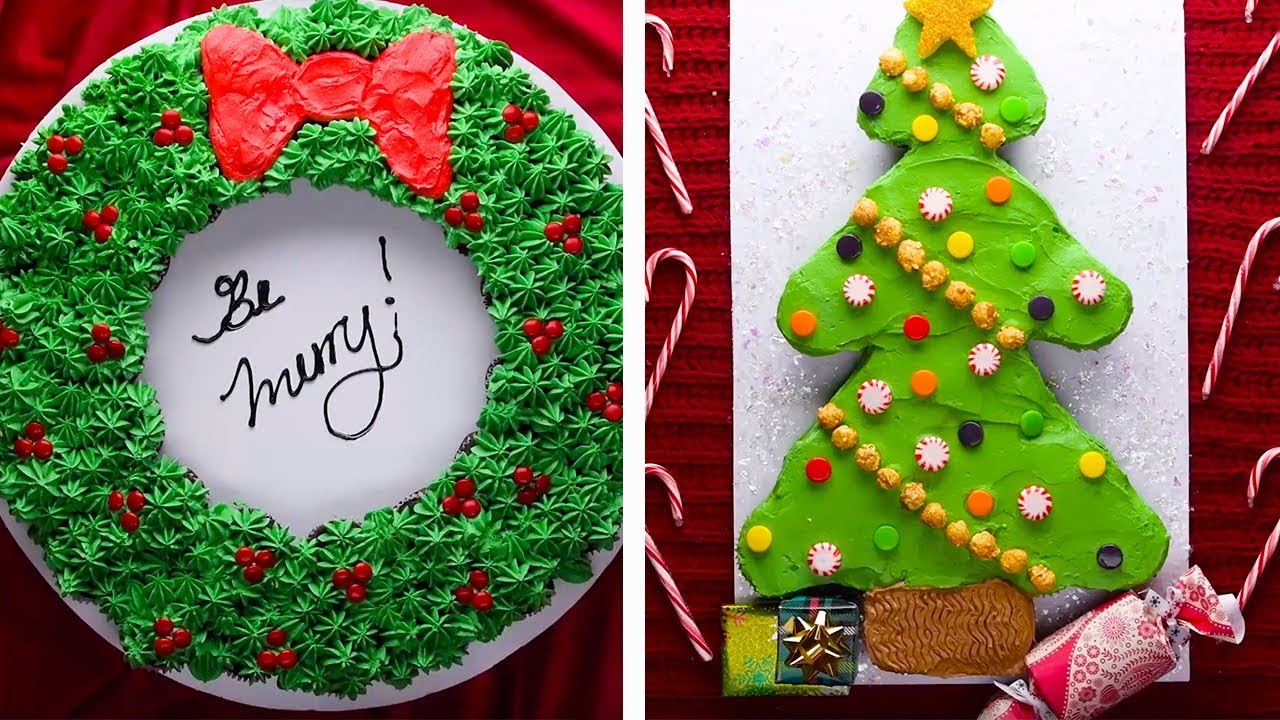
Advanced design concepts including ombre piping, color-blocked arrangements, and character-shaped layouts for themed birthday parties.
🛠️ Core Equipment
- Standard 12-cup muffin tinConsistent cup size means consistent cupcake diameter, which means consistent gaps when arranged. Silicone muffin molds produce inconsistent edges — avoid them for this application.
- Large piping bags with star tip (1M) and rose tip (2D)These two tips are responsible for every cupcake cake design you've ever seen on Pinterest. The 1M creates the classic open star swirl. The 2D creates the rosette pattern. Both are designed to cover seams between cupcakes when piped with continuous, overlapping strokes.
- Offset spatulaThe angled blade lets you spread the crumb coat across the entire cupcake arrangement without your knuckles dragging through the frosting. A flat spatula works but the offset gives you dramatically better control on a flat tray surface.
- Half-sheet pan or large cutting boardThe arrangement base. It needs to be stable, portable, and large enough to give you working room around the edges. A rimmed half-sheet pan also catches any frosting drips during decoration.
Pull-Apart Cupcake Cakes (The Party Dessert You've Been Overthinking)
🛒 Ingredients
- ✦3 cups all-purpose flour
- ✦2.5 teaspoons baking powder
- ✦1/2 teaspoon fine sea salt
- ✦1 cup unsalted butter, room temperature
- ✦2 cups granulated sugar
- ✦4 large eggs, room temperature
- ✦2 teaspoons pure vanilla extract
- ✦1 cup whole milk, room temperature
- ✦2 tablespoons sour cream
- ✦5 cups powdered sugar, sifted
- ✦1.5 cups unsalted butter, room temperature (for buttercream)
- ✦4-5 tablespoons heavy cream
- ✦2 teaspoons pure vanilla extract (for buttercream)
- ✦1/4 teaspoon fine sea salt (for buttercream)
- ✦Gel food coloring in desired colors
- ✦Sprinkles, edible glitter, or fondant decorations for finishing
👨🍳 Instructions
01Step 1
Preheat oven to 350°F (175°C). Line two 12-cup muffin tins with paper liners.
02Step 2
Whisk together flour, baking powder, and salt in a medium bowl. Set aside.
03Step 3
Beat butter and sugar in a stand mixer on medium-high for 4 minutes until pale and fluffy. Scrape the bowl down halfway through.
04Step 4
Add eggs one at a time, beating for 30 seconds after each addition. Add vanilla extract and sour cream, mix until just combined.
05Step 5
With the mixer on low, alternate adding the flour mixture and milk in three additions (flour, milk, flour, milk, flour). Mix only until the flour disappears — do not overmix.
06Step 6
Fill each lined muffin cup exactly two-thirds full using a standard cookie scoop for consistency. Bake for 18-20 minutes until a toothpick inserted in the center comes out clean.
07Step 7
Cool in the pan for 5 minutes, then transfer to a wire rack. Cool completely to room temperature — at least 45 minutes — before frosting.
08Step 8
Make the buttercream: beat butter on medium for 3 minutes until light and fluffy. Add powdered sugar one cup at a time on low. Add vanilla, salt, and 3 tablespoons cream. Beat on medium-high for 2 minutes until smooth and spreadable. Add more cream one tablespoon at a time to reach piping consistency.
09Step 9
Arrange the cooled cupcakes on a half-sheet pan in your desired shape — rectangle, circle, number, or character outline. Press them gently together so the edges touch.
10Step 10
Using the offset spatula, spread the thin crumb coat buttercream across the entire top surface of the arrangement in one continuous layer, bridging all the gaps between cupcakes. Refrigerate for 20 minutes.
11Step 11
Divide the remaining buttercream and tint with gel food coloring as desired. Fill piping bags fitted with 1M or 2D tips.
12Step 12
Pipe continuously across the chilled surface, working in rows and deliberately crossing over the joins between cupcakes. Do not treat each cupcake individually — pipe as if the entire arrangement is one cake surface.
13Step 13
Add sprinkles, edible decorations, or fondant accents immediately after piping, before the buttercream crusts.
Nutrition Per Serving
Estimates based on standard preparation. Adjustments alter macros.
🔄 Substitutions
Instead of Whole milk...
Use Full-fat oat milk or almond milk
The fat content matters for tenderness. Use full-fat plant milks specifically — low-fat versions produce a noticeably drier crumb.
Instead of Unsalted butter (cake)...
Use Refined coconut oil
Works well in the batter but does not cream the same way. Melt and cool the coconut oil instead of creaming. The cupcakes will be slightly denser.
Instead of Unsalted butter (buttercream)...
Use High-quality vegan butter (Miyoko's or Earth Balance)
Must be cold-pressed and high-fat. Standard vegan spreads contain too much water and the buttercream will not hold its piped shape.
Instead of All-purpose flour...
Use 1-to-1 gluten-free flour blend
Use a blend that contains xanthan gum. The texture will be slightly more crumbly. Chill the baked cupcakes longer before frosting as GF crumbs are more fragile.
🧊 Storage & Reheating
In the Fridge
Store covered in the refrigerator for up to 3 days. The buttercream will firm up in the cold — let the finished cake come to room temperature for 30 minutes before serving.
In the Freezer
Freeze unfrosted cupcakes individually on a sheet pan, then transfer to zip-lock bags for up to 2 months. Thaw at room temperature and frost the day of the event.
Reheating Rules
Cupcake cakes are not reheated. If the buttercream has hardened in the refrigerator, room temperature for 20-30 minutes is all that's needed to restore the soft, creamy texture.
❓ Frequently Asked Questions
How many cupcakes do I need for a pull-apart cake?
For a standard rectangular design that serves 12-15, you need 24 cupcakes arranged in a 4x6 grid. For number or letter shapes, plan for 20-30 cupcakes depending on the character. Always bake 4-6 extra as backups in case of breakage or uneven baking.
Can I make the cupcakes the day before?
Yes — and it's actually recommended. Bake and cool the cupcakes the day before, store them unfrosted in an airtight container at room temperature, and frost the day of the event. This separates the work into manageable sessions and ensures the cupcakes are fully cooled when frosting.
Why does my buttercream look greasy or separated?
Butter that is too warm is the usual cause. Your butter should be cool room temperature — about 65-68°F — not soft and shiny. If the buttercream looks curdled, refrigerate the whole bowl for 10 minutes, then beat again on medium. It will come back together.
How do I transport a finished cupcake cake?
Chill the finished cake for 30 minutes to set the frosting, then transfer the entire half-sheet pan to a flat surface in your vehicle. A non-slip mat under the pan prevents sliding. Do not cover with plastic wrap directly — it will pull frosting off. Use a tall cake box or tent loosely with foil if needed.
Can I use store-bought frosting?
You can for the crumb coat layer, but store-bought frosting is almost impossible to pipe into clean rosettes — it's too loose and contains stabilizers that prevent it from holding a crisp shape. Make the decorative piping layer from scratch.
What's the best shape for a first-time cupcake cake?
A simple rectangle or circle is the most forgiving. Complex character shapes require more cupcakes, more cutting, and more precise arrangement. Master the flat rectangular format first — the piping technique is identical and the result is just as impressive.

The Science of
Pull-Apart Cupcake Cakes (The Party Dessert You've Been Overthinking)
We turned everything on this page into a beautiful, flour-proof PDF cheat sheet. Print it out, stick it to your fridge, and never mess up your pull-apart cupcake cakes (the party dessert you've been overthinking) again.
*We'll email you the high-res PDF instantly. No spam, just perfectly cooked meals.
AlmostChefs Editorial Team
We translate the internet's most popular cooking videos into foolproof, beginner-friendly written recipes. We analyze multiple methods, test them in our kitchen, and engineer a single "Master Recipe" that gives you the best possible result with the least possible stress.