Crispy Homemade Wheat Flour Tacos (Better Than Takeout)
Golden-fried wheat flour taco shells with seasoned ground chicken, melted cheese, and a cool sour cream finish. We broke down the dough technique and frying sequence to give you shells that hold their shape, stay crispy, and don't crack when you bite in.
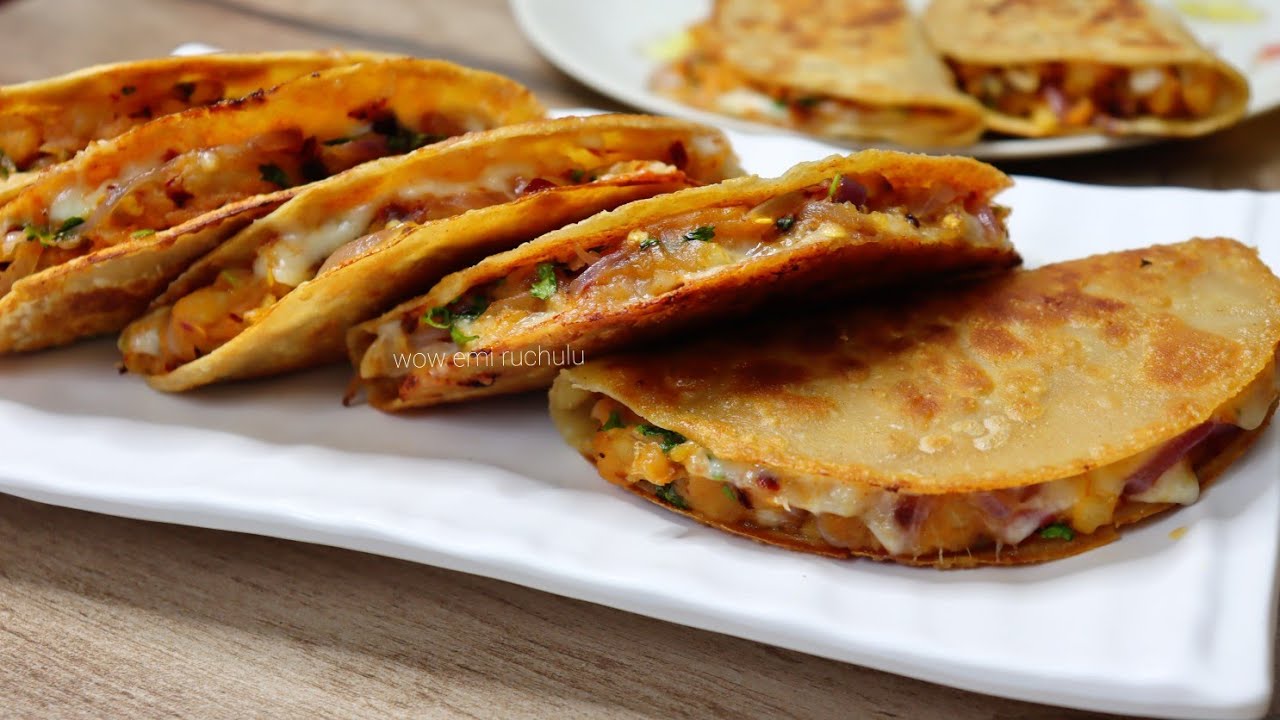
“Store-bought taco shells shatter on the first bite. Delivery versions go soggy in the bag. The fix is a two-minute dough that you fry yourself, folded while it's still warm and pliable so it locks into shape as it cools. Whole wheat flour in the blend adds nutty depth that white-flour shells can't touch. This is the taco you make when you want something fast, crunchy, and actually satisfying.”
Why This Recipe Works
A taco shell is a structural object before it's a food. Its job is to hold a hot, moist filling without collapsing, to provide textural contrast to that filling, and to not shatter the moment you apply any pressure with your teeth. Store-bought shells fail the second test. Delivery fails the first. The only way to get all three is to make the shell yourself and eat it within ten minutes of frying.
The Dough Architecture
Most flatbread doughs use pure all-purpose flour because it's predictable. This recipe uses a 57/43 blend of whole wheat to all-purpose, and the ratio matters. The whole wheat component brings two things: a nutty, slightly earthy flavor that white-flour shells completely lack, and a slightly coarser texture that creates more surface area for the oil to work against during frying — meaning a crispier crust. The all-purpose flour provides the gluten network that keeps the shell pliable enough to fold without cracking.
The cumin and chili powder in the dough itself is a deliberate choice. Seasoning only the filling means the shell tastes like fried flour and nothing else. Seasoning the dough means every bite — filling or not — has flavor. It's a small thing that makes the finished taco feel cohesive rather than assembled.
The Gluten Rest
Kneading develops gluten, but freshly kneaded dough is under tension. Roll it immediately and it springs back, fighting your rolling pin the entire time and finishing thicker than you intended. Ten minutes of rest under a damp cloth lets the gluten strands relax. You roll the same amount of dough to a larger, thinner circle with half the effort. This isn't optional — it's the difference between thin crispy shells and thick bready ones.
The Frying Physics
Oil temperature is the controlling variable. When the shell hits properly hot oil — shimmering, not smoking — the surface water in the dough vaporizes instantly, creating a micro-steam barrier that prevents oil from penetrating the interior. The exterior crisps. The inside cooks through from residual heat. The result is a shell that's crunchy without being greasy.
Cold or lukewarm oil behaves oppositely. There's no immediate vaporization, so the oil moves through the dough's pores before any crust can form. You end up with a shell that's 30% oil by the time it's done, which is why it feels heavy and goes soft within minutes.
A heavy-bottomed skillet is the right tool here. Thin pans have hot spots — you'll burn patches of the shell before the rest is even pale. Even heat means every point of contact between shell and pan crisps at the same rate.
The Fold Window
The warm-fold step is the technique that separates this recipe from everything you can buy. Immediately after draining on a paper towel, the shell is still in a brief plastic state — the starches haven't fully set, the proteins are still warm. Apply gentle pressure and it bends cleanly. Wait twenty seconds too long and it snaps.
Hold the fold for ten seconds. That's long enough for the shell to begin setting in its new shape. Release it and let it cool fully on the plate. When it's room temperature, it's rigid, structural, and ready to fill without any support.
The Filling Sequence
Building the filling in layers — onion first, then garlic, then protein — isn't ceremony. It's timing. Onions need 3–4 minutes to turn translucent and lose their raw sharpness. Garlic burns in under 90 seconds if it goes in at the same time. Ground chicken needs 6–8 minutes to cook through without drying out. Each ingredient has a different heat tolerance and a different optimal cooking time. The sequence ensures they all finish at the right point simultaneously.
Cook out all visible moisture before removing the filling from heat. Bell peppers release water as they cool, and that water will migrate into your shell during the brief assembly window. A dry filling stays crispy. A wet filling destroys in under five minutes everything the frying accomplished.
Where Beginners Mess This Up
Before we start, read this. These are the 4 reasons your crispy homemade wheat flour tacos (better than takeout) will fail:
- 1
Skipping the dough rest: Ten minutes under a damp cloth lets the gluten relax after kneading. Skipped-rest dough fights back when you roll it — it springs and shrinks, giving you thick, uneven shells that fry up bready instead of crispy. The rest takes no active effort. Just wait.
- 2
Frying in oil that isn't hot enough: The oil needs to be shimmering before the first shell goes in. Lukewarm oil soaks into the dough rather than immediately searing the surface. The result is greasy, soft shells that never develop a proper crust. Test it: a small pinch of dough dropped in should sizzle immediately on contact.
- 3
Rolling the shells too thick: Each dough ball should roll out to a 5-6 inch circle that's nearly translucent at the center. Thick shells need longer frying to cook through, and by the time the interior sets, the exterior has burned. Thin means crispy in under 90 seconds per side.
- 4
Folding the shells too late: The folding window is short. As soon as the shell comes out of the oil and drains for ten seconds, fold it. Once it cools completely, it cracks instead of bending. Fold it warm, let it cool in the taco shape, and it holds.
The Video Reference Library
Want to see it in action? Here are the exact videos we analyzed and combined to build this foolproof recipe translation:
The source video for this recipe. Clear demonstration of the dough consistency, oil temperature check, and the critical warm-fold technique for shaping the shells.
🛠️ Core Equipment
- Large heavy-bottomed skilletEven heat distribution across the full pan surface means every inch of the shell fries at the same rate. A thin pan creates hot and cold zones — you get patches that are burnt and patches that are pale and limp.
- Rolling pinConsistent pressure for rolling dough to uniform thinness. A wine bottle works in a pinch, but the weight of a proper rolling pin gives you thinner, more even shells with less effort.
- TongsFor flipping and removing hot shells from oil safely. Forks puncture the shell and break the surface. Tongs let you handle the shell without damaging the crust you just built.
- Paper towel-lined plateAbsorbs excess oil the moment the shell comes out. Every extra second the shell sits in pooled oil, it absorbs more fat and softens. Get it onto the paper towel immediately.
Crispy Homemade Wheat Flour Tacos (Better Than Takeout)
🛒 Ingredients
- ✦1 cup whole wheat flour
- ✦¾ cup all-purpose flour
- ✦1 teaspoon fine sea salt
- ✦½ teaspoon ground cumin
- ✦½ teaspoon chili powder
- ✦¼ teaspoon black pepper
- ✦¾ cup warm water
- ✦1 tablespoon olive oil, plus 2–3 tablespoons for frying
- ✦½ pound lean ground chicken or turkey
- ✦1 medium yellow onion, finely diced
- ✦3 cloves garlic, minced
- ✦2 tablespoons fresh cilantro, chopped
- ✦1 teaspoon paprika
- ✦¼ teaspoon cayenne pepper
- ✦2 tablespoons diced bell peppers
- ✦½ cup shredded cheddar cheese
- ✦2 tablespoons sour cream or Greek yogurt
- ✦1 lime, cut into wedges
👨🍳 Instructions
01Step 1
Combine the whole wheat flour, all-purpose flour, sea salt, cumin, chili powder, and black pepper in a large mixing bowl.
02Step 2
Create a well in the center and pour in the warm water and 1 tablespoon of olive oil. Mix until a shaggy dough forms, then knead for 5–7 minutes until smooth and elastic.
03Step 3
Cover the dough with a damp cloth and rest for 10 minutes at room temperature.
04Step 4
While the dough rests, heat 1 tablespoon of olive oil in a skillet over medium-high heat. Sauté the diced onion for 3–4 minutes until translucent.
05Step 5
Add the minced garlic and cook for 1 minute until fragrant. Add the ground chicken and paprika, breaking the meat into small pieces with a wooden spoon.
06Step 6
Cook the filling for 6–8 minutes until no pink remains. Stir in the diced bell peppers, cayenne, and cilantro. Remove from heat and set aside.
07Step 7
Divide the rested dough into 8 equal balls. On a lightly floured surface, roll each ball into a thin circle 5–6 inches in diameter.
08Step 8
Heat 2–3 tablespoons of olive oil in a large skillet over medium-high heat until shimmering. Fry each shell for 60–90 seconds per side until golden brown and crispy.
09Step 9
Transfer shells to a paper towel-lined plate. While still warm and pliable, fold each shell in half by hand or over the handle of a wooden spoon. Hold for 10 seconds and release.
10Step 10
Fill each cooled shell with the seasoned chicken mixture, top with shredded cheese and a dollop of sour cream or Greek yogurt.
11Step 11
Serve immediately with lime wedges.
Nutrition Per Serving
Estimates based on standard preparation. Adjustments alter macros.
🔄 Substitutions
Instead of All-purpose and whole wheat flour blend...
Use 100% whole wheat flour or spelt flour
Slightly denser shell with an earthier, nuttier flavor. Increase water by 1–2 tablespoons as whole wheat absorbs more liquid.
Instead of Ground chicken or turkey...
Use Seasoned black beans or lentils with finely chopped mushrooms
Mushrooms provide meatiness and umami. Process them coarsely before cooking so they hold their texture inside the shell.
Instead of Sour cream...
Use Plain Greek yogurt or cashew cream
Greek yogurt is tangier and higher in protein. Cashew cream is dairy-free — blend soaked cashews with water and a pinch of salt until smooth.
Instead of Shredded cheddar...
Use Crumbled feta or nutritional yeast
Feta adds sharpness and salt without the heaviness of melted cheddar. Nutritional yeast provides B vitamins and a savory umami finish for a fully dairy-free version.
🧊 Storage & Reheating
In the Fridge
Store unfilled shells in an airtight container for up to 2 days. The filling keeps separately for up to 3 days. Assemble only when ready to eat.
In the Freezer
Stack cooled, unfilled shells between sheets of parchment and freeze for up to 1 month. Thaw at room temperature for 10 minutes before filling.
Reheating Rules
Re-crisp shells in a dry skillet over medium heat for 60–90 seconds per side. Do not microwave — they steam instead of crisping and turn rubbery.
❓ Frequently Asked Questions
Why are my shells cracking when I fold them?
You waited too long after frying. The folding window is short — about 15 seconds from the moment the shell leaves the oil. Once it cools past that point, the shell sets rigid and snaps under pressure. Work faster, or keep a warm plate nearby to buy a few extra seconds.
Can I make the dough ahead of time?
Yes. Wrap it tightly in plastic wrap and refrigerate for up to 24 hours. Let it come back to room temperature for 20 minutes before rolling — cold dough tears and springs back when rolled.
How thin should I roll the shells?
Thin enough that you can almost see your hand through the center when held up to light — roughly 1–2mm. Thicker than that and the shells take longer to fry through, which means more oil absorption and a bready texture instead of a crispy one.
Can I use a tortilla press instead of a rolling pin?
Yes, but press gently. A tortilla press tends to produce slightly thicker rounds than rolling by hand. Aim for the thinner end of the press range and do a final pass with a rolling pin if needed.
Why does the filling get watery in the shell?
The bell pepper and onion release moisture as they cool. Make sure you cook the filling until any visible liquid has evaporated before removing it from heat. Watery filling softens the shell from the inside within minutes.
Is this recipe gluten-free adaptable?
Not easily with this dough — gluten is what gives the shell its structure and the snap-fold behavior when warm. A masa harina (corn) dough is the better path for gluten-free crispy shells.

The Science of
Crispy Homemade Wheat Flour Tacos (Better Than Takeout)
We turned everything on this page into a beautiful, flour-proof PDF cheat sheet. Print it out, stick it to your fridge, and never mess up your crispy homemade wheat flour tacos (better than takeout) again.
*We'll email you the high-res PDF instantly. No spam, just perfectly cooked meals.
AlmostChefs Editorial Team
We translate the internet's most popular cooking videos into foolproof, beginner-friendly written recipes. We analyze multiple methods, test them in our kitchen, and engineer a single "Master Recipe" that gives you the best possible result with the least possible stress.