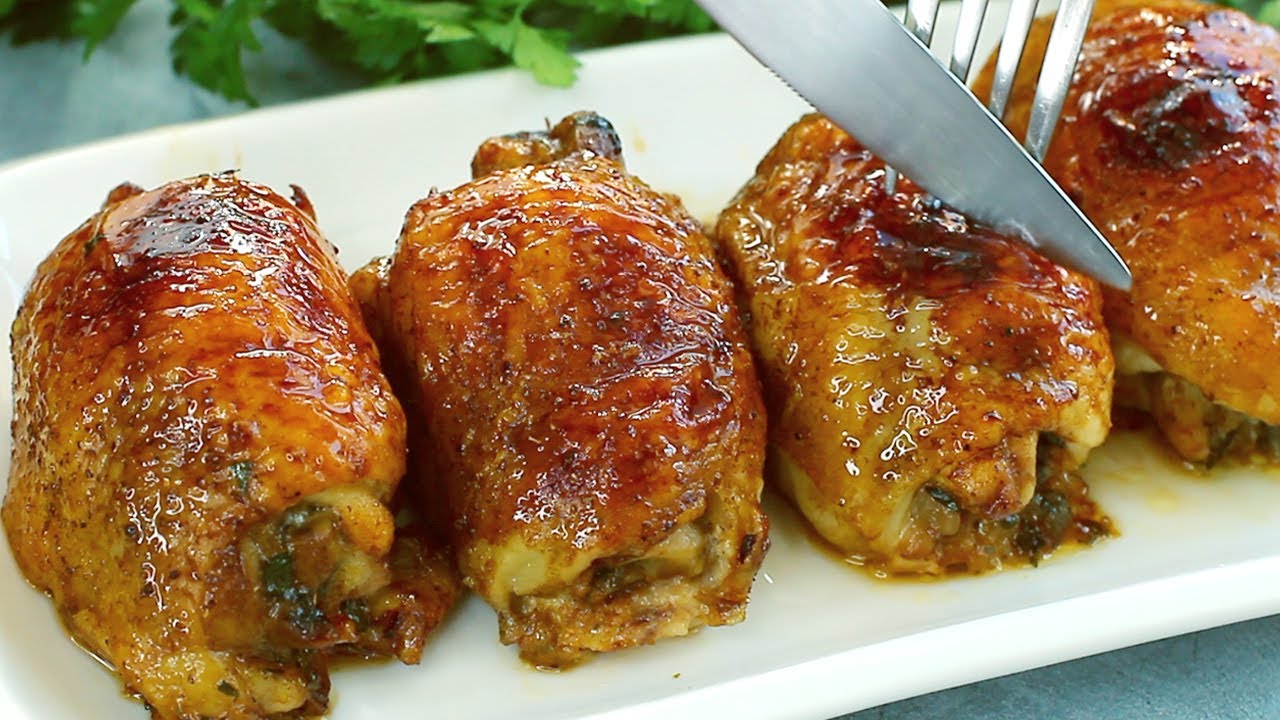
Crispy Skin Chicken Thighs (The Foolproof Pan-to-Oven Method)
Bone-in, skin-on chicken thighs seared aggressively in a cast iron skillet then finished in a hot oven — producing shatteringly crispy skin and impossibly juicy meat every single time. We broke down the most-watched YouTube methods to isolate the three decisions that actually matter.
“Chicken thighs are the most forgiving cut on the bird and still manage to disappoint most home cooks. The skin comes out rubbery, the fond burns before the meat is done, or the oven finish dries out the outside before the bone-side reaches temperature. The fix is embarrassingly simple: start skin-side down in a cold pan, let the fat render slowly, then blast it in the oven. That's it. That's the whole recipe.”
Why This Recipe Works
Chicken thighs have a reputation for being foolproof, and in the sense that they're hard to completely ruin, that's true. But there's a significant gap between "not ruined" and "the best thing on the table" — and most home cooks spend their entire lives in that gap, serving technically safe chicken with flabby skin and wondering why restaurant versions taste fundamentally different.
The answer is fat management. A bone-in, skin-on chicken thigh contains a meaningful layer of subcutaneous fat between the skin and the meat. That fat is not a problem to be avoided — it is the entire point. When rendered properly, it bastes the skin from the inside out, leaving behind a thin, taut, shatteringly crispy layer that acts as an edible container for the juicy, collagen-rich meat below. When managed poorly — too much heat too fast, moisture on the surface, wrong pan — that fat traps as liquid beneath a pale, soft exterior and you end up with something that tastes like it was cooked by someone who was thinking about something else.
The Cold Pan Principle
The single most counterintuitive element of this method is starting the chicken in a cold pan. Every instinct built from searing steaks screams to preheat until smoking. For chicken skin, that instinct is catastrophically wrong. High initial heat seizes the outer layer of skin instantly, forming a protein barrier that traps the unrendered fat underneath. You end up with a pale exterior with greasy liquid pooling beneath it, which then steams the skin from the inside and destroys any chance of crispiness.
A cold start changes the physics entirely. As the cast iron skillet heats gradually from below, the fat has time to liquefy and migrate outward through the pores of the skin before any protein setting occurs. By the time the surface temperature is high enough to brown, most of the fat has already rendered out and the skin is essentially frying in its own fat at the interface with the pan — thin, dry, and browning evenly across its entire surface. This is the same principle behind a properly cooked duck breast, and it works identically on chicken.
Why the Oven Matters
Stovetop heat is directional. It comes from one source — the burner below — and without constant manipulation, produces uneven results: a perfectly seared skin-side and a barely-warmed bone-side. The oven solves this by wrapping the entire skillet in radiant heat from all directions simultaneously. At 425°F, the oven drives heat through the bone, which conducts directly to the deepest part of the meat and ensures even cooking from the inside out while the exterior continues to set and crisp.
This is also why bone-in thighs outperform boneless for this application. The bone isn't just a structural inconvenience — it's a heat conductor and a flavor contributor. Marrow slowly releases gelatin into the surrounding meat during the oven phase, adding a richness to the thigh meat that no amount of seasoning can replicate in a boneless cut.
Temperature Is Not Optional
The conventional wisdom says chicken is done at 165°F. For thighs, that number is the legal minimum for food safety, not the culinary target. At 165°F, chicken thigh meat is safe but still has significant collagen — the connective tissue that makes thighs slightly chewy and dense. By 175-180°F, that collagen has fully converted to gelatin through a sustained heat process called denaturation, and the meat transforms. It becomes genuinely silky, with a yielding texture that pulls cleanly from the bone and a richness that breast meat simply cannot achieve at any temperature.
An instant-read thermometer is the only reliable way to hit this window. Cooking time varies based on thigh size, starting temperature, how cold your oven runs, and the weight of your skillet. A thermometer removes every variable from the equation and gives you the same result every single time, regardless of those inputs. It is the most important piece of equipment in this recipe, more important than the pan and more important than the seasoning blend.
The Basting Moment
After the oven phase, the butter-and-drippings baste is not garnish. It is a flavor delivery mechanism. The brown fond accumulated on the bottom of the skillet — the caramelized proteins and sugars from the initial sear — dissolves into the melting butter along with the aromatics from the garlic and herbs. Spooning this back over the skin for two minutes coats the exterior in a concentrated layer of savory, herbed fat that soaks into the crust without softening it. Skip this step and the chicken is good. Do it properly and the chicken is memorable.
Where Beginners Mess This Up
Before we start, read this. These are the 4 reasons your crispy skin chicken thighs (the foolproof pan-to-oven method) will fail:
- 1
Starting with a screaming hot pan: Most home cooks preheat the pan until it smokes, then add the chicken. This seizes the skin immediately and traps the subcutaneous fat underneath — exactly the opposite of what you want. Cold-pan-to-medium heat lets the fat render gradually, and by the time the skin is golden it has crisped in its own fat rather than steaming in trapped grease.
- 2
Moving the chicken too soon: Chicken thighs will release naturally from the pan when the skin is properly seared. If you're fighting the spatula, the skin isn't ready. Forcing it tears the skin and destroys the crust. Press gently, feel resistance, and wait another 90 seconds. The pan will tell you when it's time.
- 3
Skipping the dry brine: Patting the skin dry and salting it at least 30 minutes before cooking draws surface moisture out of the skin via osmosis. That moisture is then reabsorbed, taking the salt with it into the meat. The surface is left significantly drier, which means faster browning and a crisper final texture. Skipping this step produces pale, flabby skin regardless of technique.
- 4
Not using a meat thermometer: Chicken thighs are done at 165°F measured at the thickest part away from the bone, but they're better at 175-180°F where the collagen has fully converted to gelatin. Cooking by time alone is guesswork. An instant-read thermometer removes all uncertainty and is the single most important tool in poultry cookery.
The Video Reference Library
Want to see it in action? Here are the exact videos we analyzed and combined to build this foolproof recipe translation:
The definitive breakdown of the cold-pan method with side-by-side comparisons showing exactly what the skin should look like at each stage. Best resource for understanding the visual cues that tell you when to flip.
Focused entirely on cast iron heat management and why pan temperature at the start determines everything that follows. Excellent close-ups of the fat rendering progression from raw to golden.
Strips the technique down to its essential decisions with clear explanations of why each step exists. Ideal if this is your first time cooking bone-in chicken and you want to understand before you execute.
🛠️ Core Equipment
- 12-inch cast iron skilletRetains heat evenly across the entire cooking surface and transfers from stovetop to oven without drama. The heavy base is what allows the low-and-slow fat render without temperature spikes that would seize the skin. Nonstick pans are too lightweight and cannot go in a high-heat oven.
- Instant-read thermometerThe only reliable way to know when bone-in thighs are done. The bone conducts heat differently than the meat, making visual and timing cues unreliable. A $15 thermometer eliminates every guessing game in this recipe.
- Wire rack over a sheet panIf you're cooking a large batch and can't fit everything in the skillet, a wire rack elevates the thighs so hot air circulates underneath, preventing the bottom from steaming and softening while the top crisps.
- Paper towelsFor patting the skin completely dry before salting. This is a pre-cooking step, not cleanup. Moisture on the skin surface must be removed before any fat renders or you are essentially steaming the skin from the outside while the fat tries to render from the inside.
Crispy Skin Chicken Thighs (The Foolproof Pan-to-Oven Method)
🛒 Ingredients
- ✦4 bone-in, skin-on chicken thighs (about 2.5 pounds total)
- ✦1.5 teaspoons kosher salt
- ✦1 teaspoon smoked paprika
- ✦1 teaspoon garlic powder
- ✦1/2 teaspoon onion powder
- ✦1/2 teaspoon dried thyme
- ✦1/2 teaspoon freshly ground black pepper
- ✦1/4 teaspoon cayenne pepper
- ✦1 tablespoon olive oil
- ✦4 cloves garlic, smashed
- ✦4 sprigs fresh thyme
- ✦2 sprigs fresh rosemary
- ✦1 tablespoon unsalted butter
- ✦1.5 tablespoons fresh lemon juice
- ✦Flaky sea salt for finishing
👨🍳 Instructions
01Step 1
Pat the chicken thighs completely dry on all sides with paper towels. Combine the kosher salt, smoked paprika, garlic powder, onion powder, dried thyme, black pepper, and cayenne in a small bowl. Season the thighs all over with the spice mixture, making sure to get under the skin where possible.
02Step 2
Preheat your oven to 425°F. Place the chicken thighs skin-side down in a cold 12-inch cast iron skillet. Drizzle the olive oil over the bone-side. Set the burner to medium heat.
03Step 3
Cook skin-side down for 15-18 minutes without moving the chicken. The skin will initially stick, then slowly release as it renders and crisps. You should hear a steady, gentle sizzle — not aggressive popping. If it sounds violent, lower the heat slightly.
04Step 4
Flip the thighs bone-side down. The skin should be deep golden brown and audibly crisp. Add the smashed garlic cloves, fresh thyme sprigs, and rosemary sprigs to the pan.
05Step 5
Transfer the skillet to the preheated oven. Roast for 18-22 minutes until an instant-read thermometer inserted into the thickest part of the thigh (away from the bone) reads 175-180°F.
06Step 6
Remove the skillet from the oven. Add the butter to the pan and let it melt, then spoon the melted butter and pan drippings over the thighs repeatedly for 1-2 minutes.
07Step 7
Transfer the chicken thighs to a cutting board or plate skin-side up. Squeeze fresh lemon juice over the top and allow to rest for 5 minutes before serving.
08Step 8
Finish with flaky sea salt immediately before serving. The crunch of the salt against the crispy skin is intentional — it is not excessive seasoning.
Nutrition Per Serving
Estimates based on standard preparation. Adjustments alter macros.
🔄 Substitutions
Instead of Bone-in skin-on chicken thighs...
Use Boneless skinless chicken thighs
Reduce stovetop cook time to 6-8 minutes and oven time to 12-15 minutes. You lose the rendered fat and skin crispiness but retain the flavor advantages of dark meat over breast.
Instead of Smoked paprika...
Use Sweet paprika plus a drop of liquid smoke
Smoked paprika provides both color and that low campfire note. Sweet paprika alone is flat — add a very small amount of liquid smoke to approximate the depth.
Instead of Cast iron skillet...
Use Heavy stainless steel skillet
Stainless works but heats less evenly than cast iron. You may see more hot-spot browning. Do not use nonstick — it cannot handle oven temperatures above 400°F and won't develop proper fond.
Instead of Fresh thyme and rosemary...
Use Dried herbs at 1/3 the quantity
Dried herbs work during the oven phase but will not baste as elegantly as fresh sprigs. Add them to the spice rub instead of the pan.
🧊 Storage & Reheating
In the Fridge
Store in an airtight container for up to 4 days. The skin will soften — reheat in a 400°F oven for 8-10 minutes skin-side up to restore crispiness.
In the Freezer
Freeze cooked thighs for up to 3 months wrapped tightly in plastic then foil. Thaw overnight in the refrigerator before reheating.
Reheating Rules
Oven-only reheating at 400°F for 8-10 minutes. Microwave reheating destroys the skin texture entirely and steams the meat into a rubbery state. Use it only as an absolute last resort.
❓ Frequently Asked Questions
Why is my chicken skin rubbery instead of crispy?
One of two things: the skin wasn't dry enough before cooking, or you started with a hot pan. Moisture is the enemy of crispy skin. Pat dry aggressively, salt in advance to draw out additional moisture, and always start the thighs in a cold pan so the fat renders slowly rather than seizing immediately.
How do I know when to flip the chicken?
Press the thigh gently with a spatula. If it resists, the skin is still releasing fat and isn't ready. When it lifts cleanly with almost no resistance, flip it. This usually takes 15-18 minutes on medium heat. Forcing an early flip tears the skin.
Can I use chicken breasts with this method?
You can, but the result is fundamentally different. Breasts have less fat, so there's nothing to render into the skin. You'll get browning but not the same crackling crispiness. Breasts also cook faster and dry out if you take them to 175°F — pull breast meat at 160°F and rest to carryover to 165°F.
My garlic is burning before the chicken is done — what do I do?
Add the garlic cloves at the flip point, not at the beginning. Garlic burns at sustained temperatures over about 250°F and the skillet runs hotter than that during the sear phase. Adding garlic during the oven phase means it roasts gently rather than scorching.
Why do my chicken thighs stick to the pan at first?
This is normal and correct. Protein bonds to metal at first contact and releases when the surface is properly seared and the connective tissue contracts. If you're patient, the chicken will release itself. Forcing it early tears the skin and leaves it behind on the pan.
Should I cover the skillet in the oven?
No. Covering traps steam and undoes everything you accomplished during the sear phase. The whole point of the oven phase is dry radiant heat from above finishing the interior while the bottom stays in contact with the hot cast iron. Covered, you are braising. Uncovered, you are roasting. These are not the same thing.

The Science of
Crispy Skin Chicken Thighs (The Foolproof Pan-to-Oven Method)
We turned everything on this page into a beautiful, flour-proof PDF cheat sheet. Print it out, stick it to your fridge, and never mess up your crispy skin chicken thighs (the foolproof pan-to-oven method) again.
*We'll email you the high-res PDF instantly. No spam, just perfectly cooked meals.
AlmostChefs Editorial Team
We translate the internet's most popular cooking videos into foolproof, beginner-friendly written recipes. We analyze multiple methods, test them in our kitchen, and engineer a single "Master Recipe" that gives you the best possible result with the least possible stress.