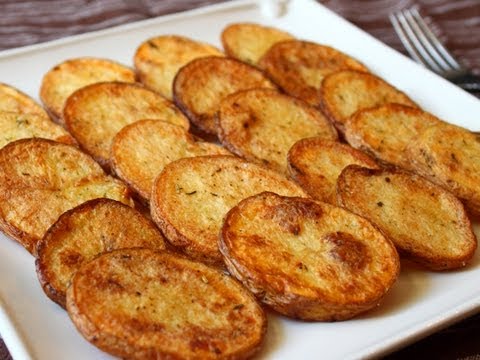
Crispy Cottage Fries (The Breakfast Potato You've Been Sleeping On)
Thick-cut rounds of russet potato pan-fried in a cast iron skillet until each slice develops a shatteringly crisp crust and a fluffy, steamy interior. We analyzed the top YouTube methods to build one foolproof technique that delivers golden, seasoned cottage fries every single time.

“Cottage fries should be simple. Slice a potato, fry it, eat it. And yet most people end up with pale, steamed, limp rounds that taste like regret. The difference between soggy and shatteringly crisp comes down to three things: the potato variety, how much you touch them in the pan, and whether you respect the Maillard reaction enough to leave them alone. We broke down every major YouTube method to give you the one approach that actually works.”
Why This Recipe Works
Cottage fries are the most underestimated item on any breakfast plate. They share table space with eggs, toast, and bacon — all dishes with devoted technique communities, endless YouTube deep dives, and passionate defenders of the correct method. Potatoes, cut into rounds and fried in a pan, get treated like an afterthought. You already know how to do this, the thinking goes. You do not need a recipe for fried potato slices.
This attitude is why most cottage fries are bad.
The Starch Architecture
Russet potatoes are not interchangeable with other varieties, and the reason is cellular. Russets are classified as floury or mealy potatoes — their cells contain high concentrations of starch granules and relatively little moisture. When heat is applied, those starch granules gelatinize quickly, the surface moisture evaporates, and the exterior dries to a rigid, golden crust. The interior, by contrast, stays fluffy and light because the steam generated from interior moisture has nowhere to go and creates tiny air pockets throughout the flesh.
Waxy potatoes — reds, fingerlings, most Yukon Golds — behave entirely differently. Their cells contain more sugar, more moisture, and less starch. They hold together better than russets when cooked in liquid, which makes them excellent for potato salad and gratins. In a dry skillet over high heat, they are a liability. The excess moisture steams the potato from the inside while the surface stays pale, and the higher sugar content means they brown unevenly — dark spots surrounded by pallid rounds.
This is not a preference or a style choice. It is chemistry.
Fat Selection and Pan Temperature
The fat you cook in determines the temperature ceiling of your fry. Extra-virgin olive oil smokes at roughly 375°F — below the 400-410°F you want for aggressive Maillard browning. Butter alone burns even faster. The correct approach is to use a neutral high-smoke-point oil as the primary cooking fat, then add a small knob of butter when you flip the rounds. The butter contributes flavor and accelerates browning on the second side through its milk solids, but the bulk of the cooking happens in oil that can handle the heat without turning acrid.
A 12-inch cast iron skillet is not negotiable for this recipe. When two pounds of cold potato rounds hit a lightweight stainless pan, the pan temperature crashes immediately and the rounds begin steaming in their own moisture rather than searing. Cast iron's thermal mass — it weighs roughly five times what a comparably sized aluminum pan does — absorbs the temperature shock and maintains a consistent searing surface throughout. The heavy base also distributes heat evenly across the cooking surface, which means the round at the edge of the pan gets the same treatment as the round in the center.
The Do-Not-Touch Principle
The Maillard reaction is a chemical process, not an aesthetic preference. At temperatures above 280°F, the amino acids and reducing sugars on the surface of the potato interact to produce hundreds of new flavor compounds — the same process responsible for the crust on bread, the sear on steak, and the color on roasted coffee beans. This reaction requires sustained, uninterrupted contact between the starch surface and the hot fat. Every time you move a potato round, you break that contact, release accumulated heat, and reset the reaction timer.
The practical implication: put the rounds in the pan, press them gently with the back of a fish spatula, and leave them alone for six to seven minutes. The sizzling will be loud at first, then quiet as the surface moisture cooks off. That quieting is the crust forming. When the round releases cleanly from the pan without any resistance, it is ready to flip. If it sticks, it is telling you that the crust is not yet complete. The pan knows more than your impatience does.
Seasoning Before, Not After
The spice mix goes on the raw potato, not the finished round. This is not arbitrary — dry spices that hit hot fat bloom in a way that spices dusted over already-cooked food never do. The garlic powder and smoked paprika applied before the potato hits the oil make contact with the hot fat in the pan and release their volatile aromatic compounds into the cooking environment. Those compounds infuse back into the potato surface during the sear. Spices added after cooking sit on top of the crust, contributing flavor only when you actively eat them, rather than becoming structurally integrated into the crust itself.
The finishing salt — flaky sea salt applied the moment the rounds come off the heat — is a separate operation entirely. Fine salt applied before cooking draws moisture to the surface and can undermine crust formation. Flaky salt applied at the end provides texture contrast and an immediate burst of salinity that fine kosher salt cannot replicate. Both have a job. Neither does the other's job.
Where Beginners Mess This Up
Before we start, read this. These are the 4 reasons your crispy cottage fries (the breakfast potato you've been sleeping on) will fail:
- 1
Using the wrong potato: Waxy potatoes like red or Yukon Gold hold too much moisture. They steam in the pan rather than crisp up, producing rounds with a slick, almost gluey surface. Russets have a high starch content and low moisture, which means the exterior dehydrates rapidly under heat, forming the brittle golden crust that cottage fries are known for.
- 2
Moving the potatoes too much: Every time you stir, flip, or nudge a potato round, you interrupt the Maillard reaction and knock off the developing crust. The browning process requires sustained, uninterrupted contact between the starch surface and the hot fat. Put the rounds in the pan, press them gently flat, and leave them alone for a full 5-7 minutes before you even think about flipping.
- 3
Crowding the skillet: Cottage fries need space. Pack too many rounds into the pan and they trap steam between each other, turning the cook environment from dry-fry to wet-steam. The result is soft, pale potatoes with zero crust development. Cook in batches if needed, or use your largest skillet and give each round at least half an inch of clearance.
- 4
Skipping the dry: If you rinse your potato slices — and you should — they must be completely dry before hitting the fat. Residual surface moisture causes violent splattering and dramatically slows the crust formation. Pat them down with a clean kitchen towel, then let them air dry on the cutting board for two minutes.
The Video Reference Library
Want to see it in action? Here are the exact videos we analyzed and combined to build this foolproof recipe translation:
The foundational method — clear technique on slice thickness, skillet temperature, and the exact color you are aiming for before flipping. The close-ups of crust development are invaluable for understanding what 'ready to flip' actually looks like.
2. Cast Iron Breakfast Potatoes Masterclass
Deep dive into cast iron seasoning and heat management for potato cookery. Covers why fat choice matters and how to recover if your potatoes start sticking mid-cook.
3. Crispy Breakfast Potatoes — No Oven RequiredFocuses on stovetop-only method with strong emphasis on the crowding problem and batch cooking strategy. Good reference for understanding how steam is the enemy of crispiness.
🛠️ Core Equipment
- 12-inch cast iron skilletThe thermal mass of cast iron holds heat steady when cold potatoes hit the pan. A lightweight skillet drops temperature immediately and the rounds end up simmering in their own moisture instead of searing. A well-seasoned cast iron skillet also provides natural non-stick properties without sacrificing crust quality.
- Fish spatula or thin metal spatulaYou need something thin enough to slide cleanly under a crisp potato round without shattering the crust. Silicone spatulas are too thick and flexible — they crush the edges. A fish spatula lifts cleanly from below.
- Sharp chef's knifeUniform slice thickness is critical. Uneven rounds cook unevenly — thin edges burn while thick centers stay raw. A sharp knife lets you cut clean, consistent 1/4-inch rounds without compression or tearing.
- Splatter screenHot fat and potato moisture produce aggressive splattering. A splatter screen keeps the stovetop clean without trapping steam the way a lid would — which would ruin the crust entirely.
Crispy Cottage Fries (The Breakfast Potato You've Been Sleeping On)
🛒 Ingredients
- ✦2 pounds russet potatoes (about 3 large), scrubbed
- ✦3 tablespoons neutral oil (avocado, vegetable, or canola)
- ✦1 tablespoon unsalted butter
- ✦1 teaspoon garlic powder
- ✦1 teaspoon smoked paprika
- ✦1/2 teaspoon onion powder
- ✦1/2 teaspoon dried thyme
- ✦1 teaspoon kosher salt, plus more to taste
- ✦1/2 teaspoon freshly ground black pepper
- ✦2 tablespoons fresh flat-leaf parsley, finely chopped (for finishing)
- ✦Flaky sea salt for finishing
👨🍳 Instructions
01Step 1
Slice the scrubbed russet potatoes into 1/4-inch rounds. Do not peel — the skin crisps beautifully and adds texture.
02Step 2
Rinse the potato rounds under cold water to remove surface starch, then spread them on a clean kitchen towel. Pat completely dry and let air dry for 2 minutes.
03Step 3
Combine garlic powder, smoked paprika, onion powder, dried thyme, salt, and black pepper in a small bowl. Toss the dried potato rounds in the spice mix until evenly coated.
04Step 4
Heat a 12-inch cast iron skillet over medium-high heat for 2-3 minutes until the pan is genuinely hot. Add the oil and swirl to coat — it should shimmer immediately.
05Step 5
Add potato rounds in a single layer without overlapping. Work in batches if necessary. Press each round gently flat with the back of a spatula.
06Step 6
Cook undisturbed for 6-7 minutes over medium-high heat until the bottoms are deep golden brown. Do not stir. Do not nudge. Do not peek more than once.
07Step 7
Add the butter to the pan around the potatoes. Flip each round carefully using a thin metal spatula, sliding it fully under the crust before lifting.
08Step 8
Cook the second side for 5-6 minutes until equally golden. Reduce heat to medium if the butter begins to smoke aggressively.
09Step 9
Transfer to a wire rack or paper towel-lined plate. Season immediately with flaky sea salt while still hot.
10Step 10
Scatter fresh parsley over the finished rounds and serve immediately.
Nutrition Per Serving
Estimates based on standard preparation. Adjustments alter macros.
🔄 Substitutions
Instead of Russet potatoes...
Use Yukon Gold potatoes
Yukon Golds are waxier and will not get as crispy, but they have a naturally buttery flavor that many people prefer. If using Yukons, slice slightly thinner — 3/16 inch — to compensate for their higher moisture content.
Instead of Neutral oil...
Use Bacon fat or duck fat
Dramatically improves flavor. Bacon fat in particular pairs with the smoked paprika to create something that tastes like a diner meal from the 1960s. Render it fresh from thick-cut bacon for best results.
Instead of Smoked paprika...
Use Regular sweet paprika plus 1/4 teaspoon chipotle powder
Approximates the smoky note. Not identical but functionally close. The chipotle adds heat as well as smoke, so reduce or omit if you want a mild result.
Instead of Fresh parsley...
Use Fresh chives or fresh dill
Chives provide mild allium brightness. Dill is unconventional but excellent alongside cottage fries served with eggs or smoked salmon.
🧊 Storage & Reheating
In the Fridge
Store cooled cottage fries in an airtight container for up to 3 days. They will soften overnight — expect to reheat them in a skillet to restore crispness.
In the Freezer
Freeze in a single layer on a baking sheet, then transfer to a zip-lock bag for up to 1 month. Reheat directly from frozen in a 425°F oven for 10-12 minutes.
Reheating Rules
Reheat in a dry cast iron skillet over medium heat for 3-4 minutes per side until re-crisped. A splash of oil helps if they are sticking. Microwave is not recommended — it generates steam that destroys the crust.
❓ Frequently Asked Questions
Why are my cottage fries soft instead of crispy?
Two most likely causes: too much moisture on the potato surface before it hit the pan, or you crowded the skillet. Both trap steam and prevent crust development. Dry your rounds completely and cook in batches with space between each slice.
Do I need to parboil the potatoes first?
No — and most recipes that call for parboiling are overcorrecting for a different problem, usually slicing the rounds too thick. At 1/4 inch, the potato cooks through from raw in the pan without any pre-cooking step. Parboiling adds time without adding quality.
Can I use olive oil instead of neutral oil?
Extra-virgin olive oil has a low smoke point and will burn before the pan reaches the temperature you need for a proper sear. Use a refined olive oil (not extra-virgin) if you want olive oil flavor, or stick with avocado or vegetable oil for the highest heat without burning.
What is the difference between cottage fries and home fries?
The cut. Cottage fries are sliced into rounds — cross-sections of the whole potato. Home fries are typically diced or cut into irregular chunks. Rounds have more surface area relative to volume, which means more crust per bite.
Why do my potatoes stick to the cast iron?
Either the pan was not hot enough before you added the oil, or the potatoes were flipped before the crust fully formed. A properly crusted potato releases cleanly from well-seasoned cast iron. If it sticks, it is telling you to wait another 60 seconds.
Can I make these in the oven instead?
Yes — roast at 425°F on a preheated sheet pan for 20-25 minutes, flipping once at the halfway point. The results are good but not identical to cast iron: you get even color across the whole round but a slightly thinner crust. Oven method also works well for large batches where stovetop batching is impractical.

The Science of
Crispy Cottage Fries (The Breakfast Potato You've Been Sleeping On)
We turned everything on this page into a beautiful, flour-proof PDF cheat sheet. Print it out, stick it to your fridge, and never mess up your crispy cottage fries (the breakfast potato you've been sleeping on) again.
*We'll email you the high-res PDF instantly. No spam, just perfectly cooked meals.
AlmostChefs Editorial Team
We translate the internet's most popular cooking videos into foolproof, beginner-friendly written recipes. We analyze multiple methods, test them in our kitchen, and engineer a single "Master Recipe" that gives you the best possible result with the least possible stress.