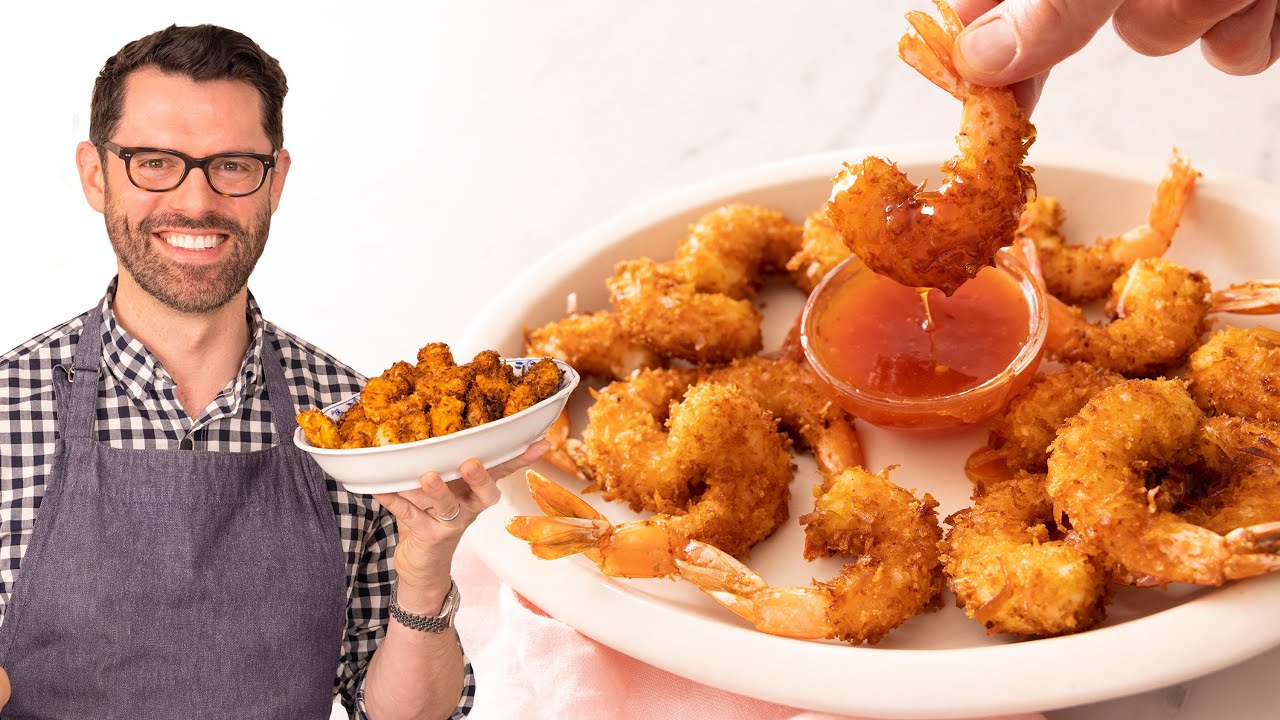
Crispy Coconut Shrimp (Oven-Baked or Fried, Mango Dipping Sauce)
Large shrimp coated in a coconut-panko mixture, oven-baked at 400°F or shallow-fried at 350°F until the exterior is golden and crackling. The egg white and honey wash bonds the coating more aggressively than whole egg. Mango dipping sauce built from coconut milk, lime, and Dijon. Science behind why pure coconut coating always burns.
“Coconut shrimp has one legitimate failure mode: the coating slides off or burns before it crisps. Both problems trace to the same two decisions — whether you dried the shrimp before coating, and whether you used pure coconut or a coconut-panko mix. Fix those two things and everything else is straightforward.”
Why This Recipe Works
Coconut shrimp is a coating-chemistry problem more than a cooking problem. The shrimp cooks in two to three minutes regardless of method. The entire technical challenge is getting the coating to bond to the shrimp surface, maintain that bond through heat, and crisp evenly without the coconut burning before the breadcrumb matrix is fully toasted. Every decision in this recipe addresses one of those three requirements.
Why Egg White Instead of Whole Egg
Most breaded protein recipes use whole egg as the wash. Whole egg works because the proteins in the white provide tackiness, and cooks use it by default without questioning why. For coconut shrimp specifically, the yolk is a problem. Egg yolk contains roughly 10 grams of fat per yolk — fat that creates a lubricating film on the shrimp surface rather than a bonding one. Egg white is almost pure protein. When it hits the shrimp, it creates a surface that the coconut-panko mixture adheres to mechanically, not just rests on top of.
The addition of honey to the egg white wash serves two functions. First, it increases surface tackiness — the slight stickiness of honey supplements the protein matrix from the white. Second, the sugar in honey undergoes caramelization and Maillard browning at lower temperatures than either the egg white proteins or the coconut sugars alone. This promotes more even, earlier browning across the surface of the coating, reducing the risk that some areas brown while others stay pale.
The Coconut-to-Panko Ratio
Pure shredded coconut coating is a documented failure mode. The thin, sugar-rich strands of dried coconut have almost no structural matrix — they lie flat on the shrimp surface and char individually at their tips before the body of the coating has reached the temperature needed for overall golden browning. The result is dark brown at the tips, pale in the center, and bitter wherever it burned.
Mixing panko at equal proportion with the coconut provides a heat-stable scaffolding. The panko's jagged, irregular particles create air pockets within the coating matrix that distribute heat more evenly and slow the rate at which individual coconut strands reach charring temperature. The panko also absorbs the egg white wash differently than coconut — more thoroughly, creating a stronger adhesive layer at the shrimp surface. The coconut provides flavor, appearance, and texture. The panko provides structure and heat stability.
The Drying Step Is Not Negotiable
The shrimp surface contains surface moisture even after they've been patted with a paper towel once. That moisture creates a barrier between the shrimp protein and the egg white wash. Where moisture is present, the wash pools rather than adhering uniformly. Where it adheres non-uniformly, the coating has weak spots that separate during cooking.
Complete drying means pressing firmly on both sides of each shrimp with paper towels and giving attention to the tail area, where moisture accumulates between the shell segments. After drying, the shrimp surface should look slightly matte rather than glossy. Glossy means moisture is still present. Matte means you've dried enough to proceed.
The Wire Rack Is Not Optional
A wire cooling rack placed inside the rimmed baking sheet changes the baking outcome significantly. Shrimp sitting flat on a sheet pan cook the top coating in dry oven air while the bottom coating steams against the metal surface. The top browns. The bottom stays soft. The result is a shrimp that's crispy on one side and chewy on the other.
Elevating on a wire rack allows the same dry oven air to circulate underneath each shrimp. Both surfaces are exposed to identical conditions — both surfaces brown evenly. The same rack used for draining after frying serves the same function: steam escaping the just-cooked shrimp rises downward and away from the coating rather than reflecting back up into it.
Baking vs. Frying — What's Actually Different
The frying method immerses the shrimp in oil at 350–375°F, meaning every surface is in simultaneous contact with hot fat. The coconut and panko absorb a small amount of that fat, which conducts heat into the coating interior more efficiently than hot air does. The result is a crisper, more even crunch with slightly more color depth.
The baking method relies on hot air convection and the small amount of cooking spray or oil on the surface. Without that surface fat, the coconut strands would desiccate rather than brown — the Maillard reaction requires fat as part of the surface chemistry. A thin coat of cooking spray solves this. The baked version is slightly drier in texture and marginally less dramatic in appearance but is a legitimate result that differs from fried in degree, not in kind.
The Dipping Sauce Chemistry
The mango dipping sauce has a design problem: coconut milk fat and citrus acid want to separate. The Dijon mustard solves this. Mustard contains mucilage compounds — primarily from the mustard seed husks — that act as emulsifiers, keeping fat and water-based components in suspension. A teaspoon of Dijon is enough to hold the sauce cohesive for the duration of a meal.
The flavor architecture of the sauce is built on contrast: the fat and sweetness of full-fat coconut milk against the sharpness of lime juice and rice vinegar, with the slight heat of cayenne and the savory depth of raw garlic. Each component is working against something else in the sauce, which is why it tastes layered rather than flat. Remove any element and the balance shifts noticeably in the direction of whatever that element was providing.
Where Beginners Mess This Up
Before we start, read this. These are the 5 reasons your crispy coconut shrimp (oven-baked or fried, mango dipping sauce) will fail:
- 1
Not drying the shrimp before coating: Wet shrimp surface prevents the egg white wash from adhering evenly. The coating slides, peels, or falls off in patches when it hits the oven or oil. Pat each shrimp completely dry with paper towels before the wash — both front and back, including the tail area. This takes 90 seconds and is the single most important prep step.
- 2
Using pure shredded coconut as the coating: Pure coconut has no structural matrix to absorb and distribute heat evenly. The thin sugar-rich strands char at the tips before the interior reaches the temperature needed to produce overall golden color. The result is black-tipped, bitter-tasting coating with pale patches in between. Mixing equal parts coconut and panko gives the shreds a heat-stable substrate that prevents individual strands from scorching.
- 3
Using whole egg instead of egg white: Whole egg wash contains fat from the yolk, which creates a slick, lubricating film that reduces coating adhesion rather than increasing it. Egg whites are almost pure protein — they form a tacky, sticky film that bonds the coconut-panko mixture firmly to the shrimp surface. The addition of honey in the wash increases tackiness and adds a small amount of sugar that promotes even browning.
- 4
Overcrowding the baking sheet or pan: Shrimp release moisture as they cook. Crowded shrimp trap that moisture between pieces, creating steam that softens the coating on the surfaces facing neighboring shrimp. Single layer with at least half an inch of clearance between pieces is the requirement — for both baking and frying.
- 5
Not serving immediately: The coconut-panko crust is at its crispest in the first 5–10 minutes after cooking. As it sits, residual moisture from the shrimp migrates outward into the coating. After 20 minutes at room temperature, the crunch is noticeably reduced. This is food for serving now, not making ahead.
The Video Reference Library
Want to see it in action? Here are the exact videos we analyzed and combined to build this foolproof recipe translation:
The primary reference for this recipe. Covers both the baking and frying technique, coating adhesion tips, and the mango dipping sauce construction.
🛠️ Core Equipment
- Wire rack on rimmed baking sheetElevates the shrimp so hot air circulates on all sides during baking. Shrimp sitting flat on a sheet pan steam on the underside and develop a pale, soft bottom coating while the top browns. A [wire cooling rack](/kitchen-gear/review/wire-cooling-rack) solves this entirely.
- Shallow dishes for coating stationWide, flat dishes allow you to dip, press, and coat shrimp in one smooth motion. Deep bowls make it impossible to press the coating evenly onto curved shrimp surfaces — you get thick patches where the shrimp touched the bowl and bare spots on the sides.
- Heavy-bottomed skillet or saucepan (for frying)For the frying method, a heavy-bottomed pan maintains oil temperature when cold shrimp are added. Thin pans drop out of the frying window immediately and recover slowly, producing greasy rather than crispy results.
- Instant-read thermometer (for frying)The frying window is 350–375°F. Below 325°F, shrimp absorb oil and the coating turns greasy. Above 400°F, the coconut scorches before the shrimp are cooked through. A thermometer is the only reliable way to stay in the window.
Crispy Coconut Shrimp (Oven-Baked or Fried, Mango Dipping Sauce)
🛒 Ingredients
- ✦1 pound large shrimp (16–20 count), peeled and deveined, tails on
- ✦2 egg whites
- ✦1 tablespoon honey
- ✦1 cup unsweetened shredded coconut
- ✦3/4 cup panko breadcrumbs
- ✦1/2 teaspoon garlic powder
- ✦1/2 teaspoon sea salt
- ✦1/4 teaspoon cayenne pepper
- ✦1/4 teaspoon ground ginger
- ✦Zest of 1 lime
- ✦Cooking spray or coconut oil (for baking) / neutral oil (for frying)
- ✦2 tablespoons fresh cilantro, chopped (for garnish)
- ✦1/3 cup coconut milk (full-fat)
- ✦2 tablespoons fresh lime juice
- ✦1 tablespoon rice vinegar
- ✦1 teaspoon Dijon mustard
- ✦1 clove garlic, minced
- ✦1 tablespoon honey (for dipping sauce)
- ✦Pinch of cayenne (for dipping sauce)
👨🍳 Instructions
01Step 1
Pat shrimp completely dry with paper towels, pressing gently on both sides. Set aside on a clean surface.
02Step 2
In a shallow bowl, whisk egg whites with honey until frothy and slightly foamy. The mixture should look opaque, not clear.
03Step 3
In a second shallow dish, combine shredded coconut, panko, garlic powder, salt, cayenne, ground ginger, and lime zest. Mix thoroughly.
04Step 4
For baking: Preheat oven to 400°F. Set a wire rack on a rimmed baking sheet and coat with cooking spray.
05Step 5
Dip each shrimp into the egg white wash, letting excess drip off. Then press firmly into the coconut-panko mixture on both sides. Press the coating in — don't just pat it.
06Step 6
For baking: Arrange coated shrimp on the wire rack in a single layer with space between each piece. Spray the tops lightly with cooking spray. Bake at 400°F for 12–15 minutes, flipping halfway, until golden and firm.
07Step 7
For frying: Heat 1 inch of neutral oil in a heavy-bottomed pan to 350–375°F. Fry shrimp in batches of 4–5 for 2–3 minutes, turning once, until deep golden. Drain on a wire rack — not paper towels.
08Step 8
Make the dipping sauce: whisk together coconut milk, lime juice, rice vinegar, Dijon mustard, minced garlic, honey, and cayenne until smooth.
09Step 9
Garnish shrimp with chopped cilantro and serve immediately alongside dipping sauce.
Nutrition Per Serving
Estimates based on standard preparation. Adjustments alter macros.
🔄 Substitutions
Instead of Egg whites with honey...
Use Beaten whole egg with 1 teaspoon honey
Works but produces slightly less adhesion. The yolk fat reduces the tackiness of the wash. If whole egg is all you have, add a second teaspoon of honey to compensate.
Instead of Unsweetened shredded coconut...
Use Unsweetened coconut flakes
Larger flakes create a more dramatic visual texture and a slightly airier crunch. They're also more prone to the burning-at-tips problem — reduce bake time by 2 minutes and watch closely.
Instead of Panko breadcrumbs...
Use Regular breadcrumbs or crushed crackers
Panko produces a lighter, crispier texture because of its larger, jagged particle structure. Regular breadcrumbs work but produce a denser, slightly heavier coating.
Instead of Mango dipping sauce...
Use Sweet chili sauce or honey-sriracha
Sweet chili sauce is the most common commercial accompaniment and works well with the coconut. Honey-sriracha provides heat that contrasts with the sweet coconut. Both are acceptable substitutes that require no preparation.
🧊 Storage & Reheating
In the Fridge
Store cooked shrimp uncovered on a wire rack for the first 30 minutes, then transfer to an airtight container for up to 2 days. The coating softens in storage.
In the Freezer
Freeze uncooked coated shrimp on a baking sheet in a single layer, then transfer to a freezer bag for up to 1 month. Bake directly from frozen at 400°F for 18–20 minutes.
Reheating Rules
Reheat in a 375°F oven on a wire rack for 6–8 minutes until crisp and hot. The microwave makes the coating soft and chewy — avoid it.
❓ Frequently Asked Questions
Why does my coconut coating keep burning before it's golden?
You're using too much coconut relative to panko, or your oven is running hot. The sugar-rich coconut strands char quickly at high temperatures. Increase the panko ratio to at least 50% of the coating mixture and check your oven temperature with a thermometer. If your oven runs hot, drop to 375°F and extend the bake time.
Can I make these ahead of time for a party?
You can coat the shrimp and refrigerate them uncooked for up to 2 hours before baking or frying. Keep them on a wire rack in the refrigerator — a flat surface causes the bottom of the coating to stick and peel. Bake or fry and serve within 10 minutes for maximum crunch.
Is the baked version as good as the fried version?
The textures are slightly different. Fried coconut shrimp has a more dramatic crunch from oil contact on all surfaces simultaneously. Baked shrimp has a slightly drier, more even crunch. For a party or larger batch, baking is more practical and the difference is not significant enough to matter.
Can I use frozen shrimp?
Yes — thaw completely in the refrigerator overnight or under cold running water, then dry very thoroughly. Frozen shrimp hold more water after thawing than fresh, which makes the drying step even more critical.
What size shrimp should I use?
16–20 count (large) is the ideal size. They hold enough coating to create a substantial crust without the shrimp being overwhelmed by it. Smaller shrimp cook faster and the coating-to-shrimp ratio is too high. Jumbo shrimp require more time and the interior can be undercooked when the exterior is browned.

The Science of
Crispy Coconut Shrimp (Oven-Baked or Fried, Mango Dipping Sauce)
We turned everything on this page into a beautiful, flour-proof PDF cheat sheet. Print it out, stick it to your fridge, and never mess up your crispy coconut shrimp (oven-baked or fried, mango dipping sauce) again.
*We'll email you the high-res PDF instantly. No spam, just perfectly cooked meals.
AlmostChefs Editorial Team
We translate the internet's most popular cooking videos into foolproof, beginner-friendly written recipes. We analyze multiple methods, test them in our kitchen, and engineer a single "Master Recipe" that gives you the best possible result with the least possible stress.