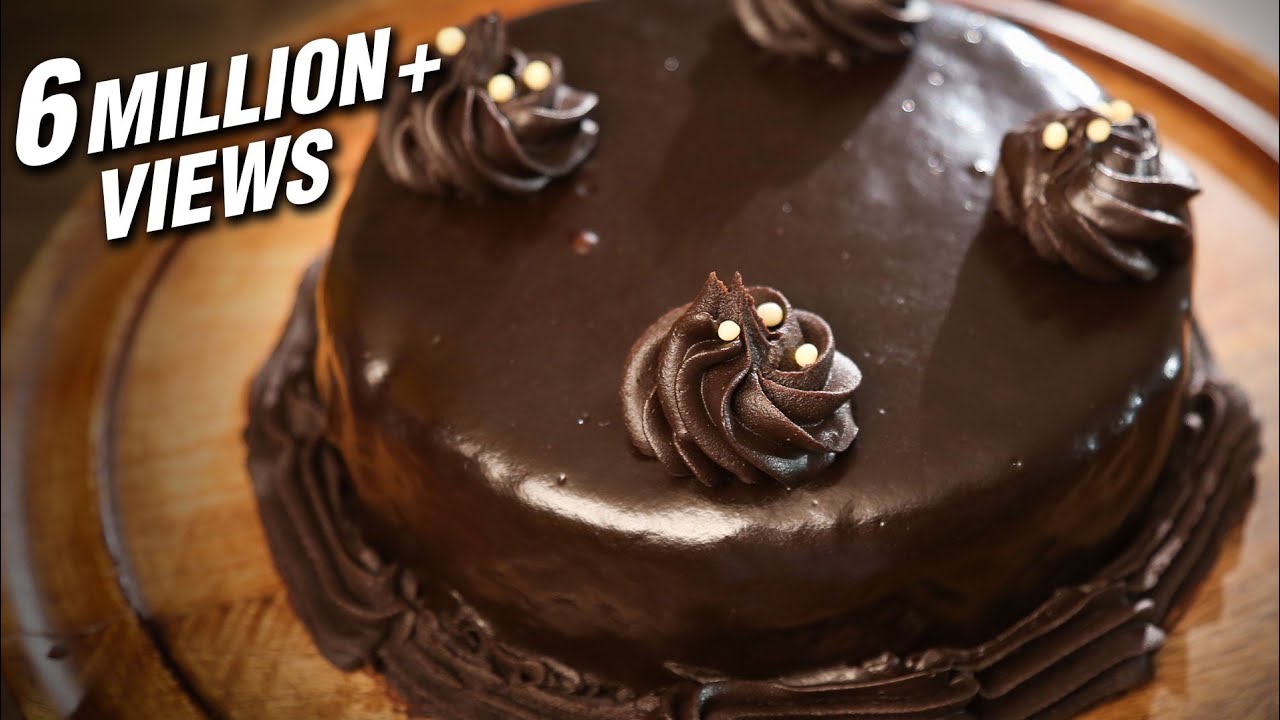
Chocolate Truffle Cake (The Fudgiest Slice You'll Ever Cut)
A dense, glossy, ganache-enrobed layer cake with a brownie-like crumb and a truffle filling that sets firm but melts clean on the tongue. We reverse-engineered the most-watched YouTube methods to isolate exactly why most homemade chocolate cake comes out dry, gummy, or flat — and what to do instead.
“Every chocolate cake promises intense, fudgy depth. Most deliver dry crumb with waxy frosting and a filling that tastes like sweetened paste. The difference between a forgettable chocolate cake and one people photograph before eating comes down to three decisions: the ratio of fat to flour, the temperature at which ganache is poured, and whether you use hot water or hot coffee in the batter. We broke down the most-watched methods to build one version that gets everything right.”
Why This Recipe Works
Chocolate truffle cake is not chocolate cake with ganache on top. The distinction matters. Standard layer cakes prioritize a light, springy crumb — that's why they use cake flour, lots of leavening, and beaten eggs to trap air. Truffle cake prioritizes density, moisture, and a deep, almost savory chocolate character. It's engineered from the start to be fudgy, which means almost every decision in the recipe runs counter to what you'd do if you were building a conventional sponge.
The Fat-to-Flour Ratio Is the Whole Game
Most chocolate cake recipes use roughly equal weights of flour and sugar, with fat at about 60–70% of the flour weight. This recipe runs the fat content higher — close to 80% when you account for the oil, eggs, and buttermilk together. Higher fat means a more tender, finer crumb structure. It also means the batter looks alarmingly thin and liquidy before it goes in the oven. This is correct. Resist the impulse to add flour. The batter's job is not to look like batter — it's to produce the right cake.
Dutch-process cocoa is non-negotiable here. Natural cocoa is acidic and reacts with baking soda to provide lift, which is what you want in a fluffy layer cake. Dutch-process has been alkalized, which neutralizes that acidity and produces a deeper, more complex chocolate flavor with less of the sharp, almost metallic note that natural cocoa can leave in high-fat batters. The color difference alone tells the story: Dutch-process produces a cake that's nearly black. Natural cocoa produces something closer to brown. Use a digital kitchen scale to measure the cocoa precisely — even a 10-gram excess makes the crumb noticeably bitter.
Coffee Is Not Optional
Hot coffee in a chocolate cake batter is one of those techniques that sounds wrong until you understand the chemistry. Coffee contains caffeoylquinic acids and aromatic esters that amplify the perception of chocolate flavor without contributing a detectable coffee taste of their own. It's the same principle as adding a pinch of salt to caramel — you're not adding a competing flavor, you're raising the intensity of the existing one. In blind tests, most people describe coffee-baked chocolate cake as "more chocolatey" without being able to identify why.
The coffee also serves a structural purpose: it replaces hot water, and its slightly acidic pH activates the baking soda more efficiently, producing a finer bubble structure in the crumb. The result is a cake that rises evenly without those large air pockets that make slices look uneven.
Two Ganaches, Two Jobs
This recipe uses ganache twice — once as a truffle filling, once as the exterior glaze — and they're made at different ratios for different reasons. The truffle filling uses a 1:1.67 cream-to-chocolate ratio, producing a ganache that sets firm enough to hold its shape between layers but melts cleanly on the tongue. The glaze uses a 1:1 ratio, producing a fluid, self-leveling coat that dries to a glossy mirror finish.
Temperature is everything for the glaze. Pour it above 100°F and it flows too fast, leaving a thin, streaky coat. Pour it below 85°F and it sets on contact, creating a lumpy, uneven surface. The 90–95°F window gives you a ganache that moves slowly and purposefully, building up in multiple passes as it drips down the sides. An offset spatula is the right tool for guiding it — flat spatulas create drag marks, and your fingers transfer heat that accelerates setting unevenly.
The Cake Soak Is Non-Negotiable
The single most underrated step in any layer cake is the soak, and nowhere is it more important than chocolate cake. The moment a chocolate sponge leaves the oven, it begins releasing moisture as steam. Within the first two minutes, it loses a measurable percentage of its total water content. The cake soak — in this case, hot coffee dissolved with sugar and cocoa — replaces that moisture before it escapes, penetrating the crumb while it's still porous and hot.
The result is a cake that stays moist for two days at room temperature rather than going stale by the following afternoon. A pastry brush gets the job done in under 30 seconds per layer. The soak also adds a second hit of coffee-amplified chocolate flavor, deepening the overall profile without changing the texture.
Why the Truffle Filling Sets This Apart
The name of the dish is not accidental. The interior filling is built exactly like a chocolate truffle — cream, chocolate, and butter, emulsified into a smooth, dense paste that sits in the center of the cake and provides a distinct textural contrast to the sponge surrounding it. The butter in particular is critical: it adds body and a faint dairy richness that cream alone doesn't provide, and it gives the filling a cleaner, more abrupt melt on the tongue — the defining characteristic of a properly made ganache truffle.
This is what separates chocolate truffle cake from generic chocolate cake. Not the darkness of the cocoa, not the height of the layers, not the gloss of the exterior. It's the moment you cut through the ganache shell, the sponge layers, and hit that dense truffle center — and everything clicks into place.
Where Beginners Mess This Up
Before we start, read this. These are the 4 reasons your chocolate truffle cake (the fudgiest slice you'll ever cut) will fail:
- 1
Overmixing the batter after adding flour: Once flour hits the wet ingredients, gluten begins developing. Every additional stir past the point of full incorporation tightens the crumb structure, turning what should be a tender, fudgy slice into something with the texture of a dense muffin. Mix until just combined — a few flour streaks are acceptable and will absorb during the rest before baking.
- 2
Pouring ganache when it's still too warm: Ganache poured at 130°F or above is too fluid to coat evenly. It runs off the sides, pools at the base, and never builds that thick, glossy shell. The correct temperature is 90–95°F — when it coats the back of a spoon cleanly and drips slowly rather than streaming. If you're unsure, let it sit five more minutes.
- 3
Skipping the cake soak: Chocolate sponge loses moisture the moment it comes out of the oven. Brushing each layer with a simple chocolate syrup or coffee-sugar soak within the first two minutes of cooling replaces that moisture before it escapes. Skip this and your cake will be noticeably drier by the time it's sliced, even if it seemed fine during assembly.
- 4
Using low-quality chocolate in the ganache: The ganache is 40% of this recipe by volume and 80% of its character. Using chocolate chips (which contain stabilizers that prevent clean melting) or milk chocolate (which lacks the bitterness to balance the sugar) produces flat, one-note results. Use dark chocolate with 60–70% cacao. The investment is a few dollars and the difference is not subtle.
The Video Reference Library
Want to see it in action? Here are the exact videos we analyzed and combined to build this foolproof recipe translation:
The most thorough walkthrough of ganache temperature control and truffle filling technique available. Essential viewing for understanding the difference between pourable and spreadable ganache consistency.
Focused entirely on ganache ratios and temperature windows. Covers why cream-to-chocolate ratio changes depending on whether you want a glaze, a filling, or a firm truffle center.
Breaks down the role of each ingredient in building a dense, moist crumb. Particularly useful for understanding why hot coffee amplifies chocolate flavor without making the cake taste like coffee.
🛠️ Core Equipment
- Two 8-inch round cake pansSame diameter ensures even layers. Dark pans absorb more radiant heat and overbrown the exterior before the center sets. Use light-colored aluminum for the most even bake.
- Digital kitchen scaleChocolate cake is sensitive to flour ratio. A cup of flour measured by scooping can be 25% heavier than one measured by weight. That excess flour is the single biggest reason home chocolate cakes are dry. Weigh everything.
- Offset spatulaEssential for spreading ganache evenly across the truffle filling layer and for smoothing the exterior coat. A flat butter knife creates drag marks and uneven pressure. The offset angle gives you control without your knuckles dragging through the ganache.
- Heatproof glass bowlFor melting chocolate and making ganache over a double boiler. Metal bowls conduct heat unevenly and can scorch the chocolate. Glass heats slowly and evenly, giving you a clean melt without seized chocolate.
Chocolate Truffle Cake (The Fudgiest Slice You'll Ever Cut)
🛒 Ingredients
- ✦240g (2 cups) all-purpose flour
- ✦400g (2 cups) granulated sugar
- ✦85g (3/4 cup) Dutch-process cocoa powder, sifted
- ✦2 teaspoons baking soda
- ✦1 teaspoon baking powder
- ✦1 teaspoon fine sea salt
- ✦2 large eggs, room temperature
- ✦240ml (1 cup) full-fat buttermilk, room temperature
- ✦240ml (1 cup) hot brewed coffee
- ✦120ml (1/2 cup) neutral oil (avocado or canola)
- ✦2 teaspoons pure vanilla extract
- ✦For the Truffle Filling: 200g (7 oz) 70% dark chocolate, finely chopped
- ✦120ml (1/2 cup) heavy cream
- ✦2 tablespoons unsalted butter, softened
- ✦1 tablespoon dark rum or espresso (optional)
- ✦For the Ganache Glaze: 300g (10.5 oz) 65% dark chocolate, finely chopped
- ✦300ml (1.25 cups) heavy cream
- ✦2 tablespoons unsalted butter, room temperature
- ✦1 tablespoon light corn syrup (for gloss)
- ✦For the Cake Soak: 60ml (1/4 cup) hot coffee
- ✦2 tablespoons granulated sugar
- ✦1 tablespoon Dutch-process cocoa powder
👨🍳 Instructions
01Step 1
Preheat the oven to 350°F (175°C). Grease two 8-inch round cake pans, line the bottoms with parchment circles, and grease the parchment.
02Step 2
In a large bowl, whisk together the flour, sugar, cocoa powder, baking soda, baking powder, and salt until fully combined.
03Step 3
In a separate bowl, whisk the eggs, buttermilk, oil, and vanilla extract together until smooth.
04Step 4
Pour the wet mixture into the dry ingredients and stir gently until almost combined. Slowly stream in the hot coffee while stirring. Mix until just combined — no dry streaks, but don't overwork it.
05Step 5
Divide the batter evenly between the two prepared pans. Bake for 32–36 minutes, until a toothpick inserted in the center comes out with moist crumbs (not wet batter, not completely clean).
06Step 6
While the cakes bake, make the cake soak: whisk together the hot coffee, sugar, and cocoa powder until the sugar dissolves. Set aside.
07Step 7
Remove cakes from the oven. Immediately brush both layers generously with the cake soak while still in the pans. Let cool in pans for 10 minutes, then invert onto a wire rack to cool completely — at least 1 hour.
08Step 8
Make the truffle filling: heat the cream in a small saucepan until it just begins to simmer. Pour over the finely chopped dark chocolate in a heatproof bowl. Let sit 2 minutes undisturbed, then stir from the center outward until completely smooth. Add the butter and rum or espresso if using. Stir until glossy.
09Step 9
Let the truffle filling cool at room temperature until it reaches a spreadable consistency — about 45 minutes. It should hold its shape when scooped but spread smoothly under an offset spatula.
10Step 10
Place the first cake layer on a wire rack set over a sheet pan. Spread the truffle filling evenly across the top, going all the way to the edge. Place the second layer on top, flat side up, and press gently to adhere.
11Step 11
Make the ganache glaze: heat the cream until simmering, pour over the chopped chocolate, and let sit 2 minutes. Stir until smooth. Add butter and corn syrup and stir until fully incorporated. Let cool to 90–95°F — it should coat a spoon and drip slowly.
12Step 12
Pour the ganache over the center of the assembled cake. Use an offset spatula to guide it gently toward the edges, letting it cascade down the sides naturally. Do not over-manipulate it — the ganache self-levels.
13Step 13
Let the ganache set at room temperature for 30 minutes, or refrigerate for 15 minutes for a firmer finish. Slice with a warm knife, wiping the blade clean between cuts.
Nutrition Per Serving
Estimates based on standard preparation. Adjustments alter macros.
🔄 Substitutions
Instead of Buttermilk...
Use Full-fat oat milk + 1 tablespoon apple cider vinegar
Let the mixture sit for 5 minutes until it curdles. It behaves nearly identically to buttermilk in the batter — the acid activates the baking soda and tenderizes the crumb.
Instead of Heavy cream (ganache)...
Use Full-fat coconut cream
Makes the ganache fully dairy-free. Slight coconut undertone that complements dark chocolate well. Use the solid portion of a refrigerated can — the watery liquid layer will make your ganache too thin.
Instead of 70% dark chocolate (filling)...
Use 60% bittersweet chocolate
Produces a slightly sweeter, less intense truffle center. Good for audiences who find 70% too sharp. Go no lower than 60% or the filling becomes cloying.
Instead of Neutral oil...
Use Melted coconut oil or melted unsalted butter
Butter adds a richer dairy flavor but produces a slightly denser crumb. Coconut oil works well but adds faint tropical notes. Both are valid — neither is neutral.
🧊 Storage & Reheating
In the Fridge
Store covered at room temperature for up to 2 days for best texture, or refrigerate for up to 5 days. Bring to room temperature for 30 minutes before serving — cold ganache mutes the chocolate flavor significantly.
In the Freezer
Freeze individual slices wrapped tightly in plastic wrap, then foil, for up to 2 months. Thaw overnight in the refrigerator. The ganache may lose some gloss but the flavor is unaffected.
Reheating Rules
Do not microwave. If the cake has been refrigerated, simply rest it at room temperature for 20–30 minutes. Microwaving melts the ganache unevenly and turns the crumb rubbery.
❓ Frequently Asked Questions
Why does my chocolate cake taste flat even with good cocoa?
You likely used hot water instead of hot coffee. Coffee contains volatile aromatic compounds that amplify chocolate flavor without making the cake taste like coffee. It's not a substitution — it's an amplifier. Brewed coffee works; instant works; espresso works best.
My ganache seized and turned grainy. Is it ruined?
No. Add one tablespoon of warm cream and stir vigorously from the center outward. The emulsion will usually re-form within 30 seconds. If it doesn't, add another tablespoon. Seized ganache almost always recovers with gentle heat and fresh cream.
Can I make this as a single-layer cake instead of two layers?
Yes, but halve the truffle filling and spread it on top of the single layer before glazing. Bake the full batter in a 9x13 pan at 350°F for 38–42 minutes. The result is more of a sheet cake with a truffle topping — less dramatic but equally delicious.
How do I know when my ganache is at the right pouring temperature?
Dip a spoon in and hold it up. At 90–95°F, the ganache should coat the back of the spoon in a thin, even layer and drip slowly when you tilt it — roughly one drip every two seconds. If it streams off, it's too warm. If it clumps, it's too cool. Give it another five minutes either way.
Do I have to use Dutch-process cocoa specifically?
For this recipe, yes. Dutch-process cocoa has been treated with alkali to neutralize its natural acidity, which produces a darker color, milder flavor, and — critically — does not react with baking soda the way natural cocoa does. Substituting natural cocoa will affect the rise and the final color. If you only have natural cocoa, replace the baking soda with an equal amount of baking powder.
Can I make the ganache ahead of time?
Yes. Ganache keeps refrigerated for up to a week or frozen for two months. Reheat it gently in a heatproof bowl set over a pot of barely simmering water, stirring slowly, until it returns to pouring consistency. Do not microwave — the uneven heat scorches the chocolate on the bottom while the top is still cold.

The Science of
Chocolate Truffle Cake (The Fudgiest Slice You'll Ever Cut)
We turned everything on this page into a beautiful, flour-proof PDF cheat sheet. Print it out, stick it to your fridge, and never mess up your chocolate truffle cake (the fudgiest slice you'll ever cut) again.
*We'll email you the high-res PDF instantly. No spam, just perfectly cooked meals.
AlmostChefs Editorial Team
We translate the internet's most popular cooking videos into foolproof, beginner-friendly written recipes. We analyze multiple methods, test them in our kitchen, and engineer a single "Master Recipe" that gives you the best possible result with the least possible stress.