The Perfect Chocolate Chip Cookie (Crispy Edge, Gooey Center Guaranteed)
A brown butter chocolate chip cookie with a shatteringly crisp edge and a soft, fudgy center that stays that way for days. We broke down the most-watched cookie videos on YouTube to isolate the three variables that separate forgettable cookies from the ones people ask you about.
“Every home baker thinks they have a reliable chocolate chip cookie recipe. Most of them produce cookies that are either cakey and pale, or flat and greasy, with no real explanation for why. The difference between a forgettable cookie and the kind people eat two of before they realize it comes down to three things: browning the butter, the ratio of brown to white sugar, and whether you actually let the dough rest. We analyzed every major cookie technique on YouTube and built one method that reliably delivers the crispy-edged, gooey-centered result everyone is chasing.”
Why This Recipe Works
A chocolate chip cookie is simultaneously the most democratic and most misunderstood recipe in American baking. Everyone has made one. Almost no one has made a truly great one — not because the technique is difficult, but because the difference between a forgettable cookie and a genuinely memorable one lives in decisions that look identical on the surface. Same ingredients. Same temperature. Opposite results.
Brown Butter Is Not Optional
The most impactful single change you can make to any cookie recipe is to brown the butter instead of merely melting it. When butter heats past its melting point, the water evaporates and the milk solids — proteins and sugars suspended in the fat — undergo their own Maillard reaction, toasting to a deep amber and releasing a cascade of nutty, caramel, and slightly savory compounds that plain melted butter doesn't contain. The flavor difference is stark and unmistakable. It tastes like the difference between a grocery store cookie and one from a bakery that charges four dollars apiece and has a line out the door.
The technique requires vigilance, not skill. Use a light-colored saucepan so you can see the milk solids change color — dark pans make this impossible and result in either underdone or burnt butter with no warning. Stir constantly. The moment the foam subsides and you see golden-brown flecks and smell toasted hazelnut, pour the butter immediately into your mixing bowl, scraping every last bit. Those brown bits on the bottom of the pan are the entire point.
The Sugar Architecture
Cookie texture is almost entirely determined by sugar chemistry, and most home bakers treat the white-to-brown sugar ratio as interchangeable. It isn't. White sugar — pure sucrose — is hydrophobic once baked. It creates crisp, snappy cookies that dry out quickly. Brown sugar contains molasses, which is hygroscopic: it actively attracts and retains moisture from the surrounding environment. Cookies made with primarily brown sugar stay soft and chewy for days rather than hours.
The 2:1 brown-to-white ratio in this recipe is a deliberate calculation, not a preference. The minority of white sugar contributes to the crisp, golden edges and the slight crunch on the bottom. The majority of brown sugar ensures the center stays fudgy and the cookie remains soft on day three. Equal parts produces a serviceable cookie. The 2:1 ratio produces the result everyone is actually trying to make.
The Dough Rest: Why It Matters More Than You Think
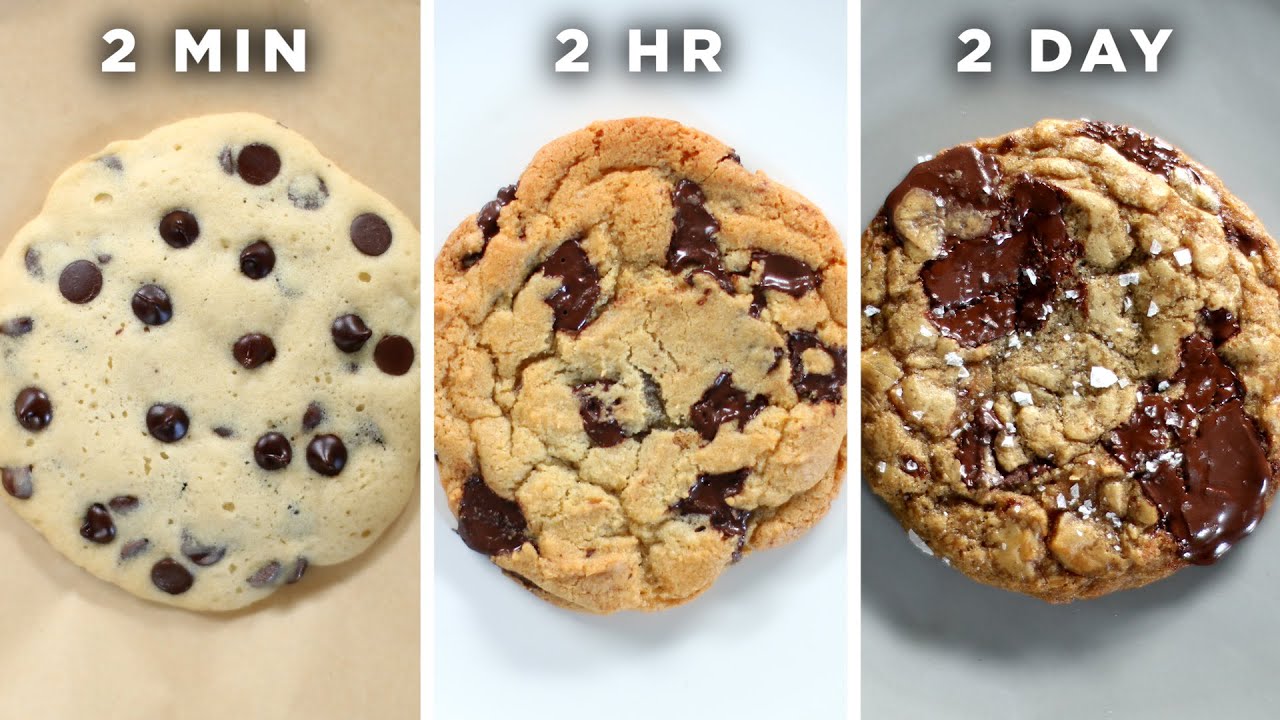
Resting cookie dough in the refrigerator is the technique that separates professional baking from home baking, and it does three distinct things simultaneously. First, it gives the flour time to fully hydrate — the proteins and starches absorb the liquid in the dough completely, which translates directly into a more cohesive, chewier final texture. Second, the cold firms the butter back up, meaning the cookies spread more slowly in the oven. Slow spread means the edges have time to set and crisp while the center is still soft — the exact combination everyone is chasing. Third, and most overlooked: moisture evaporates slowly from the surface of the dough during the rest, concentrating the flavor compounds. A 72-hour rested cookie tastes more intensely of caramel, vanilla, and chocolate than a dough baked immediately. This is why great bakery cookies taste more complex than yours — it's not a secret ingredient. It's time.
Pulling Early, Finishing on the Pan
The single most counterintuitive instruction in this recipe is also the most important: pull the cookies when they look underdone. The centers should be glossy and visibly wet when you open the oven. Every instinct you have developed from looking at food tells you to keep baking. Ignore it. The aluminum baking sheet retains significant heat after leaving the oven, and the cookies continue cooking on the pan for the 5 minutes they rest before you move them. By the time they reach the wire rack, the centers have set perfectly — dense, gooey, and pulling slightly from the edge in the way that signals an excellent cookie. If you wait until the center looks set in the oven, you've already lost. The cookie will cool to a dry, crumbly disappointment that gives you nothing to be proud of.
Carryover cooking is one of the most fundamental concepts in professional baking and one of the most consistently ignored by home cooks. The oven is not the endpoint. It is the beginning of the final phase. Learn to pull early and you will never overbake a cookie again.
Where Beginners Mess This Up
Before we start, read this. These are the 4 reasons your the perfect chocolate chip cookie (crispy edge, gooey center guaranteed) will fail:
- 1
Using melted (not browned) butter: Melted butter makes cookies spread flat and greasy. Brown butter — cooked until the milk solids toast to a deep amber — adds a nutty, caramel depth that regular butter simply cannot replicate. The extra three minutes of stirring over heat is the single highest-leverage step in the entire recipe.
- 2
Using all white sugar: White sugar makes cookies crisp and airy. Brown sugar — which contains molasses — makes cookies moist, chewy, and dense. The magic ratio is 2:1 brown to white. Invert it and you have a snappy biscuit. Equal parts gives you a serviceable cookie. The 2:1 ratio gives you the bakery result.
- 3
Baking straight from the mixing bowl: Cookie dough needs at least 30 minutes of refrigerator rest — and ideally 24-72 hours. The rest allows the flour to fully hydrate, concentrates the flavors as moisture evaporates, and firms the fat so the cookies spread more slowly in the oven, giving the edges time to set before the center collapses.
- 4
Overbaking to visual doneness: Cookies look underdone when they're actually perfect. If the center looks set and dry when you pull them from the oven, they are already overcooked. Pull them when the center still looks glossy, wet, and underdone — carryover heat from the pan will finish them in 5 minutes on the rack.
The Video Reference Library
Want to see it in action? Here are the exact videos we analyzed and combined to build this foolproof recipe translation:
A deeply methodical breakdown of every variable — butter temperature, sugar ratios, resting time, and oven positioning — with side-by-side comparisons that show exactly what each change does to the final cookie.
Focused specifically on the brown butter technique and how to judge the exact moment the milk solids hit the right amber color without tipping into burnt. Essential viewing before your first batch.
Troubleshooting-focused video that diagnoses the five most common cookie failures with clear visual examples. Particularly useful for the spreading and overbaking problems.
🛠️ Core Equipment
- Light-colored aluminum baking sheetDark pans absorb more heat and burn the bottoms before the tops set. Light aluminum reflects heat evenly, giving you golden bottoms without overdone edges. Non-negotiable for consistent results.
- Stand mixer or hand mixerProperly creaming the sugars into the brown butter incorporates air and creates the right texture. Whisking by hand works, but a mixer does it faster and more uniformly — especially important for the initial emulsification stage.
- Kitchen scaleFlour is the most commonly mis-measured ingredient in baking. One cup of flour scooped directly from the bag can weigh anywhere from 120g to 180g depending on how packed it is. Weighing eliminates that variable entirely.
- Parchment paper or silicone baking matPrevents sticking and ensures even heat transfer. A bare greased pan promotes faster spreading and uneven browning. Parchment is cheap insurance.
The Perfect Chocolate Chip Cookie (Crispy Edge, Gooey Center Guaranteed)
🛒 Ingredients
- ✦2.25 cups (280g) all-purpose flour
- ✦1 teaspoon baking soda
- ✦1 teaspoon fine sea salt
- ✦1 cup (225g) unsalted butter
- ✦1.5 cups (300g) packed light brown sugar
- ✦0.5 cup (100g) granulated white sugar
- ✦2 large eggs, room temperature
- ✦1 egg yolk, room temperature
- ✦2 teaspoons pure vanilla extract
- ✦2 cups (340g) semisweet chocolate chips or chopped chocolate
- ✦Flaky sea salt for finishing
👨🍳 Instructions
01Step 1
Brown the butter: melt the unsalted butter in a light-colored saucepan over medium heat, stirring constantly. After 4-5 minutes, the foam will subside, the milk solids will turn golden brown, and the butter will smell intensely nutty. Pour immediately into a large mixing bowl, scraping all the browned bits from the pan.
02Step 2
Let the brown butter cool for 10 minutes until it's warm but not hot to the touch. Add both sugars to the bowl and whisk vigorously for 2 minutes until fully combined and slightly lightened in color.
03Step 3
Add the two whole eggs and one extra yolk, then the vanilla extract. Whisk for another 60 seconds until the mixture is glossy and ribbons slightly when you lift the whisk.
04Step 4
Add the flour, baking soda, and fine sea salt all at once. Fold with a rubber spatula until just combined — no streaks of flour, but do not overmix. Overmixing develops gluten and produces a tough, bread-like texture.
05Step 5
Fold in the chocolate chips or chopped chocolate until evenly distributed.
06Step 6
Cover the bowl with plastic wrap and refrigerate for at least 30 minutes. For best results, rest 24-72 hours.
07Step 7
When ready to bake, preheat the oven to 375°F (190°C). Line baking sheets with parchment paper. Scoop dough into balls roughly 2 tablespoons each (about 40g) and place 2 inches apart.
08Step 8
Bake for 10-12 minutes until the edges are set and golden but the centers still look glossy, wet, and underdone. Do not wait for the center to look cooked.
09Step 9
Remove from oven and immediately sprinkle each cookie with a pinch of flaky sea salt. Let cool on the baking sheet for 5 minutes — the carryover heat finishes the center.
10Step 10
Transfer to a wire rack. Resist eating them until they've cooled for at least 5 more minutes — the texture is still setting.
Nutrition Per Serving
Estimates based on standard preparation. Adjustments alter macros.
🔄 Substitutions
Instead of Unsalted butter...
Use European-style cultured butter
Higher fat content (84% vs 80%) means more richness, more browning, and a slightly nuttier flavor once browned. Excellent upgrade if available.
Instead of All-purpose flour...
Use Bread flour
Higher protein content develops slightly more gluten, resulting in a chewier, more substantial cookie with better structural integrity. Use 1:1. A favorite among serious cookie obsessives.
Instead of Semisweet chocolate chips...
Use Dark chocolate (70% cacao), chopped
The bitterness of higher-cacao chocolate balances the sweetness more aggressively. Produces a more sophisticated, less cloying cookie. Highly recommended.
Instead of Eggs...
Use 1 flax egg per whole egg (1 tbsp ground flaxseed + 3 tbsp water, rested 5 minutes)
Viable dairy-free/vegan substitution. The texture is slightly less chewy and the edges don't set quite as crisply, but the flavor is otherwise excellent.
🧊 Storage & Reheating
In the Fridge
Store baked cookies in an airtight container at room temperature for up to 4 days. A slice of bread in the container keeps them soft by providing ambient moisture.
In the Freezer
Freeze raw dough balls for up to 3 months. Freeze baked cookies for up to 2 months. Both defrost and reheat well.
Reheating Rules
Warm baked cookies in a 300°F oven for 3-4 minutes or microwave for 15 seconds. A 15-second microwave blast restores the gooey center remarkably well.
❓ Frequently Asked Questions
Why do my cookies come out flat and greasy?
The most common cause is butter that was too warm or too soft when mixed. Brown butter needs to cool to warm-but-not-hot before you add the sugars. Hot fat coats the flour proteins before gluten can form, preventing structure. The other cause is skipping the dough rest — cold, firm dough spreads much more slowly in the oven.
Can I skip the dough rest?
Technically yes, but the cookie will be noticeably less good. Without rest, the flour hasn't fully hydrated, the fat is still too soft, and the flavors haven't concentrated. The minimum is 30 minutes in the fridge. Twenty-four hours is meaningfully better. Seventy-two hours is the professional standard.
Why does my cookie come out cakey instead of chewy?
Two likely causes: too much white sugar relative to brown, or too many egg whites. Brown sugar's molasses content is hygroscopic — it pulls moisture from the air and keeps cookies soft and chewy. White sugar dries out and crisps. The extra yolk in this recipe replaces some of the binding function of whites without the lift they create.
What's the difference between baking soda and baking powder in cookies?
Baking soda requires an acid in the recipe to activate (the brown sugar and vanilla provide this) and produces a flatter, crispier spread. Baking powder contains its own acid and produces more lift and a cakier texture. This recipe uses baking soda specifically to encourage horizontal spread and chewy, crispy-edged results rather than dome-shaped, fluffy cookies.
Can I make these without a mixer?
Yes. Brown butter is liquid and the sugars dissolve into it easily with vigorous hand whisking. The only step that benefits significantly from a mixer is the initial sugar-butter emulsification, and two solid minutes of hand whisking achieves the same result. This recipe does not require machine mixing.
Why do bakery cookies taste different from homemade ones?
Three factors: professional bakers use higher-fat butter, rest dough for 24-72 hours as a matter of routine, and pull cookies much earlier than home bakers are comfortable with. The underbaking instinct is the hardest to develop — it requires trusting that the cookie will finish on the hot pan. Once you internalize that, your cookies will stop tasting homemade.

The Science of
The Perfect Chocolate Chip Cookie (Crispy Edge, Gooey Center Guaranteed)
We turned everything on this page into a beautiful, flour-proof PDF cheat sheet. Print it out, stick it to your fridge, and never mess up your the perfect chocolate chip cookie (crispy edge, gooey center guaranteed) again.
*We'll email you the high-res PDF instantly. No spam, just perfectly cooked meals.
AlmostChefs Editorial Team
We translate the internet's most popular cooking videos into foolproof, beginner-friendly written recipes. We analyze multiple methods, test them in our kitchen, and engineer a single "Master Recipe" that gives you the best possible result with the least possible stress.