Easy Chia Pudding (No-Cook Breakfast That Actually Keeps You Full)
A no-cook overnight breakfast that combines chia seeds with creamy almond and coconut milk to create a thick, satisfying pudding packed with omega-3s and fiber. We analyzed the most popular methods to build one foolproof ratio that nails the texture every time.
“Chia pudding has a reputation problem. People make it once, get a slimy, clumpy, flavorless gel, and swear it off forever. That's not a chia problem — it's a ratio and technique problem. Get the seed-to-liquid ratio right, whisk it twice, and what you end up with is a thick, creamy pudding that genuinely holds you until lunch. We tested the most popular YouTube methods to find the one formula that works without babysitting.”
Why This Recipe Works
Chia pudding is one of those recipes that looks foolproof until you make it wrong three times in a row. The seeds are forgiving in theory and unforgiving in practice: too much liquid and nothing sets, too little and you're eating a gel brick, wrong timing and the whole batch is rubbery clumps at the bottom of a jar. The recipe above is the result of solving those three specific problems — nothing more, nothing less.
The Ratio Is the Recipe
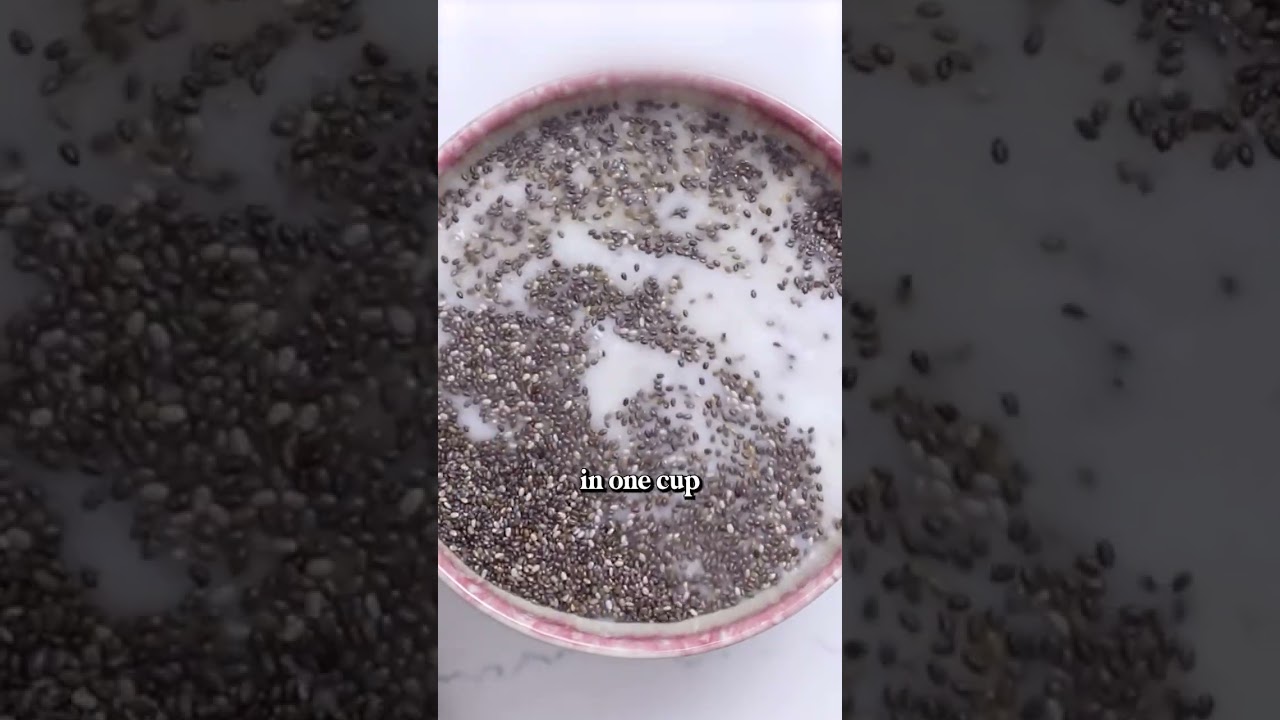
Every chia pudding failure traces back to a single number: the seed-to-liquid ratio. The correct ratio is 1:3 by volume. For this recipe, that's 1/3 cup chia seeds to 1.5 cups combined milk. That ratio is the entire technique. It isn't a guideline you can eyeball — the gelling behavior of chia seeds is precise enough that 20% too many seeds changes the texture from creamy to rubbery, and 20% too few means the pudding never fully sets.
The coconut milk and almond milk blend isn't arbitrary either. Full-fat coconut milk contributes fat and body, giving the pudding its satisfying, spoonable density. Almond milk provides volume and a neutral flavor base that lets the vanilla and cinnamon come through clearly. Either milk alone tips the balance wrong: pure coconut milk produces something closer to a coconut fat bomb than a breakfast pudding; pure almond milk makes something too thin to take seriously.
The Double-Whisk Rule
Chia seeds are hydrophilic — they attract and absorb water aggressively. The moment they hit liquid, they start drawing in moisture and expanding. Left undisturbed, they sink and begin gelling together in a single mass at the bottom of the bowl within minutes. The single most effective fix for clumpy chia pudding is a second whisk ten minutes after the first.
Stir everything together, walk away, come back in ten minutes, and whisk again. By then the seeds have begun to hydrate but haven't fully locked into position. The second whisk breaks up any forming clumps and redistributes the seeds evenly before they're committed to a final position. Then jar immediately and refrigerate. This two-step approach takes thirty seconds of extra effort and eliminates the most common chia pudding complaint entirely.
Overnight vs. Six Hours
Six hours is the minimum. Overnight is the correct answer. At six hours, the outer layers of each seed have gelled but the center may still be slightly firm, giving the pudding a subtly gritty texture. By eight to ten hours, full hydration is complete — each seed has become a tiny gel bead suspended in thickened milk, and the overall texture becomes uniformly smooth and creamy.
The practical implication is simple: make chia pudding the night before, not the morning of. Trying to rush it with a shorter chill will consistently disappoint.
Toppings at Serving Time
Fresh fruit releases liquid as it sits. Berries placed on top of chia pudding twelve hours ahead of time will bleed juice down through the pudding, disrupting the texture and diluting the flavor. The jar looks appealing in a meal prep photo; the reality is a watery, pink-tinted pudding by Wednesday.
Keep toppings separate until the moment you eat. The almonds and coconut add crunch that disappears within minutes once they contact wet pudding, so those especially should be scattered at the last second. A glass jar with a wide mouth makes this staging easy — the pudding stores in the jar, the toppings go on top right before eating, and nothing gets soggy in the fridge.
The honey drizzle last. It's not decorative — the raw honey provides a flavor contrast against the faintly earthy chia base that ties the whole bowl together. Add it too early and it dissolves into the pudding. Add it at the end and it pools in visible amber lines across the fruit. That's the version worth eating.
Where Beginners Mess This Up
Before we start, read this. These are the 4 reasons your easy chia pudding (no-cook breakfast that actually keeps you full) will fail:
- 1
Wrong seed-to-liquid ratio: Too many seeds and the pudding turns into a rubbery brick. Too few and it never sets — you get milk with some seeds floating in it. The correct ratio is 1 part chia seeds to 3 parts liquid by volume. For this recipe, that means 1/3 cup seeds to about 1.5 cups combined milk. Memorize that ratio and you can scale this to any serving size.
- 2
Skipping the second stir: Chia seeds sink and clump in the first 10 minutes after mixing. If you jar the mixture and immediately refrigerate it without a second whisk 10 minutes later, you'll find clumps of dry seeds at the bottom and thin liquid at the top. Stir once, wait 10 minutes, stir again, then seal and refrigerate.
- 3
Under-chilling the pudding: Chia pudding needs a minimum of 6 hours to fully hydrate and gel. Four hours gives you a loose, uneven texture. Overnight is the sweet spot — 8 hours produces the thick, spoonable consistency that makes this breakfast worth eating. Plan for at least one full night ahead.
- 4
Using too much sweetener upfront: The pudding concentrates as it chills. What tastes mild before refrigeration will taste noticeably sweeter after 8 hours. Start with less sweetener than you think you need — you can always drizzle more honey at serving time.
The Video Reference Library
Want to see it in action? Here are the exact videos we analyzed and combined to build this foolproof recipe translation:
A clear walkthrough of the seed-to-liquid ratio, the double-whisk technique, and how to assess texture before serving. The best reference for understanding what properly set chia pudding looks and feels like.
🛠️ Core Equipment
- Medium mixing bowlYou need enough room to whisk vigorously without splashing. Chia seeds are lightweight and will scatter if the bowl is too small.
- Fine-mesh whiskBreaks apart seed clumps more effectively than a spoon. The goal is even distribution before the seeds start gelling.
- Four glass jars with lidsGlass jars allow you to see the texture before opening, stack efficiently in the fridge, and don't absorb flavors or odors. Mason jars or recycled jam jars work perfectly. Plastic containers with tight-fitting lids are an acceptable substitute.
- Measuring cupsThe ratio is everything with chia pudding. Eyeballing the seeds is the fastest way to end up with the wrong texture. Measure precisely the first few times until you can judge by eye.
Easy Chia Pudding (No-Cook Breakfast That Actually Keeps You Full)
🛒 Ingredients
- ✦1 cup unsweetened almond milk
- ✦1/2 cup full-fat coconut milk
- ✦1/3 cup raw chia seeds
- ✦2 tablespoons pure maple syrup
- ✦1 teaspoon pure vanilla extract
- ✦1/4 teaspoon ground cinnamon
- ✦Pinch of sea salt
- ✦1/4 cup fresh blueberries, for topping
- ✦2 tablespoons fresh strawberries, sliced, for topping
- ✦2 tablespoons raw almonds, roughly chopped
- ✦1 tablespoon unsweetened shredded coconut
- ✦1 tablespoon raw honey, for drizzling
👨🍳 Instructions
01Step 1
Combine the almond milk and full-fat coconut milk in a medium mixing bowl.
02Step 2
Add the chia seeds to the milk and stir with a fine-mesh whisk, breaking apart any clumps.
03Step 3
Add the vanilla extract, maple syrup, ground cinnamon, and sea salt. Whisk vigorously for about one minute until everything is evenly distributed.
04Step 4
Let the mixture sit uncovered at room temperature for 10 minutes, then whisk again to prevent clumping at the bottom.
05Step 5
Divide the mixture equally among four glass jars or serving containers. Cover tightly and refrigerate for at least 6 hours, preferably overnight.
06Step 6
Remove from the refrigerator and check the consistency. It should be thick and spoonable — similar to a loose yogurt. If it's too thick, stir in a splash of almond milk until you reach the desired consistency.
07Step 7
Top each jar with blueberries and sliced strawberries. Scatter chopped almonds and shredded coconut over each serving.
08Step 8
Drizzle raw honey over each jar just before serving. Serve immediately while still cold.
Nutrition Per Serving
Estimates based on standard preparation. Adjustments alter macros.
🔄 Substitutions
Instead of Almond milk...
Use Oat milk
Richer, more luxurious mouthfeel with minimal flavor change. Oat milk produces a slightly creamier final pudding and is closer to dairy in body.
Instead of Full-fat coconut milk...
Use Plain Greek yogurt
Tangier flavor, higher protein, less creamy texture. Stir the yogurt directly into the almond milk before adding seeds. Reduces total fat significantly.
Instead of Maple syrup...
Use Monk fruit sweetener
Zero glycemic impact. Start with half the volume of maple syrup and taste — monk fruit is sweeter by weight. No bitter aftertaste at moderate amounts.
Instead of Fresh blueberries and strawberries...
Use Fresh raspberries and blackberries
Deeper color, more tart flavor, superior antioxidant profile. Dark berries have higher anthocyanin content. The visual contrast against white pudding is striking.
🧊 Storage & Reheating
In the Fridge
Store covered jars for up to 3 days. Add toppings only at serving time to prevent the fruit from releasing liquid into the pudding.
In the Freezer
Not recommended. Chia pudding thaws with a separated, watery texture that no amount of stirring will fully correct.
Reheating Rules
This recipe is served cold. If you prefer it at room temperature, remove from the refrigerator 15 minutes before eating. Do not microwave.
❓ Frequently Asked Questions
Why didn't my chia pudding set?
Either the ratio was off or it didn't chill long enough. The correct ratio is 1 part chia seeds to 3 parts liquid. Anything less than 6 hours of refrigeration won't fully gel. Try overnight if you're consistently getting loose results.
Why is my pudding clumpy at the bottom?
You skipped the second stir. Chia seeds sink within minutes of mixing. Stir once, wait 10 minutes, then stir again before jarring. That second whisk redistributes the seeds before they've locked into a clumped gel.
Can I use water instead of milk?
Technically yes, but the result will be noticeably less creamy and the flavor will be flat. Water-based chia pudding has the texture of slightly gelled water. Use at least some plant-based milk for a worthwhile result.
Is this actually filling enough for breakfast?
Yes, and the mechanism is the fiber. Eleven grams of fiber per serving expands in your stomach and slows gastric emptying, which translates to sustained satiety for 3-4 hours. The fat from coconut milk contributes too. It's more filling than it looks.
Can I make this with only coconut milk?
You can, but full-fat coconut milk alone produces a very rich, heavy pudding with a pronounced coconut flavor. Blending it 2:1 with almond milk gives you creaminess without overwhelming the other flavors.
Why add coconut milk and almond milk instead of just one?
Coconut milk provides fat and creaminess. Almond milk provides volume and a neutral backdrop. Together they hit the right balance of richness and lightness. Using either alone either overshoots on calories and flavor or undershoots on texture.

The Science of
Easy Chia Pudding (No-Cook Breakfast That Actually Keeps You Full)
We turned everything on this page into a beautiful, flour-proof PDF cheat sheet. Print it out, stick it to your fridge, and never mess up your easy chia pudding (no-cook breakfast that actually keeps you full) again.
*We'll email you the high-res PDF instantly. No spam, just perfectly cooked meals.
AlmostChefs Editorial Team
We translate the internet's most popular cooking videos into foolproof, beginner-friendly written recipes. We analyze multiple methods, test them in our kitchen, and engineer a single "Master Recipe" that gives you the best possible result with the least possible stress.