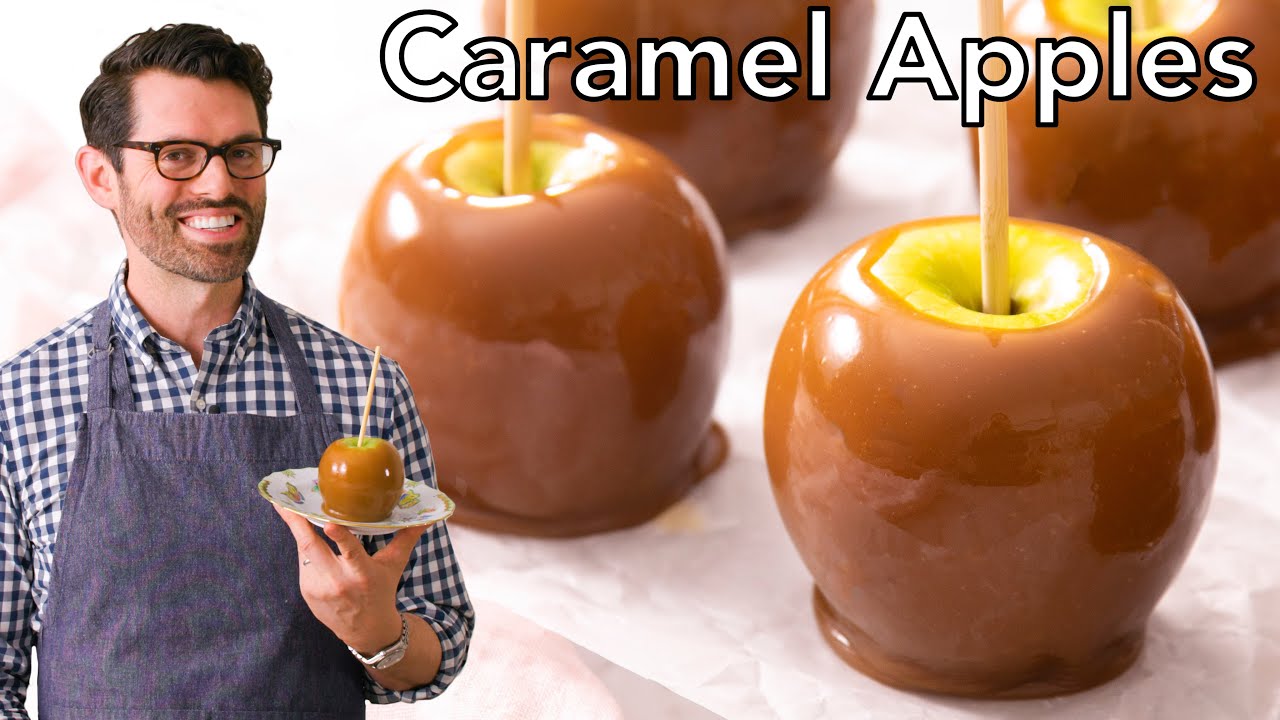
Classic Caramel Apples (The No-Seize, No-Drip Method)
Crisp tart apples dipped in a buttery, glossy homemade caramel with optional chocolate drizzle and nut toppings. We broke down the chemistry of caramel-making to eliminate the two failures that ruin most batches — crystallization and runny coating — so you get a perfect shell every single time.
“Most caramel apple failures happen in the same two ways: the caramel seizes into a grainy mess mid-cook, or it slides right off the apple onto the parchment paper. Neither is a mystery. Both are completely preventable once you understand what's actually happening in the pan. This recipe was built around eliminating both failure modes before they start.”
Why This Recipe Works
Caramel is one of the most unforgiving techniques in pastry, which makes its appearance in a recipe labeled "easy fall treat" somewhat misleading. The gap between glossy, perfect caramel apples and a pot of grainy amber gunk is narrower than most people realize — and it's a gap defined entirely by whether you understand the chemistry involved.
Sugar Is Trying to Crystallize the Entire Time
Sucrose molecules in solution have one agenda: find other sucrose molecules and lock together into crystals. Everything about caramel-making is designed to interrupt this process long enough to get the caramel where you need it.
This is why you stop stirring once the syrup starts boiling. Agitation encourages crystal formation. A single rogue crystal clinging to the side of the pan, swept back into the syrup by a spoon, can seed a chain reaction that turns the entire batch grainy within seconds. The wet pastry brush trick — wiping down the pan sides before the boil — exists specifically to eliminate those rogue crystals before they become a problem.
The deep amber color you're targeting isn't arbitrary aesthetics. At around 340-350°F, the sucrose molecules have broken down into hundreds of new compounds through a process called pyrolysis — producing the bitter, complex, roasted flavors that make caramel taste like something more than melted sugar. Pale golden caramel is just sweet. Dark amber caramel has depth.
The Apple Is the Obstacle
The fruit itself is working against you. Apples are 85% water, and their skins are coated in either natural pectin wax or, for commercial varieties, an applied food-grade wax designed to extend shelf life. Both create adhesion problems. Water turns to steam on contact with 350°F caramel; that steam layer physically pushes the coating away from the skin. Wax simply repels the caramel on contact.
The fix is mechanical: wash thoroughly, dry completely, and strip the wax. A kitchen cloth applied with firm pressure handles home-grown apples. For supermarket apples, the boiling water dip is faster and more thorough. The skin needs to be bone dry and slightly tacky before the apple touches the caramel.
Granny Smith is the standard variety for one unambiguous reason: tartness. The caramel adds between 40-48 grams of sugar per serving. Without a sharp, acidic apple underneath, the entire thing reads as aggressively sweet. The Granny Smith's natural malic acid content cuts through that sweetness and gives each bite a balanced finish.
Cream Chemistry
When cream hits hot caramel, it's not simply thinning the mixture — it's creating an emulsion. The fat molecules in the cream coat and separate the caramelized sugar molecules, which is what produces that smooth, cohesive texture instead of a grainy one. This only works if the emulsion forms properly, which requires slow addition and constant movement.
Adding cold cream collapses the process: the temperature shock causes the caramel to seize and the fat to separate before emulsification can occur. Room temperature cream gives you control. A slow pour gives the emulsion time to form. The baking soda at the end introduces CO2 micro-bubbles that expand slightly during setting, producing a coating that's pliable enough to bite through cleanly — the difference between a caramel apple you can eat without dislocating your jaw and one that requires a dentist's release form.
A proper heavy-bottomed saucepan is non-negotiable throughout this process. Hot spots in a thin pan mean part of your caramel is burning while the rest hasn't finished cooking — you lose the color window before the batch is ready. Even heat is the difference between a controlled process and a guessing game.
Toppings Are Infrastructure, Not Decoration
The caramel coating has a setting window of roughly 90 seconds after dipping. Toppings applied inside that window bond permanently into the surface as the caramel cools around them. Toppings applied after the caramel sets just slide off. This is not a preference — it's the physics of cooling sugar. The chopped peanuts go on immediately. The chocolate drizzle, which needs a set surface to sit on top of rather than sink into, goes on last, after everything has cooled.
The whole thing is a sequencing problem dressed up as a dessert recipe. Get the sequence right and the results look professional. Get it wrong and you're picking caramel off your parchment paper. Follow the order, respect the temperatures, and the recipe delivers.
Where Beginners Mess This Up
Before we start, read this. These are the 4 reasons your classic caramel apples (the no-seize, no-drip method) will fail:
- 1
Wet apples repel caramel: Any moisture on the apple's skin acts as a barrier between the fruit and the caramel. Water turns to steam on contact with hot caramel, creating micro-bubbles that prevent adhesion. Wash the apples well in advance, dry them completely, and wipe down the skin with a clean cloth to remove wax. If you're working with store-bought apples, a quick dip in boiling water for 10 seconds strips the commercial wax coating more effectively than rubbing alone.
- 2
Stirring the caramel after it starts boiling: Once the sugar syrup begins to bubble, stirring introduces agitation that encourages sugar molecules to recrystallize into each other — the grainy, clumped disaster known as 'seized' caramel. Dissolve the sugar completely before the boil, then put the spoon down. Swirl the pan gently if you need to distribute heat, but no stirring until the butter goes in.
- 3
Adding the cream too fast: Cold cream hitting 350°F caramel causes a violent eruption that can splash burning liquid. Beyond the safety issue, the temperature shock can cause the caramel to seize or separate. The cream should be at room temperature, added in a slow, steady pour while you stir constantly. The mixture will still steam and bubble — that's normal. Slow and controlled keeps it emulsified.
- 4
Dipping apples into caramel that's too hot: Caramel straight off the heat is too fluid to coat effectively — it pools at the base and leaves the top of the apple bare. Let it cool for 3-5 minutes until it thickens enough to coat a spoon and hold its shape for a few seconds. A candy thermometer reading of around 200°F is your dipping window.
The Video Reference Library
Want to see it in action? Here are the exact videos we analyzed and combined to build this foolproof recipe translation:
The source video for this recipe. Clear demonstration of the correct amber color to target and the proper cream-adding technique that prevents seizing.
🛠️ Core Equipment
- Heavy-bottomed saucepanEssential for even heat distribution during the caramelization process. Thin pans create hot spots that burn one section while the rest is still dissolving. A 3-quart [heavy saucepan](/kitchen-gear/review/heavy-saucepan) is the ideal size — large enough to handle the cream eruption without overflow.
- Candy thermometerColor alone is an unreliable guide to caramel temperature. A thermometer tells you exactly when you've hit the firm-ball stage (245-250°F) needed for a coating that sets properly without being rock hard. Skip it and you're guessing.
- Parchment-lined baking sheetGreased parchment is the only surface caramel apples won't bond to permanently. Silicone mats work too. Wax paper, foil, and bare sheet pans will hold the apple hostage until the caramel tears away.
- Wooden popsicle sticksThey need to anchor firmly enough to support the weight of the caramel coating while you dip and rotate. Push each stick at least halfway through the apple and test for wobble before you dip. A loose stick means the apple falls into the pan.
Classic Caramel Apples (The No-Seize, No-Drip Method)
🛒 Ingredients
- ✦6 medium Granny Smith apples, stems intact
- ✦2 cups granulated sugar
- ✦1 cup heavy cream, room temperature
- ✦6 tablespoons unsalted butter
- ✦1 tablespoon vanilla extract
- ✦1 teaspoon sea salt
- ✦1/4 teaspoon baking soda
- ✦6 wooden popsicle sticks or lollipop sticks
- ✦1/2 cup roasted unsalted peanuts, finely chopped
- ✦1/2 cup dark chocolate chips
- ✦2 tablespoons coconut oil
- ✦2 tablespoons water
👨🍳 Instructions
01Step 1
Wash and thoroughly dry each apple under cool running water, then rub the skin with a cloth to remove any waxy coating.
02Step 2
Insert a wooden stick into the stem end of each apple, pushing it about halfway through the fruit and ensuring it's firmly secured.
03Step 3
Line a large baking sheet with parchment paper and lightly grease it. Set it nearby for the finished apples.
04Step 4
Combine the granulated sugar and water in a heavy-bottomed saucepan over medium-high heat, stirring until the sugar fully dissolves before the mixture boils.
05Step 5
Stop stirring once the mixture begins to bubble. Allow the caramel to cook undisturbed for 8-10 minutes, swirling the pan occasionally, until it reaches a deep amber color.
06Step 6
Remove the pan from heat and immediately stir in the unsalted butter until fully incorporated and the mixture stops bubbling.
07Step 7
Pour in the heavy cream very slowly while stirring constantly. The mixture will rise and steam vigorously — this is normal. Keep pouring slowly and stirring until fully combined.
08Step 8
Add the vanilla extract and sea salt, stirring well to combine.
09Step 9
Stir in the baking soda gently — the mixture will foam slightly, which helps create a smoother, more supple coating texture.
10Step 10
Allow the caramel to cool for 3-5 minutes until thick enough to coat a spoon and hold its shape briefly.
11Step 11
Dip each apple into the warm caramel, rotating slowly to ensure an even coating. Lift and hold over the pan for 10 seconds to let excess drip off.
12Step 12
Place each coated apple on the prepared parchment sheet, spacing them at least 2 inches apart to prevent sticking.
13Step 13
If using toppings, sprinkle the chopped peanuts onto each apple immediately while the caramel is still warm and tacky.
14Step 14
Melt the dark chocolate chips with coconut oil in a microwave-safe bowl in 30-second intervals, stirring between each, until fully smooth.
15Step 15
Drizzle the melted chocolate over the cooled caramel apples using a spoon or squeeze bottle. Allow to set at room temperature for 20-30 minutes before serving.
Nutrition Per Serving
Estimates based on standard preparation. Adjustments alter macros.
🔄 Substitutions
Instead of Granulated sugar...
Use Coconut sugar or monk fruit sweetener
Coconut sugar produces a slightly deeper, more molasses-forward caramel. Monk fruit sweetener reduces calories by roughly 10-15% with minimal impact on texture. Either works well in this recipe.
Instead of Heavy cream...
Use Full-fat coconut milk or cashew cream
Coconut milk adds a faint tropical note that pairs well with dark chocolate. Cashew cream (soaked cashews blended with water) is nearly neutral and maintains a smooth mouthfeel. Use at the same volume, room temperature.
Instead of Roasted peanuts...
Use Crushed pecans, almonds, or pumpkin seeds
Pecans add buttery richness. Almonds add clean crunch. Pumpkin seeds work especially well for a fall-themed presentation and add a subtle earthiness. All hold their texture on the caramel coating without getting soggy.
Instead of Granny Smith apples...
Use Pink Lady or Honeycrisp apples
Both maintain crisp texture and hold toppings equally well. Slightly sweeter base flavor — reduce caramel sugar by 2 tablespoons to compensate if you prefer a more balanced result.
🧊 Storage & Reheating
In the Fridge
Wrap each apple individually in parchment paper and refrigerate for up to 5 days. The caramel firms up cold, which is actually pleasant — the texture becomes chewy rather than sticky.
In the Freezer
Not recommended. Freezing causes the apple interior to release water when thawed, which separates the caramel coating from the fruit.
Reheating Rules
No reheating needed. If refrigerated, let apples sit at room temperature for 10-15 minutes before serving to soften the caramel back to its ideal consistency.
❓ Frequently Asked Questions
Why does my caramel slide off the apple?
Two likely causes: the apple wasn't dry enough before dipping, or the caramel was too hot when you dipped. Moisture on the apple skin prevents adhesion. Caramel that's too fluid won't build up into a coating — let it cool to around 200°F before dipping.
Why did my caramel turn grainy and crystallized?
You either stirred the syrup after it started boiling, or sugar crystals from the pan sides fell back into the syrup and triggered a chain reaction. You can recover seized caramel by adding 2 tablespoons of water and re-dissolving over low heat. To prevent it, use a wet pastry brush to wipe down the pan sides before the syrup boils.
Can I make caramel apples without a candy thermometer?
Yes, but you're relying on color and texture cues alone. The caramel is ready to dip when it's a deep reddish-amber and coats the back of a spoon thickly. Drop a small amount into a glass of cold water — it should form a firm ball that holds its shape. If it dissolves immediately, it needs more time.
How far in advance can I make caramel apples?
Up to 24 hours ahead works well. Refrigerate unwrapped until the caramel sets fully (about 30 minutes), then wrap individually in parchment. Beyond 24 hours, the apple begins releasing juice that can weaken the caramel bond.
Why do I need baking soda in the caramel?
The small amount of baking soda introduces micro air bubbles that make the finished caramel slightly softer and more pliable — easier to bite through without yanking the entire coating off the apple. It also contributes to a smoother, glossier surface. Don't skip it, but don't add more than the recipe calls for or the caramel will taste faintly soapy.
Can I use store-bought caramel instead of making it from scratch?
Melted caramel candies work in a pinch but produce a thinner, sweeter coating with less depth of flavor. They also tend to set harder than homemade. If using store-bought, add 2 tablespoons of heavy cream per cup of melted caramel to improve the texture and make it easier to work with.

The Science of
Classic Caramel Apples (The No-Seize, No-Drip Method)
We turned everything on this page into a beautiful, flour-proof PDF cheat sheet. Print it out, stick it to your fridge, and never mess up your classic caramel apples (the no-seize, no-drip method) again.
*We'll email you the high-res PDF instantly. No spam, just perfectly cooked meals.
AlmostChefs Editorial Team
We translate the internet's most popular cooking videos into foolproof, beginner-friendly written recipes. We analyze multiple methods, test them in our kitchen, and engineer a single "Master Recipe" that gives you the best possible result with the least possible stress.