Homemade Cappuccino (Café Quality Without the Machine)
A rich, velvety Italian espresso drink with equal parts strong coffee, steamed milk, and thick foam — made accessible at home without a professional espresso machine. We broke down the milk temperature and whisking technique so you get that signature dense foam every single time.
“Most homemade cappuccinos fail at the foam. The milk either comes out flat and watery, or scalded into a rubbery mess with no texture at all. Genuine cappuccino foam is dense, glossy, and spoonable — and it has nothing to do with owning a $400 machine. It has everything to do with hitting the right temperature and whisking at the right moment. We mapped the exact technique so you don't have to guess.”
Why This Recipe Works
Cappuccino is three ingredients in precise ratio: espresso, steamed milk, foam. The Italian original was designed to be consumed standing at a bar in about four minutes. Every element serves a structural function, and when one is wrong the whole drink fails. Most homemade attempts fail at the foam — not because of equipment, but because of two variables nobody talks about: temperature precision and timing.
The Milk Problem
Milk foam is not steam. It is protein. Specifically, it is a network of whey and casein proteins that unfold at heat and trap air when agitated. This process only works within a narrow temperature band. Below 140°F, the proteins haven't denatured enough to hold air. Above 165°F, they've denatured so thoroughly they can't hold structure at all — you get flat, soapy bubbles that last about fifteen seconds.
The target is 150–160°F. At this temperature the proteins are mobile enough to form a foam matrix but not so cooked that they collapse on contact with air. A kitchen thermometer removes the guesswork entirely. Steam wisps are a reasonable proxy once you've made this enough times to recognize the visual — but not on your first attempt.
Fat content determines foam stability. Whole milk foams better than skim because the fat molecules coat the protein network and slow bubble collapse. This is why your barista uses whole milk unless you ask otherwise. If you're going dairy-free, oat milk is the only widely available alternative that contains enough soluble fiber (beta-glucan) to mimic this stabilizing effect. Almond milk foam lasts about thirty seconds. Oat milk foam can hold for several minutes.
The Timing Window
Foam forms while the milk is hot and proteins are still mobile. The window between "hot enough to foam" and "too cool to foam" is roughly sixty to ninety seconds. This means you whisk immediately when the pan comes off the heat — not after you pour the espresso, not after you find your cup, not after you check your phone. Immediately.
A French press is genuinely the best manual foaming tool in a home kitchen. Pour the hot milk in, pump the plunger thirty times with fast, even strokes, and you'll produce foam denser than most handheld electric frothers can manage. The mesh creates uniform bubble size. Uniform bubble size means stable foam.
The Assembly Architecture
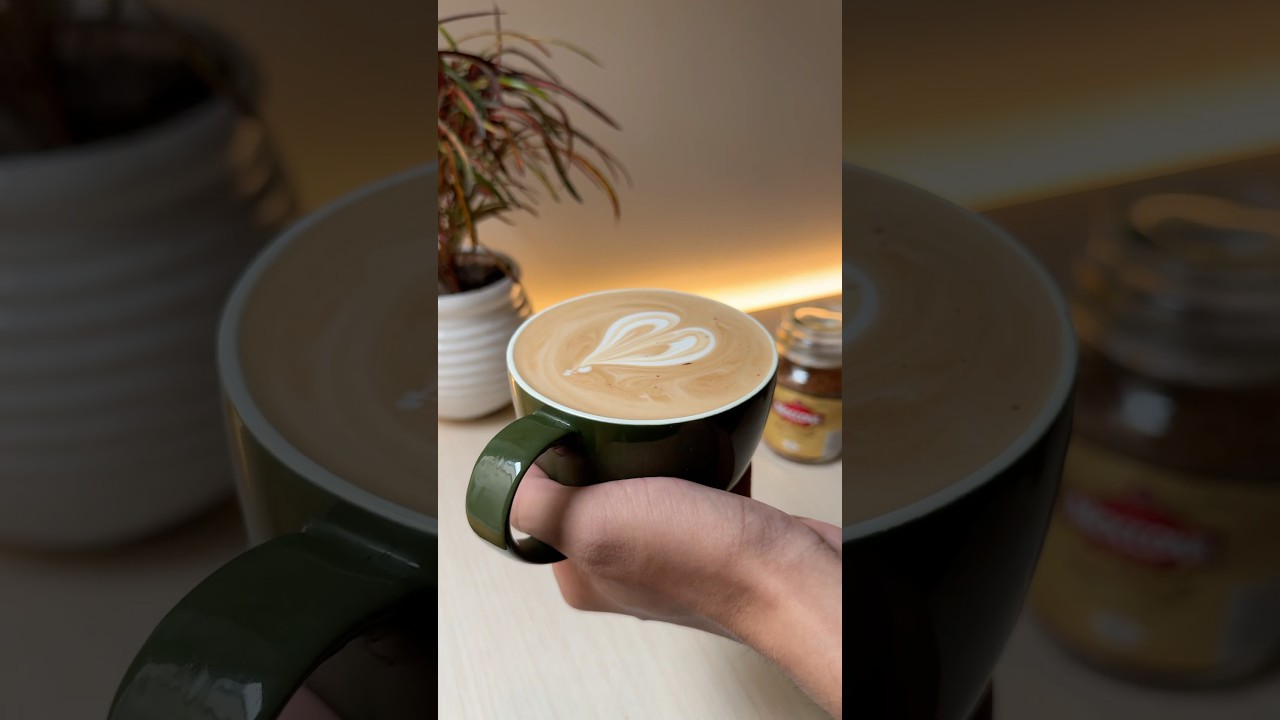
Espresso first. Always. The crema — the thin layer of emulsified oils on top of freshly brewed espresso — is fragile and will disperse if you pour aggressively on top of it. By building the coffee base first and pouring the milk in gently, close to the surface, you preserve the layering that gives a cappuccino its visual and textural identity.
The pinch of sea salt is not garnish. Sodium ions directly suppress bitter taste receptors on the tongue — this is documented food science, not folk wisdom. A single pinch in the espresso before you build the drink rounds the bitterness without adding any perceptible salt flavor. Skip it if you want, but taste the difference first.
Why the Cup Temperature Matters
Ceramic is a heat sink. An unwarmed cup pulls 10–15°F out of the milk on contact, which collapses the foam and makes the drink taste flat within seconds. Thirty seconds of hot tap water in the cup before you build the drink costs nothing and changes everything. This is standard practice in every café that takes coffee seriously. It should be standard practice in your kitchen.
Where Beginners Mess This Up
Before we start, read this. These are the 4 reasons your homemade cappuccino (café quality without the machine) will fail:
- 1
Overheating the milk: Milk proteins that produce stable foam break down above 160°F. Past that threshold, you get thin, large bubbles that collapse within seconds. The target is 150–160°F — warm enough to feel hot on your wrist but not scalding. If you see aggressive bubbling in the pan, you've already gone too far.
- 2
Whisking too late: Foam forms while the milk is still warm. If you wait until the milk cools before whisking, the proteins have already set and you'll get nothing but flat liquid. Remove the pan from heat and whisk immediately — the window is about 60 seconds.
- 3
Using skim milk expecting full foam: Fat content matters. Whole milk creates the richest, most stable foam because fat coats the proteins and holds the bubble structure. Skim milk produces voluminous but fragile foam that dies before you get the cup to the table. If you want dairy-free, oat milk is the only alternative that reliably performs.
- 4
Pouring the espresso last: Espresso goes in first, always. Pouring hot milk into espresso (not espresso into milk) preserves the coffee's crema and allows the milk to blend in layers. Reverse the order and you dilute the coffee and flatten the foam before it even reaches the cup.
The Video Reference Library
Want to see it in action? Here are the exact videos we analyzed and combined to build this foolproof recipe translation:
The clearest walkthrough of stovetop milk steaming available. Demonstrates the exact visual cues for 150°F milk — the fine steam wisps and gentle shimmer — and shows the whisking motion that creates dense, stable foam without a steam wand.
🛠️ Core Equipment
- Small saucepanControls heat distribution during steaming. A thin pan overheats the milk on the bottom while the surface stays cool, producing uneven foam. Any small heavy-bottomed saucepan works.
- WhiskThe mechanical action of a whisk introduces air into the milk proteins at the right temperature to create foam. A fork produces nothing. A [French press](/kitchen-gear/review/french-press) plunger is an excellent alternative — pump it rapidly while the milk is still hot.
- Kitchen thermometerTakes the guesswork out of milk temperature. You are targeting 150–160°F with zero margin for error. Once you've made this a dozen times you can judge by steam alone, but not at first.
- Prewarmed cupA cold ceramic cup drops the milk temperature by 10–15°F on contact, collapsing the foam almost immediately. Fill your cup with hot water for 60 seconds before building the drink.
Homemade Cappuccino (Café Quality Without the Machine)
🛒 Ingredients
- ✦8 ounces whole milk (or any milk alternative)
- ✦2 ounces heavy cream
- ✦1.5 ounces espresso or strong brewed coffee, cooled slightly
- ✦0.5 teaspoon vanilla extract
- ✦0.5 tablespoon honey or agave nectar
- ✦1 pinch fine sea salt
- ✦0.25 teaspoon ground cinnamon (optional garnish)
- ✦1 pinch unsweetened cocoa powder (optional garnish)
👨🍳 Instructions
01Step 1
Brew your espresso or prepare 1.5 ounces of very strong coffee using your preferred method, then set aside to cool for about 2 minutes.
02Step 2
Pour the whole milk and heavy cream into a small saucepan over medium heat.
03Step 3
Warm the milk mixture gently, stirring occasionally with a whisk, until it reaches 150–160°F or small steam wisps begin rising from the surface, about 4–5 minutes.
04Step 4
Remove the saucepan from heat and vigorously whisk the warm milk mixture for 1–2 minutes until a layer of fine, creamy foam develops on top.
05Step 5
Pour the cooled espresso into your prewarmed serving cup, filling it about one-third of the way.
06Step 6
Slowly pour the steamed milk into the espresso cup while holding back the foam with a spoon, filling until the cup is nearly full.
07Step 7
Top with a generous dollop of the reserved foam, creating a layer about 0.5 inches thick.
08Step 8
Dust the foam lightly with ground cinnamon or cocoa powder if desired, then serve immediately.
Nutrition Per Serving
Estimates based on standard preparation. Adjustments alter macros.
🔄 Substitutions
Instead of Whole milk and heavy cream...
Use Oat milk with 1 tablespoon coconut cream
Oat milk creates excellent foam naturally due to its beta-glucan content. Coconut cream replaces the richness lost from removing dairy fat. Almond milk foams poorly — avoid it unless you have no other option.
Instead of Honey or agave nectar...
Use Stevia or monk fruit sweetener (half the quantity)
No caloric sweetness. The aftertaste varies significantly by brand — taste test before committing to a large batch. Add after heating, not before, to preserve potency.
Instead of Regular espresso or strong coffee...
Use Decaffeinated espresso or half-caf blend
Maintains the full coffee flavor profile without the stimulant load. Works identically in the recipe. Good option for afternoon drinks or caffeine-sensitive drinkers.
Instead of Vanilla extract...
Use Almond extract (use one-quarter the amount)
Almond extract is roughly four times more potent than vanilla. A little goes a long way. Creates a noticeably different aromatic profile — amaretto-adjacent rather than sweet cream. Works well, but it's a different drink.
🧊 Storage & Reheating
In the Fridge
Cappuccino does not store. Foam collapses within minutes and the espresso oxidizes within an hour. Make and drink immediately.
In the Freezer
Not applicable. This is a made-to-order drink.
Reheating Rules
Do not reheat. If you need to work ahead, brew the espresso and keep it in a small thermos. Steam fresh milk when you're ready to drink.
❓ Frequently Asked Questions
Why is my foam thin and watery instead of thick and spoonable?
One of three things: the milk overheated and the proteins broke down, you waited too long after removing the pan from heat before whisking, or you used a low-fat milk. Whole milk at 150–160°F, whisked immediately off heat, is the formula. Skim milk and plant milks other than oat milk reliably fail this test.
Can I make this without an espresso machine?
Yes — and this recipe is designed for that. Strong drip coffee works acceptably, a moka pot is excellent, and cold brew concentrate (diluted 1:1 with hot water) is surprisingly good. The coffee just needs to be concentrated enough that adding milk doesn't flatten the flavor.
What's the difference between a cappuccino and a latte?
Ratio. A cappuccino is roughly one-third espresso, one-third steamed milk, one-third foam. A latte is the same espresso with much more steamed milk and only a thin cap of foam. Cappuccino is stronger and smaller. Latte is milkier and larger.
Why does my homemade cappuccino taste bitter?
Either the coffee was over-extracted (brewed too long or too hot) or the milk was overheated. The pinch of sea salt in this recipe directly addresses coffee bitterness — don't skip it. Also check your coffee-to-water ratio; stronger brew is not the same as longer brew.
Does the type of espresso roast matter?
For a milk drink, a medium-dark or dark roast performs best. The caramelized, chocolatey notes of a darker roast cut through the milk in a way that light, fruity roasts don't. Light roast single-origin espresso tastes washed out in a cappuccino — save those beans for straight shots.
Can I sweeten after it's made?
You can, but it's harder to distribute evenly through a layered drink with foam on top. Adding sweetener to the espresso before building the drink integrates it more cleanly. Honey and agave dissolve faster in warm liquid — stir them into the hot espresso directly.

The Science of
Homemade Cappuccino (Café Quality Without the Machine)
We turned everything on this page into a beautiful, flour-proof PDF cheat sheet. Print it out, stick it to your fridge, and never mess up your homemade cappuccino (café quality without the machine) again.
*We'll email you the high-res PDF instantly. No spam, just perfectly cooked meals.
AlmostChefs Editorial Team
We translate the internet's most popular cooking videos into foolproof, beginner-friendly written recipes. We analyze multiple methods, test them in our kitchen, and engineer a single "Master Recipe" that gives you the best possible result with the least possible stress.