Crispy Bread Pizza Sandwich on Tawa (Indian Street Food, Done Right)
Soft whole wheat bread loaded with garlic butter, tangy tomato sauce, melted mozzarella, and fresh vegetables — cooked on a tawa until shatteringly crispy. The Indian street food answer to pizza that's faster, cheaper, and arguably better.
“Street food carts across Mumbai and Delhi have been making this for decades. The appeal is obvious: pizza flavor in under 25 minutes, no oven required, customizable with whatever vegetables are in your fridge. What most home versions get wrong is the heat management — too low and you get a pale, soggy sandwich. Too high and the bread burns before the cheese melts. One technique adjustment fixes both problems.”
Why This Recipe Works
Indian street food operates on a simple principle: maximum flavor from minimum equipment. A tawa — the flat iron griddle found in every Indian kitchen and on every street corner — is one of the most efficient cooking surfaces ever designed. It transfers heat directly, evenly, and fast. The bread pizza sandwich exists because someone looked at that griddle and thought: what if pizza didn't need an oven?
The answer is this dish. And it works, if you understand why.
The Crust Problem
Most home versions of this recipe produce a pale, soft sandwich that folds in half when you pick it up. The cause is almost always the same: the tawa wasn't hot enough when the sandwich went on, or the cook lowered the heat too soon out of anxiety.
The crust needs to form fast. When bread hits a properly hot surface, the moisture in the outer layer flashes to steam, the proteins set, and a rigid golden crust forms within 90 seconds. This crust is structural — it's what holds the whole sandwich together through the flip. Without it, you have hot bread and shifting filling that dumps onto the tawa when you try to turn it.
Get the pan hot before the sandwich touches it. Medium-high heat, no shortcuts. Once the crust has set — about 2 minutes in — you can lower to medium and let the heat work its way through to the cheese without risking the exterior.
The Moisture Management Problem
Bell peppers, spinach, mushrooms, onion — every vegetable in this recipe contains significant water. During cooking, that water has to go somewhere. In an oven pizza, it evaporates upward. On a tawa sandwich, it has nowhere to go except into the bread.
Two adjustments prevent a soggy interior. First, pat the mushrooms dry before they go in — mushrooms are 90% water and release most of it when heated. Second, keep the filling layer compact. The thicker the filling, the more moisture accumulates, and the less effectively the heat reaches the cheese. One tight, even layer of vegetables. No mounding. The cheese is the binder — it needs direct heat contact to melt properly.
The Sauce Formula
Straight pizza sauce inside a tawa sandwich tends to make the bread wet before it even hits the pan. The yogurt addition in this recipe solves that. Mixed into the sauce, the yogurt thickens it, adds protein that helps it set under heat, and introduces a slight lactic tang that cuts through the richness of the mozzarella. It's a small adjustment with a significant effect on both texture and flavor.
Use a sugar-free or homemade sauce if you can. Commercial pizza sauces often contain added sugar that burns on a hot tawa before the sandwich is cooked through.
The Flip
Street food vendors make the flip look effortless because they've done it ten thousand times. The home cook hesitates, and hesitation is where sandwiches fall apart — literally.
Use a wide flat spatula, slide it fully under the sandwich before committing, and flip in one confident motion. If the bottom crust hasn't set yet, the sandwich will try to fold — don't force it. Wait another 30-60 seconds and try again. A properly crisped crust releases cleanly from a well-seasoned tawa. If it's sticking, it's not ready.
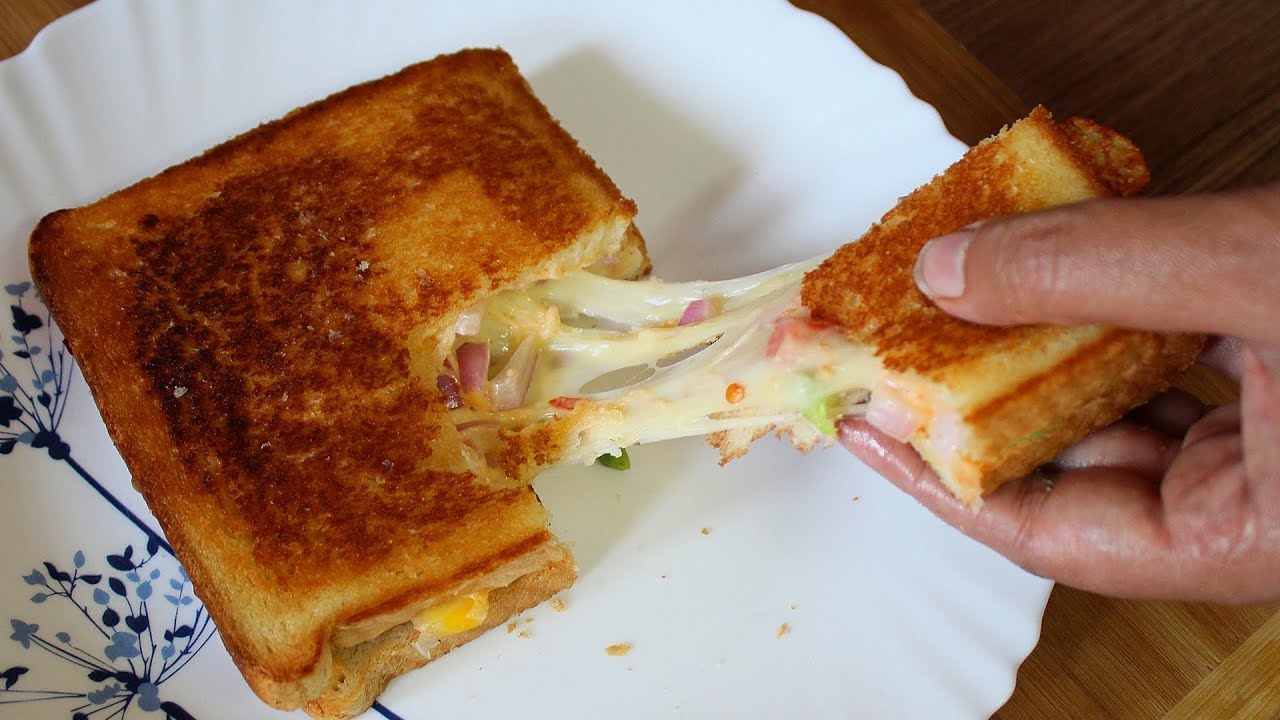
One minute of rest after cooking. The cheese inside is liquid when it comes off the heat. Cutting immediately means it pours out. Waiting 60 seconds means it sets just enough to hold the layers in place when you slice diagonally.
This is 22 minutes of cooking, not 22 minutes of stress. The technique is repeatable once you understand what you're managing: crust formation, moisture control, and a confident flip. Everything else is just assembly.
Where Beginners Mess This Up
Before we start, read this. These are the 4 reasons your crispy bread pizza sandwich on tawa (indian street food, done right) will fail:
- 1
Cooking on heat that's too low: A tawa or skillet needs to be properly hot before the sandwich goes on — medium-high, not medium. Low heat steams the bread instead of crisping it, and you end up with a pale, soft sandwich that falls apart when you cut it. The crust should set within 90 seconds of hitting the pan.
- 2
Overloading the filling: Every extra layer of vegetables adds moisture that has to escape during cooking. Too many wet toppings (especially spinach and mushrooms) turn the interior soggy. Chop everything small, pat mushrooms dry before using, and keep the filling layer no thicker than 1.5cm so the heat can reach the cheese.
- 3
Skipping the rest period: Cutting immediately after the tawa means molten cheese runs everywhere and the structure collapses. One minute of rest lets the cheese firm back up just enough to hold the layers together when you slice diagonally. It's 60 seconds. Wait.
- 4
Spreading butter too thick on the outer sides: The garlic butter on the exterior is for flavor and browning — not a moisture barrier. Too much and you get greasy bread that smokes on the tawa and tastes heavy. A thin, even layer is all you need.
The Video Reference Library
Want to see it in action? Here are the exact videos we analyzed and combined to build this foolproof recipe translation:
The source video that inspired this recipe. Watch specifically for the moment they check crust color before flipping — that visual cue is more reliable than any timer.
🛠️ Core Equipment
- Tawa or large flat skilletA flat surface gives maximum contact between bread and heat, which is what creates the even, crispy golden crust. A ridged grill pan leaves lines and uneven browning. Cast iron or heavy non-stick both work.
- Wide flat spatulaThe sandwich needs to be flipped in one decisive motion without the filling shifting. A narrow spatula causes one side to drop before the other, dumping vegetables. Width and confidence are both required.
- Small mixing bowlsYou're making two separate mixtures — garlic butter and sauce — before you touch the bread. Having them ready in advance means assembly is fast and sequential, not chaotic.
Crispy Bread Pizza Sandwich on Tawa (Indian Street Food, Done Right)
🛒 Ingredients
- ✦4 slices whole wheat bread
- ✦1 cup mozzarella cheese, shredded
- ✦1/2 cup pizza sauce or tomato-based pasta sauce
- ✦1 medium bell pepper, finely diced
- ✦1 small red onion, thinly sliced
- ✦1 cup fresh baby spinach, roughly chopped
- ✦1/2 cup mushrooms, thinly sliced and patted dry
- ✦1/4 cup fresh coriander, chopped
- ✦2 tablespoons unsalted butter, softened
- ✦2 tablespoons low-fat plain yogurt
- ✦1 clove garlic, minced
- ✦1/2 teaspoon dried oregano
- ✦1/4 teaspoon red chili flakes
- ✦1/4 teaspoon black pepper
- ✦1/4 teaspoon sea salt
- ✦Oil spray for tawa
👨🍳 Instructions
01Step 1
Combine the softened butter with minced garlic, dried oregano, and black pepper in a small bowl. Mix until fully blended.
02Step 2
In a separate bowl, mix the pizza sauce with yogurt and red chili flakes until combined. This is your sandwich base.
03Step 3
Spread the garlic butter mixture thinly and evenly on one side of each bread slice. This will be the exterior.
04Step 4
Flip two of the bread slices over. Spread the sauce mixture on the unbuttered sides, dividing evenly between both slices.
05Step 5
Sprinkle half the shredded mozzarella over the sauce on both slices.
06Step 6
Distribute bell pepper, red onion, spinach, mushrooms, and coriander evenly over the cheese. Keep the layer compact — no mounding.
07Step 7
Top with the remaining mozzarella, pressing gently so it adheres to the vegetables and will hold everything in place when flipped.
08Step 8
Place the remaining two bread slices on top, buttered side facing outward. Press firmly to compress the sandwich slightly.
09Step 9
Heat a [tawa or heavy skillet](/kitchen-gear/review/cast-iron-skillet) over medium-high heat until hot. Lightly spray with oil.
10Step 10
Place one sandwich on the tawa. Cook undisturbed for 4-5 minutes until the bottom is deep golden brown and the bread feels set.
11Step 11
Flip confidently using a [wide flat spatula](/kitchen-gear/review/fish-spatula) in one smooth motion. Cook the second side for 4-5 minutes until equally golden and the cheese has melted through.
12Step 12
Transfer to a cutting board and rest for 1 minute. Repeat with the second sandwich.
13Step 13
Slice each sandwich diagonally and serve immediately while the cheese is still warm.
Nutrition Per Serving
Estimates based on standard preparation. Adjustments alter macros.
🔄 Substitutions
Instead of Whole wheat bread...
Use Multigrain or sprouted grain bread
Nuttier flavor, higher fiber, and better mineral absorption due to lower phytic acid. Slightly denser texture — press the sandwich a little firmer before cooking.
Instead of Mozzarella cheese...
Use Part-skim mozzarella or cottage cheese mixed with a small amount of parmesan
Reduces saturated fat while keeping creaminess. Cottage cheese adds extra protein. Mix ratio: 3 parts cottage cheese to 1 part finely grated parmesan.
Instead of Unsalted butter...
Use Cold-pressed extra virgin olive oil or avocado oil
Brush onto the bread instead of spreading. Lighter flavor, better anti-inflammatory fat profile. The crust browns slightly differently — watch for it.
Instead of Pizza sauce...
Use Sugar-free marinara or homemade tomato sauce with dried basil and garlic
Eliminates added sugars that contribute to blood sugar spikes. Homemade takes 10 minutes and the flavor difference is significant.
🧊 Storage & Reheating
In the Fridge
Store assembled but uncooked sandwiches wrapped tightly for up to 1 day. Cook directly from cold — add 1-2 minutes per side. Cooked sandwiches store for up to 2 days but lose their crust.
In the Freezer
Not recommended for cooked sandwiches — the bread turns rubbery when reheated. If freezing, assemble without cooking, wrap individually, and freeze for up to 3 weeks.
Reheating Rules
Reheat cooked sandwiches on a dry tawa over medium heat for 2-3 minutes per side to restore crispiness. Microwave leaves the bread soft and disappointing.
❓ Frequently Asked Questions
Can I make this without a tawa?
Yes. Any flat, heavy-bottomed skillet works — cast iron, stainless steel, or non-stick. The key is a flat cooking surface for maximum bread contact. A ridged grill pan leaves uneven browning and doesn't melt the cheese as evenly.
Why is my cheese not melting through to the center?
Two likely causes: your filling layer is too thick, or your heat is too high and the bread is browning before the heat penetrates to the cheese. Keep the filling under 1.5cm thick and use medium-high heat — not high. The cheese needs time, not just temperature.
Can I add meat to this?
Yes — cooked and crumbled chicken, or thinly sliced deli turkey, work well. Pre-cook any raw protein before adding. Raw meat inside a sandwich cooked on a tawa won't reach safe temperature before the bread burns.
My bread burns before the cheese melts. What am I doing wrong?
Heat is too high. Start at medium-high to set the crust, then reduce to medium for the remaining cook time. The cheese needs 3-4 minutes of sustained moderate heat to melt through — not 90 seconds of scorching heat.
Is this the same as a toastie or grilled cheese?
Related, but different. The tawa pizza sandwich uses a pizza sauce base and is built around the cheese-vegetable-sauce combination of pizza rather than the cheese-only simplicity of a grilled cheese. The yogurt in the sauce also gives it a distinctly Indian tang that neither a toastie nor a Western grilled cheese has.
Can I make these ahead for meal prep?
Assemble uncooked and refrigerate wrapped for up to 24 hours. Cook to order. Cooked sandwiches don't reheat well — the crust softens irreversibly in storage. The 22-minute total time makes this fast enough to cook fresh each time.

The Science of
Crispy Bread Pizza Sandwich on Tawa (Indian Street Food, Done Right)
We turned everything on this page into a beautiful, flour-proof PDF cheat sheet. Print it out, stick it to your fridge, and never mess up your crispy bread pizza sandwich on tawa (indian street food, done right) again.
*We'll email you the high-res PDF instantly. No spam, just perfectly cooked meals.
AlmostChefs Editorial Team
We translate the internet's most popular cooking videos into foolproof, beginner-friendly written recipes. We analyze multiple methods, test them in our kitchen, and engineer a single "Master Recipe" that gives you the best possible result with the least possible stress.