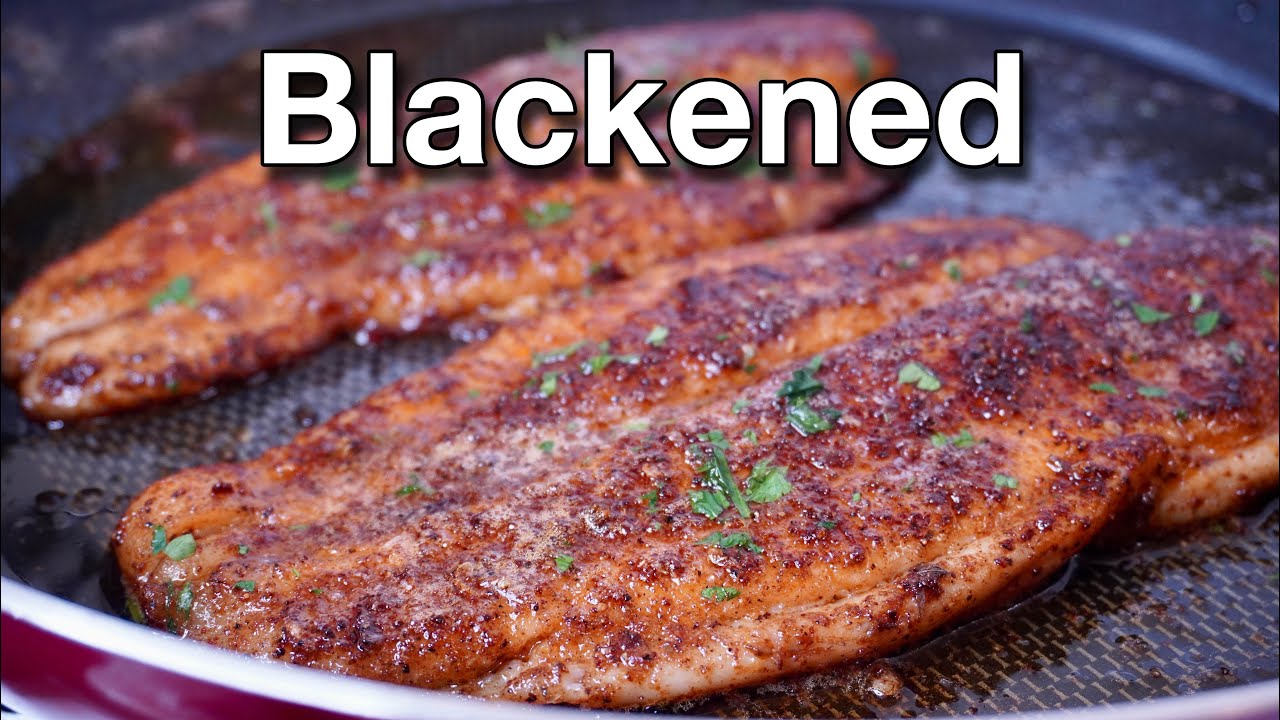
Blackened Fish Done Right (The Cast-Iron Method That Actually Works)
A bold Cajun-inspired technique where fish fillets get coated in a fierce spice blend and seared in a screaming-hot cast-iron skillet until a dark, crackling crust forms — while the inside stays tender and flaky. We synthesized the best methods to nail the crust without burning, drying out, or smoking up your kitchen.
“Most blackened fish recipes tell you to crank the heat and cook fast. What they don't tell you is that a dry pan is the enemy, a wet fish fillet is a disaster, and the difference between a perfect dark crust and a burnt spice coating is about ninety seconds. We broke down the technique so you stop leaving those flavors in the pan.”
Why This Recipe Works
Blackening is not seasoning. It is a controlled thermal event. Chef Paul Prudhomme invented the technique in 1980s Louisiana as a way to mimic the flavor of wood-fired cooking using a cast-iron skillet cranked to temperatures most home cooks have never attempted. The goal is not to cook the fish — it's to carbonize the spice coating on the surface while the fish inside stays completely undisturbed. Getting that right requires understanding a few specific physical facts.
The Maillard Reaction Is the Entire Point
Blackening produces its flavor through the Maillard reaction — the same chemistry responsible for a seared steak crust, toasted bread, and roasted coffee. Sugars and amino acids in the spice blend react at temperatures above 280°F to produce hundreds of new flavor compounds: nutty, savory, smoky, and slightly bitter in a way that registers as depth rather than char. Below that temperature, you're just warming spices. Above 450°F, you're burning them.
The window is narrow. A cast-iron skillet preheated for four minutes over medium-high heat on a standard home range sits right in that zone. This is not an accident — it's why cast iron is the only correct pan for this technique. Stainless steel works as a backup. Anything thinner or lighter loses temperature the moment the cold fish hits it and you spend the cook time climbing back up to searing range instead of actually searing.
Dry Fish Is Non-Negotiable
Surface moisture is the enemy of every crust-based cooking technique, and blackening is especially sensitive to it. Water on the surface of the fillet turns to steam when it hits the hot pan, and that steam layer sits between the spice coating and the hot metal, preventing direct contact. No contact, no Maillard reaction. No Maillard reaction, no crust — just gray, steamed fish wearing spices like a costume.
Pat the fillets dry twice. If you have five extra minutes, set them on a wire rack and let air circulation finish the job. This single step separates home cooks who produce restaurant-quality blackened fish from those who wonder why their version always disappoints.
The Butter Question
The classic blackening fat combination — olive oil and butter — is functional but imperfect. The olive oil raises the smoke point of the butter enough to prevent immediate burning, while the butter's milk solids contribute to browning and flavor. The problem is that at true blackening temperatures, the butter still threatens to scorch in the time it takes to sear all four fillets.
Ghee solves this cleanly. With virtually no milk solids remaining, ghee handles aggressive heat without browning or burning, and its flavor profile — nutty, rich, slightly sweet — amplifies the spice blend rather than competing with it. If you cook blackened fish regularly, switching to ghee is the most straightforward upgrade available.
The Flip Is Not a Decision — It's a Release
The fish tells you when to flip it. When the Maillard reaction completes on the bottom surface, the proteins in the crust contract and release cleanly from the pan. If you try to slide a spatula under the fillet and it resists, the crust isn't done. Forcing it tears the crust off and leaves the best part of the dish on the pan. Three to four minutes of patience solves every sticking problem in this recipe.
A thin flexible spatula is not optional here. The sharp, thin edge slides under the crust without disrupting it. A thick spatula wedges against it and causes damage. Use the right tool and the flip is effortless.
Aromatics at the End, Not the Beginning
Minced garlic added at the start of a blackening cook burns to a bitter paste within 90 seconds at these temperatures. Added in the final minute, it blooms in the residual pan fat without scorching, perfuming each fillet as it finishes. The fresh rosemary does the same — its volatile oils release into the hot fat and coat the fish from below in the final moments of cooking.
This is the difference between garlic flavor and burnt garlic flavor, and it costs you nothing except remembering to wait.
Where Beginners Mess This Up
Before we start, read this. These are the 4 reasons your blackened fish done right (the cast-iron method that actually works) will fail:
- 1
Not drying the fish before seasoning: Surface moisture is the single biggest crust-killer. When wet fish hits a hot pan, the water steams before the spices can sear, producing a gray, rubbery exterior instead of a dark, caramelized crust. Pat every fillet aggressively dry with paper towels — then dry them again.
- 2
Skimping on pan preheat time: Three to four minutes of dry preheating is not a suggestion. A cast-iron skillet takes far longer to reach proper searing temperature than most home cooks expect. If the fat smokes the instant it hits the pan, you're at the right temperature. If it gently sizzles, you're not.
- 3
Moving the fish too early: The crust releases from the pan when it's ready — and not a second before. If you try to flip a fillet and it resists, it needs more time. Force it and you strip the crust off entirely. Wait for it to release cleanly, which takes 3-4 minutes without touching.
- 4
Crowding the pan: Every fillet touching another drops the pan temperature dramatically. Steam builds between them and you lose the sear. Cook in batches if your pan can't hold four fillets with half an inch of space between each.
The Video Reference Library
Want to see it in action? Here are the exact videos we analyzed and combined to build this foolproof recipe translation:
The primary reference for this recipe — solid close-up work showing the crust development at each stage and exactly what color you're aiming for before the flip.
🛠️ Core Equipment
- Cast-iron skilletMandatory for blackening. Cast iron retains and distributes heat better than any other pan material, which is what creates the consistent, even crust. Stainless steel is a backup — non-stick is entirely incompatible with this technique.
- Thin flexible spatulaFlipping a blackened fillet requires a thin, sharp edge that slides cleanly under a fragile crust. A thick spatula tears the crust. A fish spatula or thin offset spatula is the right tool.
- Paper towelsFor drying the fish. This is not optional — see failure point one. Use more than you think you need.
- Splatter screenBlackening at high heat produces aggressive oil splatter. A splatter screen keeps your stovetop and hands out of harm's way without trapping steam the way a lid would.
Blackened Fish Done Right (The Cast-Iron Method That Actually Works)
🛒 Ingredients
- ✦4 firm white fish fillets (6 oz each, such as mahi-mahi or cod)
- ✦2 teaspoons smoked paprika
- ✦1 teaspoon cayenne pepper
- ✦1 teaspoon garlic powder
- ✦1 teaspoon onion powder
- ✦1 teaspoon dried thyme
- ✦1 teaspoon dried oregano
- ✦1/2 teaspoon freshly ground black pepper
- ✦1/2 teaspoon sea salt
- ✦1/4 teaspoon white pepper
- ✦3 tablespoons extra virgin olive oil
- ✦2 tablespoons unsalted butter
- ✦2 cloves garlic, minced
- ✦1 teaspoon fresh rosemary, finely chopped
- ✦1 large lemon, cut into wedges
- ✦Fresh parsley for garnish
👨🍳 Instructions
01Step 1
Pat the fish fillets dry with paper towels on both sides. Press firmly — you want no visible surface moisture.
02Step 2
Combine smoked paprika, cayenne, garlic powder, onion powder, dried thyme, oregano, black pepper, sea salt, and white pepper in a shallow dish. Whisk until fully integrated.
03Step 3
Coat each fillet evenly on both sides with the spice blend, pressing gently so the mixture adheres to the surface. Every part of the fillet should be covered.
04Step 4
Heat a [cast-iron skillet](/kitchen-gear/review/cast-iron-skillet) over medium-high heat for 3-4 minutes until the pan is very hot. Test by holding your hand two inches above the surface — you should feel intense radiant heat immediately.
05Step 5
Add olive oil and butter to the hot skillet. Swirl to coat as the butter foams and the foam begins to subside, about 60 seconds.
06Step 6
Place the seasoned fillets into the skillet, spaced apart. Do not move them.
07Step 7
Sear without touching for 3-4 minutes until a dark, caramelized crust forms on the bottom and the sides of the fish turn opaque halfway up.
08Step 8
Slide a thin spatula under each fillet. If it resists, wait 30 more seconds. When it releases cleanly, flip each fillet.
09Step 9
Sear the second side for 2-3 minutes until cooked through and the flesh flakes easily when pressed with a fork.
10Step 10
In the final minute, scatter minced garlic and fresh rosemary over the fish. Let the aromatics bloom in the pan fat.
11Step 11
Transfer to a serving platter. Squeeze fresh lemon juice over each fillet immediately while hot. Garnish with parsley and lemon wedges. Serve at once.
Nutrition Per Serving
Estimates based on standard preparation. Adjustments alter macros.
🔄 Substitutions
Instead of Extra virgin olive oil + unsalted butter...
Use Ghee or avocado oil
Both have higher smoke points than the butter-oil combination, which means less smoke and a marginally cleaner sear. Ghee adds a nutty depth that complements the spice blend well.
Instead of Mahi-mahi or cod...
Use Wild-caught salmon or mackerel
Fatty fish blacken beautifully and add omega-3 richness. Reduce cook time by 30-60 seconds per side — fatty fish cook faster and overcooking turns them chalky.
Instead of Dried thyme and oregano...
Use Fresh herbs added at the finish
Use fresh thyme and oregano added in the final 30 seconds of cooking alongside the garlic. Brighter, more vibrant flavor but shorter aroma window — serve immediately.
Instead of Sea salt (1/2 teaspoon)...
Use 1/4 teaspoon sea salt plus juice of half a lemon
Lower sodium with a compensating brightness from the acid. The lemon amplifies the perception of saltiness without actually adding more sodium.
🧊 Storage & Reheating
In the Fridge
Store cooled fillets in an airtight container for up to 2 days. The crust softens overnight — it will not return to its original texture when reheated.
In the Freezer
Not recommended. Fish loses its texture significantly after freezing and thawing, and the crust becomes saturated and soggy.
Reheating Rules
Reheat in a dry skillet over medium heat for 2-3 minutes per side. Avoid the microwave — it turns the spice crust into a paste and steams the fish into rubbery submission.
❓ Frequently Asked Questions
Why is my fish crust burning instead of blackening?
Blackened and burnt are different things — blackened is dark brown and deeply caramelized, burnt is acrid and black-black. If your crust tastes bitter, your heat is too high or you left it too long. Medium-high heat, not maximum. 3-4 minutes, not 6.
Can I use a non-stick pan?
No. Non-stick coatings cannot handle the temperatures required for blackening and will degrade, potentially releasing harmful compounds. Cast iron is the correct tool. A heavy stainless skillet is the only acceptable substitute.
What fish works best for blackening?
Firm, thick fillets: mahi-mahi, cod, redfish, snapper, or grouper. The fillet needs to be at least 3/4 inch thick or the interior will overcook by the time the crust forms. Thin, delicate fish like tilapia or sole won't hold up to this technique.
Do I need to marinate the fish?
No. Blackening is a dry technique — the spice rub goes on right before cooking. Marinating fish for more than 20-30 minutes in any acidic marinade begins to denature the proteins and creates a mushy texture. Season and sear immediately.
Why is my fish sticking to the pan?
Either the pan wasn't hot enough when you added the fish, or you tried to flip it before the crust formed. A properly seared crust releases from the pan naturally. If it's stuck, wait another 30-60 seconds — the Maillard reaction will finish and it will let go.
Can I finish blackened fish in the oven?
Yes, for very thick fillets (over 1 inch). Sear for 2 minutes per side on the stovetop, then transfer the cast-iron skillet to a 400°F oven for 4-5 minutes to finish the interior without burning the exterior spice crust.

The Science of
Blackened Fish Done Right (The Cast-Iron Method That Actually Works)
We turned everything on this page into a beautiful, flour-proof PDF cheat sheet. Print it out, stick it to your fridge, and never mess up your blackened fish done right (the cast-iron method that actually works) again.
*We'll email you the high-res PDF instantly. No spam, just perfectly cooked meals.
AlmostChefs Editorial Team
We translate the internet's most popular cooking videos into foolproof, beginner-friendly written recipes. We analyze multiple methods, test them in our kitchen, and engineer a single "Master Recipe" that gives you the best possible result with the least possible stress.