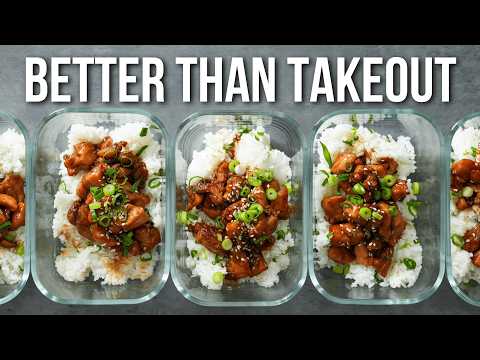
Better Than Takeout Sesame Chicken (High-Protein Meal Prep That Actually Delivers)
Crispy pan-seared chicken breast coated in a glossy savory-sweet sesame sauce that beats delivery on every metric — flavor, protein, cost, and reheat quality. We broke down the technique to give you restaurant-quality results in 40 minutes with ingredients you already have.

“Takeout sesame chicken has two things working against it: it's deep-fried in oil that's been used all day, and the sauce is built on sodium and cornstarch slurry that tastes fine at the restaurant and like cardboard the next morning. This version pan-sears the chicken in a single hot skillet, builds a real sauce from scratch in the same pan, and — critically — it reheats better than the original. 42 grams of protein per serving, done in 40 minutes, no delivery fee.”
Why This Recipe Works
Takeout sesame chicken solves a real problem — it tastes good, it's fast, and you didn't have to cook it. The issue is that the version arriving in a white container was fried hours ago, the sauce was batch-made at scale, and by the time it reaches your table it's already past peak. Make it at home with this technique and you get to eat it at the exact right moment. And then again on Wednesday from the fridge, when it tastes even better.
The Coating Equation
Most home sesame chicken fails at the first step: wet chicken going into a hot pan. Moisture on the surface of the chicken vaporizes the moment it hits the oil, dropping the pan temperature and creating a steam layer between the protein and the metal. You can't sear through steam. The result is pale, rubbery chicken with no crust — and a crust is what keeps the sauce attached.
The cornstarch-egg white coating solves this in two ways. First, the egg white acts as a binder that holds the cornstarch against the surface and partially seals the exterior of each piece, slowing moisture loss during cooking. Second, the cornstarch itself browns more aggressively than protein alone, giving you a golden, lightly textured crust that sauce clings to instead of pooling around. This is the same principle behind restaurant-style velvet coating — just stripped down for a home kitchen without a vat of oil.
Why Batching Matters More Than You Think
Pan searing is a heat transfer operation. Your cast iron skillet holds a finite amount of thermal energy. When you add cold chicken to it, the pan cools. Add too much chicken and the temperature drops below the searing threshold — roughly 300°F — and you're no longer searing, you're steaming. The chicken turns gray, the moisture evaporates into the air instead of locking inside, and no amount of extra cook time recovers the texture.
Two batches. Every time. Even if the pieces would technically fit in one layer. Give the pan a full minute to recover between batches — you'll hear the difference when the second batch hits.
Sauce Architecture
The sauce in this recipe isn't complicated, but the order of operations matters. You build it in the same pan where the chicken seared, which means the first thing that happens when you add liquid is that the brown fond on the pan bottom dissolves into the sauce. That fond is Maillard reaction products — the same complex flavor compounds responsible for seared steak and roasted coffee. They dissolve immediately in the soy sauce-broth mixture and make the sauce taste like it reduced for an hour.
The sesame oil and rice vinegar serve opposing functions. Sesame oil contributes fat-soluble aromatic compounds — the nutty, roasted character that reads as distinctly Asian to the Western palate. Rice vinegar cuts the sweetness of the honey and the heaviness of the soy, adding the sharp brightness that prevents the sauce from being one-dimensional. Together they create the contrast that makes the dish compulsive.
The Meal Prep Case
This recipe is built for four days of lunches, and it behaves better than most meal-prep proteins for a specific reason: the cornstarch in the coating continues to interact with the sauce as the dish sits, thickening the sauce slightly and binding it more tightly to each piece. Day-two sesame chicken from this recipe has better sauce-to-chicken ratio than day-one. That's unusual. Most proteins dry out or get oversauced in storage. This one hits a kind of equilibrium.
Use glass containers. The sauce contains sesame oil and vinegar, both of which leach into plastic over four days and transfer flavor to everything else in your fridge. Glass seals better, reheats more evenly, and doesn't absorb anything. If you're doing meal prep seriously, a set of glass meal prep containers is the infrastructure investment that actually changes your week.
Where Beginners Mess This Up
Before we start, read this. These are the 4 reasons your better than takeout sesame chicken (high-protein meal prep that actually delivers) will fail:
- 1
Not drying the chicken before coating: Surface moisture is the enemy of the Maillard reaction. Wet chicken steams in the pan instead of searing, producing pale, rubbery pieces that won't hold the sauce properly. Pat every surface dry with paper towels before you do anything else. This single step is responsible for at least half the texture difference between good and mediocre pan-seared chicken.
- 2
Crowding the pan: When chicken pieces touch each other in the skillet, the pan temperature drops and steam gets trapped between them. You get braised chicken instead of seared chicken. Work in two batches, give each piece room, and let the heat recover between batches. This is not optional — it's the difference between golden crust and gray sadness.
- 3
Skipping the sesame seed toast: Raw sesame seeds taste flat and slightly bitter. Two minutes in a dry skillet over medium heat activates the oils and develops the nutty, roasted flavor that defines the dish. The moment they turn golden and start releasing aroma, pull them immediately — they go from toasted to burnt in under 30 seconds.
- 4
Building the sauce separately instead of in the same pan: The fond — the brown bits left in the pan after searing the chicken — is concentrated flavor. When you deglaze the pan with the sauce ingredients, those bits dissolve and integrate into the sauce, adding depth that no amount of extra soy sauce can replicate. Don't wipe the pan. Don't switch to a clean skillet. Use the same pan.
The Video Reference Library
Want to see it in action? Here are the exact videos we analyzed and combined to build this foolproof recipe translation:
The source recipe video. Watch particularly for the pan-searing batching technique and how the sauce is built directly in the chicken drippings — that step is what makes the sauce taste like it cooked for an hour.
2. The Science of Perfectly Seared Chicken
Deep dive into why dry surfaces, pan temperature, and batch size determine sear quality. Understanding the Maillard reaction here makes every chicken recipe you cook better.
3. Meal Prep Fundamentals: Saucy Proteins That Reheat WellCovers the specific containers, cooling protocols, and reheating methods that keep saucy chicken meal prep from turning into a gluey, sad mess by Wednesday.
🛠️ Core Equipment
- Large heavy-bottomed skillet or wok ↗High heat capacity and even distribution are critical for searing chicken without temperature drop. A [cast iron skillet](/kitchen-gear/review/cast-iron-skillet) or heavy stainless steel pan holds heat through two batches of cold chicken. Thin nonstick pans lose heat the moment the chicken hits the surface.
- Instant-read meat thermometer ↗Chicken breast at 165°F is the difference between perfectly cooked and dry. The visual test — 'is it white inside?' — misses the target regularly because color develops before safe temperature is reached. A [thermometer](/kitchen-gear/review/instant-read-thermometer) removes all guesswork.
- Shallow mixing bowl and whisk ↗The egg white and cornstarch coating needs to be smooth and even before the chicken goes in. Lumpy coating creates thick spots that don't adhere and burn before the chicken cooks through. A [stainless mixing bowl](/kitchen-gear/review/mixing-bowls) and small whisk handle this in 30 seconds.
- Meal prep glass containers ↗Glass containers seal better and don't absorb sauce odor or color the way plastic does. They also go directly from fridge to microwave — though reheating in a skillet with a splash of water is strictly superior for texture.
Better Than Takeout Sesame Chicken (High-Protein Meal Prep That Actually Delivers)
🛒 Ingredients
- ✦1.75 pounds boneless, skinless chicken breast, cut into 1.5-inch cubes
- ✦1 large egg white
- ✦3 tablespoons cornstarch
- ✦3 tablespoons low-sodium soy sauce
- ✦2.5 tablespoons sesame oil
- ✦2.5 tablespoons rice vinegar
- ✦2.5 tablespoons raw honey
- ✦4 cloves fresh garlic, minced
- ✦1.5 tablespoons fresh ginger, finely minced
- ✦0.5 cup low-sodium chicken broth
- ✦3 tablespoons peanut or vegetable oil for cooking
- ✦0.75 teaspoon red pepper flakes
- ✦3 tablespoons white sesame seeds
- ✦3 scallions, sliced into thin rings
- ✦Kosher salt and freshly cracked black pepper to taste
👨🍳 Instructions
01Step 1
Pat the chicken cubes thoroughly dry using paper towels on all sides.
02Step 2
Whisk together the egg white and cornstarch in a shallow bowl until completely smooth with no lumps.
03Step 3
Season the chicken generously with salt and pepper, then toss in the egg white-cornstarch mixture until all pieces are evenly coated.
04Step 4
Heat 1.5 tablespoons of peanut oil in a large skillet over medium-high heat until shimmering and just beginning to smoke, about 1 minute.
05Step 5
Working in two batches, sear the chicken for 4-5 minutes per side until deep golden brown and cooked through to 165°F internal temperature. Transfer the first batch to a clean plate before starting the second.
06Step 6
Toast the sesame seeds in a dry skillet over medium heat for 2-3 minutes, stirring frequently, until fragrant and lightly golden. Remove immediately and set aside.
07Step 7
In the same skillet used for the chicken (don't clean it), whisk together the soy sauce, sesame oil, rice vinegar, honey, minced garlic, minced ginger, and red pepper flakes directly in the pan.
08Step 8
Pour in the chicken broth and stir to combine, scraping up any browned bits from the pan bottom. Bring to a gentle simmer over medium heat.
09Step 9
Return the seared chicken to the skillet and fold gently into the sauce, cooking for 2-3 minutes until the sauce thickens slightly and coats the chicken evenly.
10Step 10
Taste and adjust with additional salt, pepper, or a few drops of soy sauce as needed.
11Step 11
Transfer to a serving platter or divide among meal prep containers. Garnish generously with the toasted sesame seeds and sliced scallions.
12Step 12
Serve immediately over steamed jasmine rice or with roasted vegetables, or cool completely before sealing and refrigerating for up to 4 days.
Nutrition Per Serving
Estimates based on standard preparation. Adjustments alter macros.
🔄 Substitutions
Instead of Honey...
Use Pure maple syrup or monk fruit sweetener
Maple adds earthiness and caramelizes well; monk fruit delivers near-zero glycemic impact. If using monk fruit, use a quality brand — cheap versions have a cooling aftertaste that doesn't work in savory sauces.
Instead of Chicken breast...
Use Chicken thigh meat, cubed
Thighs are more forgiving — they don't dry out if you overshoot 165°F by a few degrees. Richer texture, slightly higher calorie count. Cook time stays the same.
Instead of Low-sodium soy sauce...
Use Tamari or coconut aminos
Tamari has deeper umami and is naturally gluten-free. Coconut aminos is slightly sweeter and thinner — you may need to reduce the honey by half a tablespoon to balance. Both work well.
Instead of White sesame seeds...
Use Black sesame seeds or a black-and-white blend
Black sesame has a more robust, earthy flavor and striking visual contrast. Nutritionally slightly superior. Toast them the same way — they're done when you smell them, since color change is harder to read.
🧊 Storage & Reheating
In the Fridge
Store in airtight glass containers for up to 4 days. The sauce continues to absorb into the chicken overnight — flavor peaks on day two.
In the Freezer
Freeze in portioned containers for up to 2 months. Thaw overnight in the refrigerator. The sauce may separate slightly on thaw — a minute in a warm skillet with a splash of broth brings it back together.
Reheating Rules
Best reheated in a skillet over medium-low heat with 1-2 tablespoons of water or broth, covered, for 3-4 minutes. Microwave works but dries the chicken edges — if you must, cover loosely and use 70% power in 90-second intervals.
❓ Frequently Asked Questions
Why does my sesame chicken sauce come out thin and watery?
Two possible causes: the chicken wasn't dry enough before searing, so it released water into the pan, or the sauce wasn't reduced long enough after adding the broth. Let the sauce simmer actively for at least 2-3 minutes with the chicken in the pan before pulling it off heat. The cornstarch coating on the chicken also thickens the sauce as it dissolves — this is intentional.
Can I make this without egg white in the coating?
Yes, but the crust will be thinner and less protective. The egg white helps the cornstarch adhere and creates a light, crispy barrier that keeps the chicken juicy. If you skip it, just use cornstarch alone — pat the chicken dry, season it, and dust lightly with cornstarch. Still works, just slightly less textured.
Is this actually better than restaurant sesame chicken?
Different, not just better. Restaurant versions are deep-fried in battered pieces, which produces a thicker, crunchier coating. This version is lighter — pan-seared with a thin cornstarch coat — with better sauce depth because you're building it from fresh aromatics. If you want the deep-fry crunch, you need a fryer. If you want something that tastes cleaner and reheats without turning into a grease bomb, this wins.
How do I keep the chicken from sticking to the pan?
The chicken will stick initially, and that's fine — this is the Maillard reaction happening. Don't force it. After 3-4 minutes of undisturbed searing, the crust releases naturally from the pan surface. If you try to move it before the crust forms, it tears. Wait for the release.
Can I add vegetables to this?
Yes. Broccoli florets, snap peas, and bell pepper strips all work well. Stir-fry them in the skillet before building the sauce — about 3-4 minutes over high heat. Remove them, cook the chicken as directed, then return the vegetables when you add the chicken back to the sauce. Don't add raw vegetables directly to the sauce or they'll leach water and thin it out.
Why use low-sodium soy sauce instead of regular?
Control. Regular soy sauce hits around 900-1000mg sodium per tablespoon. Low-sodium comes in around 550-600mg. When you're using 3 tablespoons of soy sauce plus chicken broth, the sodium adds up fast. Low-sodium lets you season to taste and actually taste the other flavors in the sauce — the sesame, vinegar, ginger — without everything being flattened by salt.

The Science of
Better Than Takeout Sesame Chicken (High-Protein Meal Prep That Actually Delivers)
We turned everything on this page into a beautiful, flour-proof PDF cheat sheet. Print it out, stick it to your fridge, and never mess up your better than takeout sesame chicken (high-protein meal prep that actually delivers) again.
*We'll email you the high-res PDF instantly. No spam, just perfectly cooked meals.
AlmostChefs Editorial Team
We translate the internet's most popular cooking videos into foolproof, beginner-friendly written recipes. We analyze multiple methods, test them in our kitchen, and engineer a single "Master Recipe" that gives you the best possible result with the least possible stress.