The Last Beef Chili Recipe You'll Ever Need (One-Pot Weeknight Winner)
A hearty, deeply spiced American classic built on caramelized beef, two kinds of beans, and a tomato base that simmers into something far better than the sum of its parts. We broke down the most popular YouTube methods and the science behind every step so you can nail rich, complex chili in under an hour.
“Most homemade chili is just seasoned meat soup. It's thin, flat, and forgettable — the kind of thing you eat once and never request again. The difference between that and chili that has people hovering over the pot before it's done comes down to three moves most recipes skip: caramelizing the tomato paste before it hits liquid, browning the beef hard enough to build a crust, and giving the whole thing 25 minutes of uncovered simmer time so the sauce reduces to something that actually coats a spoon. None of it is complicated. All of it matters.”
Why This Recipe Works
Chili is a deceptively simple dish. One pot, common ingredients, no technical skills required — and yet most versions are forgettable at best and genuinely bad at worst. The gap between a bowl that gets second helpings and one that sits in the fridge untouched comes down to a series of small decisions that most recipes either skip or bury in vague language like "cook until done."
Brown the Beef Like You Mean It
Ground beef has a problem: it contains a lot of water. When that water hits a hot pan, it steams before it evaporates, which means the beef cooks through without ever developing the crust that makes it taste like anything. The solution is heat management. High temperature, adequate fat, and patience. Don't stir the beef for the first two minutes. Let it sit flat against the pan and develop a real golden crust before you break it up. This is the Maillard reaction at work — the same chemistry that makes grilled steak taste different from boiled. Skip this step and you have gray protein in sauce. Do it right and you have caramelized meat that contributes its own deep flavor to every spoonful.
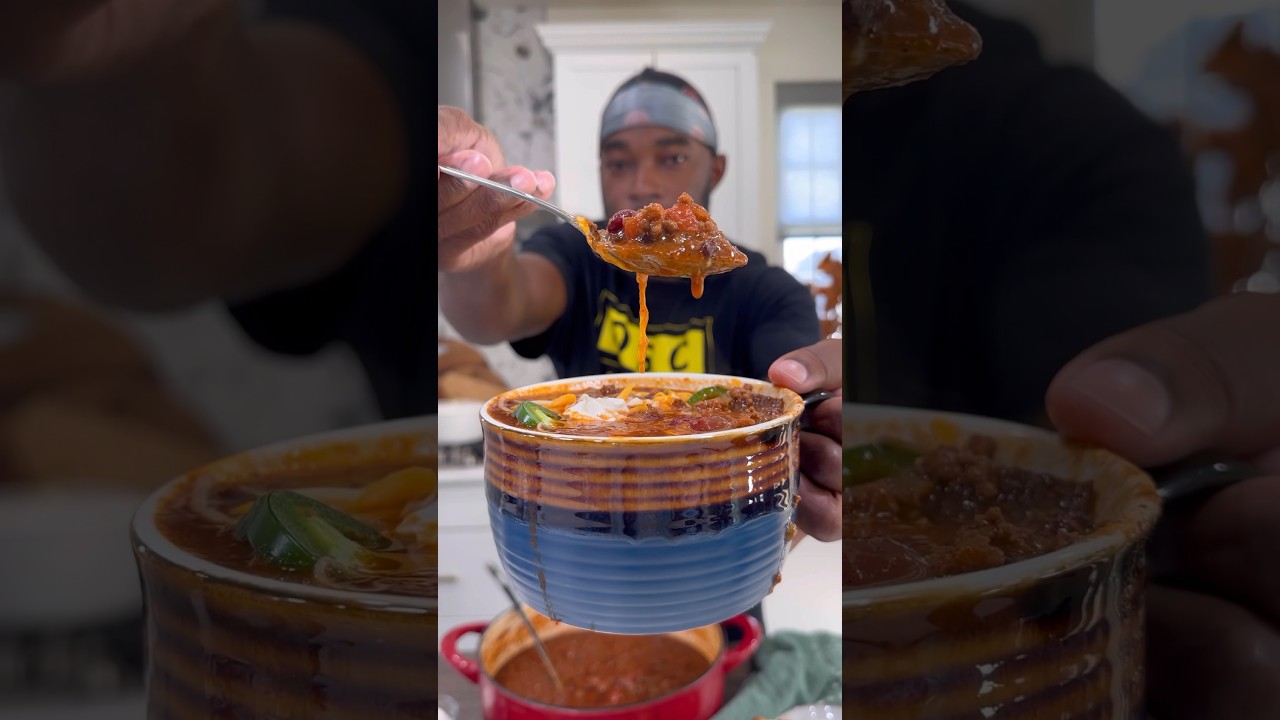
The Tomato Paste Move That Changes Everything
There's a technique used in professional kitchens called "pincé" — cooking tomato paste dry in a hot pan before adding any liquid. The paste goes from bright, acid-sharp red to a deeper rust color as the sugars caramelize and the raw tomato flavor cooks out. What you're left with is concentrated umami, a slight smokiness, and an undertone that tastes like it simmered for hours even if it hasn't.
Push the meat and vegetables to the sides, add the paste to the bare center of the pot, and leave it alone for 90 seconds. Then stir. This one move adds more depth than any combination of extra spices you could add later.
Beans Are Infrastructure
Two kinds of beans is not aesthetic preference — it's structural engineering. Kidney beans are dense and starchy with thick skins that hold their shape through 30 minutes of simmering. They provide the meaty chew that makes chili feel substantial. Black beans are softer, with thinner skins that start to break down at the edges during the simmer. That breakdown releases starch directly into the liquid, thickening the sauce naturally without any added flour or cornstarch. Together they create a chili that has both body and texture. Use only one kind and you're compromising one or the other.
Rinse both before they go in. The liquid in canned beans is high in sodium and has a distinctly metallic undertone. Thirty seconds under cold water removes it entirely.
The Uncovered Simmer
This is the step most recipes mention and most cooks ignore. Leave the pot uncovered for the full simmer. Water needs somewhere to go. Over 25-30 minutes of gentle, uncovered simmering, the sauce reduces and concentrates, the vegetables release their liquid and then reabsorb the spiced broth, and the beans begin to break down at the edges in a way that fundamentally changes the texture of the whole dish.
A Dutch oven or heavy-bottomed pot is your best tool here. Thin pots create hot spots that scorch the bottom layer — you'll smell it before you see it, and by then the bitterness has already spread. Even heat across the entire base keeps the simmer gentle and consistent.
Time Is the Last Ingredient
Chili is one of the few dishes that is objectively, measurably better on day two. The spices continue blooming in the fat overnight. The beans absorb more of the seasoned liquid. The acidity from the tomatoes mellows and integrates. If you have the option, make this the night before you need it. Reheat low and slow with a splash of broth. The version you serve will taste like it took twice as long to make.
Where Beginners Mess This Up
Before we start, read this. These are the 4 reasons your the last beef chili recipe you'll ever need (one-pot weeknight winner) will fail:
- 1
Skipping the tomato paste caramelization: Dumping tomato paste directly into liquid is the single biggest reason homemade chili tastes tinny and thin. When you push the meat aside and cook the paste dry in the center of the pot for 90 seconds, you trigger the Maillard reaction — the same browning chemistry that makes seared steak taste different from boiled. The paste turns from bright red to rust, loses its raw acidity, and develops a concentrated, almost smoky depth that you cannot get any other way.
- 2
Underbrowning the beef: Ground beef cooked to 'no pink remaining' is steamed meat. Ground beef cooked to golden brown with visible crust is caramelized protein. The difference in flavor is enormous. Use medium-high heat, don't stir constantly, and give the beef 6-7 minutes to develop real color before moving on. Crowding the pot or adding the onions too early kills the browning temperature.
- 3
Covering the pot during the simmer: Chili needs to reduce. A covered pot traps steam and keeps everything soupy. Leave it uncovered for the full 25-30 minute simmer so water evaporates, the sauce concentrates, and the beans begin to break down slightly at the edges, thickening the whole pot naturally. This is the step that separates chili from stew.
- 4
Seasoning only at the end: Salt added only at serving sits on top of the food. Salt added in layers — at the beef stage, at the vegetable stage, and again after the simmer — penetrates every component. Taste and adjust throughout the cook, not just at the end.
The Video Reference Library
Want to see it in action? Here are the exact videos we analyzed and combined to build this foolproof recipe translation:
The source video that anchors this recipe. Solid walkthrough of the browning and simmer technique with clear visual cues for when each stage is done.
🛠️ Core Equipment
- Large heavy-bottomed pot or Dutch ovenEven heat distribution prevents hot spots that scorch the bottom while leaving the center undercooked. A [Dutch oven](/kitchen-gear/review/dutch-oven) is ideal — its weight maintains a steady simmer temperature without constant adjustment.
- Wooden spoon or stiff silicone spatulaFor breaking up the beef and scraping the fond (the browned bits) from the bottom of the pot when you add liquid. The fond is flavor — don't leave it.
- Fine-mesh sieve or colanderFor draining and rinsing the canned beans before they go in. Rinsing removes the starchy, sodium-heavy canning liquid that would otherwise muddy the broth.
The Last Beef Chili Recipe You'll Ever Need (One-Pot Weeknight Winner)
🛒 Ingredients
- ✦2 tablespoons extra-virgin olive oil
- ✦1 pound lean ground beef (93% lean)
- ✦2 medium yellow onions, finely diced
- ✦3 cloves garlic, minced
- ✦1 red bell pepper, diced
- ✦1 medium zucchini, diced
- ✦2 cans (14.5 ounces each) diced tomatoes, no sugar added
- ✦1 can (15 ounces) kidney beans, drained and rinsed
- ✦1 can (15 ounces) black beans, drained and rinsed
- ✦3 tablespoons tomato paste
- ✦2 cups low-sodium beef broth
- ✦2 tablespoons chili powder
- ✦1 tablespoon ground cumin
- ✦1 teaspoon smoked paprika
- ✦1 teaspoon dried oregano
- ✦1/2 teaspoon cayenne pepper
- ✦1 bay leaf
- ✦Salt and freshly cracked black pepper to taste
- ✦Fresh cilantro for garnish
- ✦Plain Greek yogurt for serving (optional)
👨🍳 Instructions
01Step 1
Heat olive oil in a large, heavy-bottomed pot over medium-high heat until shimmering, about 1 minute.
02Step 2
Add the ground beef and cook, breaking it apart with a wooden spoon, until no pink remains and the meat is golden brown with visible crust, about 6-7 minutes.
03Step 3
Add the diced onions and cook, stirring frequently, until soft and translucent, about 4-5 minutes.
04Step 4
Stir in the minced garlic and cook for 1 minute until fragrant.
05Step 5
Add the red bell pepper and zucchini, stir to combine, and cook for 3 minutes to begin softening.
06Step 6
Push everything to the sides of the pot and add the tomato paste to the center. Cook it undisturbed for 90 seconds until it darkens from bright red to rust-brown, then stir everything together.
07Step 7
Pour in the diced tomatoes with their juice and the beef broth, scraping the bottom of the pot thoroughly to release all the browned bits.
08Step 8
Add the kidney beans, black beans, chili powder, cumin, smoked paprika, oregano, cayenne, and bay leaf. Stir until fully combined.
09Step 9
Bring to a gentle boil, then reduce heat to low and simmer uncovered for 25-30 minutes, stirring occasionally.
10Step 10
Taste and adjust seasoning with salt and black pepper. Remove the bay leaf.
11Step 11
Ladle into bowls and top with fresh cilantro and a dollop of Greek yogurt if desired.
Nutrition Per Serving
Estimates based on standard preparation. Adjustments alter macros.
🔄 Substitutions
Instead of Ground beef (93% lean)...
Use Ground turkey breast or plant-based ground meat
Turkey is leaner and slightly milder — compensate with an extra half teaspoon of smoked paprika. Plant-based ground works well and holds up to the long simmer; add a splash more broth as it absorbs liquid faster.
Instead of Canned diced tomatoes...
Use 3 cups fresh diced tomatoes or 1 large can crushed tomatoes
Fresh tomatoes give more vibrant acidity but thinner body — simmer an extra 10 minutes to compensate. Crushed tomatoes produce a silkier sauce with better cling to the beans and meat.
Instead of Low-sodium beef broth...
Use Homemade bone broth or vegetable broth
Bone broth deepens the body and adds natural gelatin that makes the sauce feel richer. Vegetable broth lightens the profile significantly — balance it with an extra tablespoon of tomato paste.
Instead of Chili powder blend...
Use Pure ancho chile powder plus individual spices
Commercial chili powder blends often contain salt and anti-caking agents. Replacing with 1.5 tablespoons pure ancho chile powder gives cleaner, more complex heat and full control over sodium.
🧊 Storage & Reheating
In the Fridge
Store in an airtight container for up to 4 days. The flavor peaks on day 2.
In the Freezer
Freeze in individual portions for up to 3 months. Thaw overnight in the fridge.
Reheating Rules
Reheat on the stovetop over low heat with a splash of broth or water, stirring occasionally. Microwave works but tends to make the beans mushy — use it only if necessary, covered, at 70% power.
❓ Frequently Asked Questions
Why is my chili watery?
You either covered the pot during the simmer or didn't cook it long enough. Chili needs an uncovered simmer of at least 25 minutes to reduce properly. If it's still thin after 30 minutes, crank the heat slightly and stir more frequently for another 5-10 minutes until it coats a spoon.
Can I make this in a slow cooker?
Yes, but don't skip the stovetop browning steps. Brown the beef and caramelize the tomato paste in a skillet first, then transfer everything to the slow cooker. Cook on low for 6-8 hours or high for 3-4. Leave the lid slightly ajar in the last hour so it thickens.
Is beef chili gluten-free?
This recipe is naturally gluten-free as written. The main hidden gluten risk in chili is commercial chili powder blends and beef broth — check both labels and use certified gluten-free versions if you're cooking for someone with celiac disease.
How do I make it spicier?
Increase the cayenne to 1 teaspoon, add a diced jalapeño with the bell pepper, or stir in a teaspoon of chipotle in adobo sauce with the tomatoes. The chipotle option adds smokiness alongside heat and is the most interesting upgrade.
Do I have to use two kinds of beans?
No, but you should. Kidney beans stay firm and meaty throughout the simmer. Black beans break down slightly at the edges, naturally thickening the sauce. Using only one type gives you either texture or body — the combination gives you both.
Why does my chili taste flat even though I followed the recipe?
Ninety percent of flat chili comes from underseasoning at multiple stages, not from bad ingredients. Salt the beef when it goes in, taste after the vegetables cook, and adjust again after the simmer. Flat chili also often needs acid — a squeeze of lime juice just before serving brightens everything.

The Science of
The Last Beef Chili Recipe You'll Ever Need (One-Pot Weeknight Winner)
We turned everything on this page into a beautiful, flour-proof PDF cheat sheet. Print it out, stick it to your fridge, and never mess up your the last beef chili recipe you'll ever need (one-pot weeknight winner) again.
*We'll email you the high-res PDF instantly. No spam, just perfectly cooked meals.
AlmostChefs Editorial Team
We translate the internet's most popular cooking videos into foolproof, beginner-friendly written recipes. We analyze multiple methods, test them in our kitchen, and engineer a single "Master Recipe" that gives you the best possible result with the least possible stress.