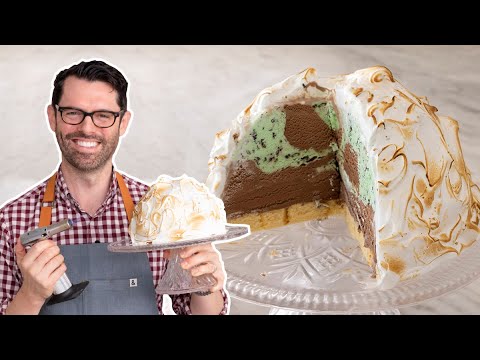
Showstopper Baked Alaska (The Freeze-First Method Nobody Skips)
A retro American classic — sponge cake layered with ice cream, encased in billowing toasted meringue. We reverse-engineered the technique to solve the one problem that kills every home attempt: ice cream that melts before the meringue browns. The answer is freezing the assembly overnight and working with a screaming-hot oven.

“Most Baked Alaska disasters happen before the meringue even touches the oven. The ice cream isn't frozen hard enough, the oven isn't hot enough, and five minutes later you have warm soup in a meringue shell. The fix is boring but absolute: freeze the assembled cake until it's a solid brick, then hit it with a 425°F oven for exactly the right window. Do those two things right and you get what everyone in the room will photograph before they eat it.”
Why This Recipe Works
Baked Alaska is a physics trick dressed up as a dessert. The meringue — a foam of air, protein, and sugar — is one of the most effective thermal insulators in the domestic kitchen. Egg white foam conducts heat at roughly one-tenth the rate of the ice cream beneath it. In the 5-7 minutes the dish spends in a 425°F oven, the meringue surface reaches browning temperature while the ice cream behind the insulating layer barely registers a temperature change. The whole thing works because of thermodynamics, not magic.
Which is why, when it fails, it fails for physical reasons — not mysterious ones.
The Freeze Is the Recipe
Everything else is assembly. The one variable that actually determines whether this dish succeeds is the temperature of the ice cream going into the oven. Partially frozen ice cream melts at roughly 28°F. A screaming hot oven deposits heat into the meringue surface instantaneously, and that heat travels inward. If the ice cream starts at -5°F (thoroughly frozen overnight), the meringue has time to brown before the inner temperature climbs past the melting threshold. If it starts at 15°F (frozen for only two hours), it doesn't.
This is not a matter of preference. It is the load-bearing structural principle of the entire recipe.
Four hours is the stated minimum. Overnight is what actually works. If your assembly has any softness when you press the top, it is not ready. Put it back.
Meringue Is Architecture
The meringue serves two functions simultaneously: it browns beautifully for presentation, and it insulates completely for function. Both depend on it being properly made. Underwhipped meringue — soft peaks rather than stiff — has too much liquid water content. That water conducts heat directly into the ice cream instead of blocking it. Stiff, glossy peaks are dry enough to function as actual insulation.
The cream of tartar is not optional. It stabilizes the foam by lowering the pH, which makes the protein networks in egg white stronger and more resistant to collapse under heat. Salt opens up the protein structure initially so it whips faster. These aren't finishing touches — they're structural chemistry.
Add sugar gradually. One tablespoon every 15 seconds, with the stand mixer running at full speed. Dumping sugar in fast creates a heavy syrup on the bottom of the bowl that never fully incorporates. The result is dense, flat meringue that slides off vertical surfaces and weeps liquid within minutes. Patience during the sugar addition is the difference between meringue that holds up and meringue that puddles.
Coverage Is Non-Negotiable
Every exposed millimeter of cake or ice cream is a heat entry point. The meringue is a sealed system — it only works if it's airtight. Apply a generous base coat first with an offset spatula, covering every surface including the bottom edges where the cake meets the parchment. Go back and build the decorative peaks on top of that solid foundation. Decorative swirls applied to a thin first coat are cosmetic on top of a structural failure.
The 5-minute room temperature rest before meringuing is exactly right. Less and the meringue won't adhere to the surface — it slides on a condensation layer. More and the ice cream starts warming. Set a timer, move with purpose, and go straight from freezer to meringue to oven without unnecessary pauses.
The Oven Window
Five to seven minutes at 425°F is a narrow band and the difference between the edges of it matters. At five minutes, peaks are lightly golden. At seven, they're deep amber. At nine, you have scorched meringue and the ice cream has started to go. Stay at the oven window. This is not a set-and-walk-away moment. The browning accelerates sharply in the last 90 seconds and the oven does not warn you.
If you own a kitchen torch, consider using it instead of or after the oven. The torch gives you surgical control — you can brown each peak individually without exposing the whole dish to sustained ambient heat. The result looks more hand-finished and gives you a few extra seconds of margin on the ice cream.
Slice at the table. The reveal is the point.
Where Beginners Mess This Up
Before we start, read this. These are the 4 reasons your showstopper baked alaska (the freeze-first method nobody skips) will fail:
- 1
Insufficient freeze time: The number one Baked Alaska failure. If the ice cream layer has any give when you press it, it will liquefy during baking before the meringue can set. The assembly must be completely solid — frozen through the center — before meringue touches it. Four hours minimum. Overnight is better. There is no other solution.
- 2
Warm meringue bowls or tools: Egg whites refuse to whip properly in even slightly greasy or warm equipment. A trace of egg yolk, a damp bowl, or a warm beater will prevent the whites from developing the stiff peaks needed to insulate the ice cream. Wipe everything down with paper towel and a splash of white vinegar before you start.
- 3
Gaps in the meringue coating: The meringue is the insulation layer. Any exposed patch of cake or ice cream becomes a heat entry point and the ice cream below it melts. Every surface must be covered, including the sides down to the baking sheet. Treat it like you're sealing a waterproof membrane.
- 4
Pulling the cake from the freezer too early: Letting the frozen assembly sit at room temperature for more than 5 minutes before meringuing starts warming the ice cream. Move fast. The meringue application should take under 3 minutes. Oven should already be preheated before the cake comes out of the freezer.
The Video Reference Library
Want to see it in action? Here are the exact videos we analyzed and combined to build this foolproof recipe translation:
The primary reference for this recipe's technique. Clear demonstration of the meringue application, freeze timing, and what properly stiff peaks look like before the cake goes in the oven.
2. Meringue Masterclass
Deep dive into the chemistry of egg white foams — why fat kills meringue, what cream of tartar actually does, and how to identify the exact moment the peaks are stiff enough to insulate against oven heat.
3. Classic American DessertsHistorical context and flavor variation ideas for Baked Alaska — how to swap the ice cream layers, what cake bases work best, and how the French version (omelette norvégienne) differs in technique.
🛠️ Core Equipment
- Stand mixer or hand electric mixer ↗Whipping meringue by hand is theoretically possible and practically a nightmare. You need consistent speed and the endurance to whip for 4-5 minutes while gradually adding sugar. A [stand mixer](/kitchen-gear/review/stand-mixer) frees both hands for adding sugar slowly.
- Offset spatula ↗The angled blade lets you apply meringue to vertical sides without knuckling into the surface. Spreading meringue with a straight spatula creates uneven coverage. An [offset spatula](/kitchen-gear/review/offset-spatula) gives you the control to build decorative peaks without thinning out the insulating layer.
- Rimmed baking sheet with parchment ↗The parchment prevents the cake base from fusing to the sheet during the brief bake. A rimmed sheet catches any meringue drips and gives you a stable surface to rotate while applying the coating.
- Kitchen torch (optional) ↗A [kitchen torch](/kitchen-gear/review/kitchen-torch) gives you more control over browning than the oven — you can hit peaks and edges precisely without the ice cream warming through. Not required, but gives a more dramatic finish.
Showstopper Baked Alaska (The Freeze-First Method Nobody Skips)
🛒 Ingredients
- ✦1 store-bought pound cake, about 10-12 ounces
- ✦1 pint vanilla ice cream, softened slightly
- ✦6 large egg whites, room temperature
- ✦3/4 cup granulated sugar
- ✦1 teaspoon vanilla extract
- ✦1/2 teaspoon cream of tartar
- ✦1/4 teaspoon sea salt
- ✦2 tablespoons unsalted butter, for the baking sheet
- ✦2 tablespoons all-purpose flour, for dusting
- ✦1/4 teaspoon almond extract, optional
👨🍳 Instructions
01Step 1
Line a baking sheet with parchment paper and lightly brush with softened unsalted butter.
02Step 2
Slice the pound cake horizontally into two equal layers, creating a sturdy base and top.
03Step 3
Place the bottom cake layer on the prepared baking sheet. Spread the softened ice cream evenly across the surface, leaving a 1-inch border around the edges.
04Step 4
Top with the second cake layer and press down gently to secure the ice cream between the two pieces.
05Step 5
Transfer the entire assembly to the freezer for at least 4 hours, preferably overnight, until completely solid.
06Step 6
Preheat your oven to 425°F and position the rack to the upper-middle position. Do this before removing the cake from the freezer.
07Step 7
Remove the frozen cake and let sit at room temperature for exactly 5 minutes. No longer.
08Step 8
Whisk the egg whites with cream of tartar and sea salt in a clean, dry bowl on medium-high speed for 1-2 minutes until soft peaks form.
09Step 9
With the mixer running, gradually add the granulated sugar one tablespoon at a time every 15 seconds. Beat until stiff, glossy peaks form and all sugar is dissolved, about 4-5 minutes total.
10Step 10
Fold in vanilla extract and almond extract if using, just until combined.
11Step 11
Working quickly, spread the meringue over the entire frozen cake with an offset spatula, ensuring complete coverage including the sides. Build decorative peaks and swirls across the top.
12Step 12
Place immediately in the preheated oven and bake for 5-7 minutes, watching closely, until peaks turn light golden brown.
13Step 13
Remove from oven, rest for 2-3 minutes, then slice and serve immediately.
Nutrition Per Serving
Estimates based on standard preparation. Adjustments alter macros.
🔄 Substitutions
Instead of Vanilla ice cream...
Use Greek yogurt-based frozen dessert or sorbet
Slightly tangier flavor with less richness. Sorbet works beautifully with fruit-forward flavor profiles — raspberry or mango underneath lemon meringue is outstanding.
Instead of Granulated sugar in meringue...
Use Coconut sugar or monk fruit sweetener
Coconut sugar adds a subtle caramel note and browns faster under heat — watch the oven carefully. Monk fruit adds a slight cooling sensation that pairs oddly with cold ice cream; use half the amount.
Instead of Store-bought pound cake...
Use Homemade almond flour or oat flour sponge
Slightly denser texture with a nutty flavor. Ensure the homemade base is fully cooled and firm before assembly — any residual warmth will start melting the ice cream immediately.
Instead of Egg white meringue...
Use Aquafaba meringue from canned chickpea liquid
Equally fluffy and suitable for vegan guests. Use 3 tablespoons of aquafaba per egg white. It takes slightly longer to reach stiff peaks — about 8-10 minutes of beating.
🧊 Storage & Reheating
In the Fridge
Baked Alaska does not store well once the meringue is browned — serve immediately after the oven rest. The unfinished frozen assembly keeps tightly wrapped in the freezer for up to 7 days.
In the Freezer
The assembled cake (pre-meringue) freezes well for up to 1 week. Do not freeze after applying and baking the meringue — it turns rubbery and weeps.
Reheating Rules
This dish does not reheat. It is a serve-immediately dessert by design. Slice at the table for maximum theatrical effect.
❓ Frequently Asked Questions
Why did my ice cream melt in the oven?
The assembly wasn't frozen hard enough before the meringue went on. The ice cream needs to be a solid brick — completely frozen through the center. A soft or partially frozen assembly will always melt at 425°F in the time it takes the meringue to brown. Freeze overnight, not just for a few hours.
Can I use a kitchen torch instead of the oven?
Yes, and it gives you more control. A kitchen torch lets you brown specific peaks without putting the whole cake in heat. The result is more dramatic and precise. If torching, work in smooth sweeping passes and keep the flame moving — stopping on one spot scorches the meringue rather than toasting it.
Why is my meringue weeping liquid?
Undissolved sugar is the most common cause. If you added the sugar too fast or didn't beat long enough, the sugar draws moisture out of the meringue as it sits. Always add sugar gradually and rub a small amount between your fingers to check for grit before using.
Can I make this ahead of time?
Partially. The frozen cake-and-ice-cream assembly can be made up to a week ahead and kept in the freezer tightly wrapped. Apply the meringue and bake on the day you're serving — within 20 minutes of serving, ideally.
What ice cream flavors work best?
Classic vanilla is foolproof. Beyond that, coffee, strawberry, and mint chip all perform well. Avoid ice creams with large mix-ins like cookie chunks or candy pieces — they create uneven layers that are hard to cut cleanly. Sorbet works surprisingly well for a lighter, more acidic version.
My meringue slid off the sides while I was applying it. What happened?
The meringue was either underwhipped or the frozen cake had started to warm and condensation formed on the surface. Meringue needs a dry, cold surface to grip. If condensation appears on the cake before you've finished applying the meringue, pat it dry quickly with paper towel and work faster.

The Science of
Showstopper Baked Alaska (The Freeze-First Method Nobody Skips)
We turned everything on this page into a beautiful, flour-proof PDF cheat sheet. Print it out, stick it to your fridge, and never mess up your showstopper baked alaska (the freeze-first method nobody skips) again.
*We'll email you the high-res PDF instantly. No spam, just perfectly cooked meals.
AlmostChefs Editorial Team
We translate the internet's most popular cooking videos into foolproof, beginner-friendly written recipes. We analyze multiple methods, test them in our kitchen, and engineer a single "Master Recipe" that gives you the best possible result with the least possible stress.